


Published on:2021-04-16
Argo CD: A Tool for Kubernetes DevOps


In this post, I’ll show you how Argo CD betters Kubernetes DevOps process. Before we begin, let’s look at some background information.
Argo CD Capability
GitOps: The origin
As you may already know, Weaveworks published a post titled GitOps - Operations by Pull Request in 2017. Alexis, the author, introduced a way of deployment by using Git as source of truth.
In GitOps practices, we need to define and manage software infrastructures in Git repositories. Software infrastructures involve not only IaaS and Kubernetes but also applications. Everyone can make modifications to software infrastructures by submitting a Pull Request, and an automated program will perform those modifications.
Thus, everyone will be able to focus on developing new features instead of worrying about operation and maintenance including installation, modification, and migration.
Argo CD: GitOps coming true
Argo CD is a GitOps continuous delivery (CD) tool on top of Kubernetes. Here is the schematic diagram from the Argo CD community.
You can see from the diagram that:
- Argo CD pulls application configurations from Git Repo and deploys applications in Kubernetes clusters.
- If someone wants to add a new feature, he or she just needs to submit a Pull Request to Git Repo to modify application deployment configurations. Then, wait for merging.
- Once the Pull Request gets merged, Argo CD will run an update per Webhook triggers.
- Applications updated and notifications sent.
To sum it up, automated operation and maintenance and continuous delivery. Simple and easy to understand, right?
Argo CD: Powerful and extensible
The above functions will be able to cover ordinary Kubernetes operation and maintenance. What if things get more complicated? We cannot escape from scenarios involving multi-cloud, multi-platform, and multi-middleware.
Argo CD defines four components in its processing logic:
- Event Source: An
EventSourcedefines the configurations required to consume events from external sources. - Sensor: It listens to events on the eventbus and acts as an event dependency manager to resolve and execute the triggers.
- Eventbus: It acts as the transport layer of Argo-Events by connecting the event-sources and sensors.
- Trigger: A Trigger is the resource/workload executed by the sensor once the event dependencies are resolved.
For more information, see Architecture.
As for operation and maintenance folks, you just need to focus on two aspects:
- Events Argo CD can process: AMQP, AWS SNS, AWS SQS, Cron Schedules, GCP PubSub, GitHub, GitLab, HDFS, File Based Events, Kafka, Minio, NATS, MQTT, K8s Resources, Slack, NetApp StorageGrid, Webhooks, Stripe, NSQ, Emitter, Redis, and Azure Events Hub.
- Actions Argo CD can perform: Argo Workflows, Standard K8s Objects, HTTP Requests, AWS Lambda, NATS Messages, Kafka Messages, Slack Notifications, Argo Rollouts CR, Custom/Build Your Own Triggers, and Apache OpenWhisk.
Argo CD on Kubernetes
I’ll use Kubernetes v1.18.3 to deploy Argo CD.
Step 1: Deploy Argo CD
-
Run the following command to create a namespace. Name it argocd.
kubectl create namespace argocd -
Run the following command to deploy Argo CD.
kubectl apply -n argocd -f https://raw.githubusercontent.com/argoproj/argo-cd/v1.8.3/manifests/install.yamlNote
The Argo CD community also provides an HA deployment method by running the commandkubectl apply -n argocd -f https://raw.githubusercontent.com/argoproj/argo-cd/v1.8.3/manifests/ha/install.yaml. It’s for deployment in production. -
Run the following command to set the Service type to NodePort.
kubectl patch svc argocd-server -p '{"spec": {"type": "NodePort"}}' -n argocd -
Run the following command to view all the Services in the namespace
argocd.$ kubectl -n argocd get svc NAME TYPE CLUSTER-IP EXTERNAL-IP PORT(S) AGE argocd-dex-server ClusterIP 10.233.34.191 <none> 5556/TCP,5557/TCP,5558/TCP 5m37s argocd-metrics ClusterIP 10.233.54.3 <none> 8082/TCP 5m36s argocd-redis ClusterIP 10.233.18.86 <none> 6379/TCP 5m36s argocd-repo-server ClusterIP 10.233.3.171 <none> 8081/TCP,8084/TCP 5m36s argocd-server NodePort 10.233.61.3 <none> 80:31808/TCP,443:30992/TCP 5m36s argocd-server-metrics ClusterIP 10.233.36.228 <none> 8083/TCP 5m36s
Step 2: Log in to Argo CD
-
Run the following command to get the admin account’s password.
$ kubectl get pod -n argocd |grep argocd-server

argocd-server-7d597d9bcd-6nzct        1/1     Running   0          22m
The Pod ID is the password, namely,
argocd-server-7d597d9bcd-6nzct. -
Access Argo CD Web page through
http://{HOST_IP}:31808, and useadmin/argocd-server-7d597d9bcd-6nzctas account and password to log in.
Step 3: Install CLI tool
Let’s use Linux as an example.
-
Run the following commands to download CLI tool and make it executable.
curl -sSL -o /usr/local/bin/argocd https://github.com/argoproj/argo-cd/releases/download/v1.8.3/argocd-linux-amd64 chmod +x /usr/local/bin/argocd -
Run the following command to use the CLI tool to log in to the Argo CD running on your Kubernetes cluster. Make sure you replace
HOST_IPwith your host IP address.$ argocd login {HOST_IP}:31808 --username admin --password argocd-server-7d597d9bcd-6nzct 'admin' logged in successfully Context '{HOST_IP}:31808' updated -
You can use the following command to update the admin password to
passwordfor your convenience.$ argocd account update-password --account admin --current-password argocd-server-7d597d9bcd-6nzct --new-password password Password updated Context '{HOST_IP}:31808' updated
Step 4: Create an application
We surely can create an application through the Web UI, but let’s use the CLI tool here so that you can better understand Argo CD by using the commands below.
-
Run the following command to create an application.
argocd app create guestbook --repo https://github.com/argoproj/argocd-example-apps.git --path guestbook --dest-server https://kubernetes.default.svc --dest-namespace defaultAs for the flags in the command:
--repo: specify the Git repository.--path: specify the relative path of the deployment files in the Git repository.--dest-server: address for accessing the cluster.--dest-namespace: namespace for deploying the application.
If you go to the directory
https://github.com/argoproj/argocd-example-apps/tree/master/guestbook, you can find two YAML files for Deployment and Service respectively. -
After a while, you can view the service created shown on the Argo CD web page.
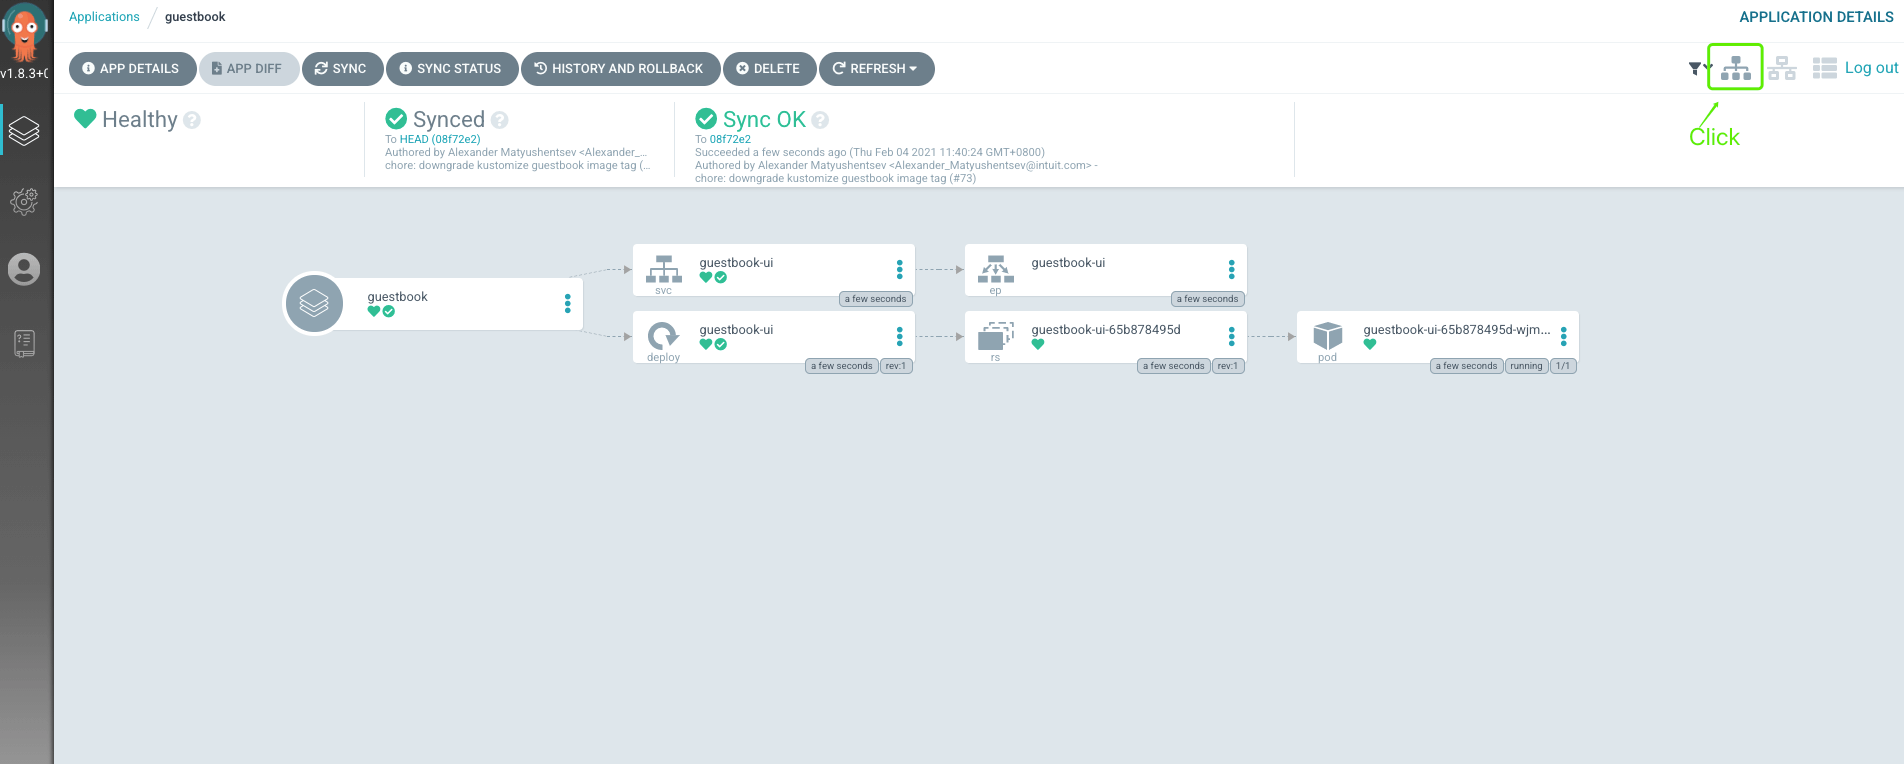
-
Click it to see its details. You can also click the icon in the upper right corner to view its topology diagram.
-
Run the following command to see the Services created.
$ kubectl get all -n default NAME READY STATUS RESTARTS AGE pod/guestbook-ui-65b878495d-wjmxh 1/1 Running 0 60s NAME TYPE CLUSTER-IP EXTERNAL-IP PORT(S) AGE service/guestbook-ui ClusterIP 10.233.55.230 <none> 80/TCP 61s service/kubernetes ClusterIP 10.233.0.1 <none> 443/TCP 12d NAME READY UP-TO-DATE AVAILABLE AGE deployment.apps/guestbook-ui 1/1 1 1 60s NAME DESIRED CURRENT READY AGE replicaset.apps/guestbook-ui-65b878495d 1 1 1 60s -
Now, run the following command to delete the application. Argo CD will delete the application from its records, and relevant workloads will also be deleted in Kubernetes.
argocd app delete guestbook
Recap
This blog walks you through the basic functions of Argo CD. I guess you have had a better understanding through the above demonstration about how to deploy Argo CD and how to create an application with it.
As a matter of fact, Argo CD functionality goes beyond this blog. Argo CD can also realize functions such as synchronizing modifications in Git repository to make updates in Kubernetes and automatically trigger updates after image modifications. As you can see from the above schematic diagram, various needs for automated deployment can be met through Event Source and Trigger.
Last but not the least, when updating Kubernetes, Argo CD also supports various resource description methods, including Kustomize, Helm, Ksonnet, Yaml, Json, and customized extension. Wouldn’t that make our life easier in using Kubernetes?
See Also
Table of Contents