Kubernetes Resource Requests and Limits Deep Dive
As you create resources in a Kubernetes cluster, you may have encountered the following scenarios:
- No CPU requests or low CPU requests specified for workloads, which means more Pods “seem” to be able to work on the same node. During traffic bursts, your CPU is maxed out with a longer delay while some of your machines may have a CPU soft lockup.
- Likewise, no memory requests or low memory requests specified for workloads. Some Pods, especially those running Java business apps, will keep restarting while they can actually run normally in local tests.
- In a Kubernetes cluster, workloads are usually not scheduled evenly across nodes. In most cases, in particular, memory resources are unevenly distributed, which means some nodes can see much higher memory utilization than other nodes. As the de facto standard in container orchestration, Kubernetes should have an effective scheduler that ensures the even distribution of resources. But, is it really the case?
Generally, cluster administrators can do nothing but restart the cluster if the above issues happen amid traffic bursts when all of your machines hang and SSH login fails. In this article, we will dive deep into Kubernetes requests and limits by analyzing possible issues and discussing the best practices for them. If you are also interested in the underlying mechanism, you can also find the analysis from the perspective of source code. Hopefully, this article will be helpful for you to understand how Kubernetes requests and limits work, and why they can work in the expected way.
Concepts of Requests and Limits
To make full use of resources in a Kubernetes cluster and improve scheduling efficiency, Kubernetes uses requests and limits to control resource allocation for containers. Each container can have its own requests and limits. These two parameters are specified by resources.requests and resources.limits. Generally speaking, requests are more important in scheduling while limits are more important in running.
resources:
    requests:
        cpu: 50m
        memory: 50Mi
    limits:
        cpu: 100m
        memory: 100Mi
Requests define the smallest amount of resources a container needs. For example, for a container running Spring Boot business, the requests specified must be the minimum amount of resources that a Java Virtual Machine (JVM) needs to consume in the container image. If you only specify a low memory request, the odds are that the Kubernetes scheduler tends to schedule the Pod to the node which doesn’t have sufficient resources to run the JVM. Namely, the Pod cannot use more memory which the JVM bootup process needs. As a result, the Pod keeps restarting.
On the other hand, limits determine the maximum amount of resources that a container can use, preventing resource shortage or machine crashes due to excessive resource consumption. If it is set to 0, it means no resource limit for the container. In particular, if you set limits without specifying requests, Kubernetes considers the value of requests is the same as that of limits by default.
Kubernetes requests and limits apply to two types of resources - compressible (for example, CPU) and incompressible (for example, memory). For incompressible resources, appropriate limits are extremely important.
Here is a brief summary of requests and limits:
- If services in a Pod are using more CPU resources than the limits specified, the Pod will be restricted but will not be killed. If no limit is set, a Pod can use all idle CPU resources.
- If a Pod is using more memory resources than the limits specified, container processes in the Pod will be killed due to OOM. In this case, Kubernetes tends to restart the container on the original node or simply create another Pod.
- 0 <= requests <=Node Allocatable; requests <= limits <= Infinity.
Scenario Analysis
After we look at the concepts of requests and limits, let’s go back to the three scenarios mentioned at the beginning.
Scenario 1
First and foremost, you need to know that CPU resources and memory resources are completely different. CPU resources are compressible. The distribution and management of CPU are based on Completely Fair Scheduler (CFS) and Cgroups. To put it in a simple way, if the Service in a Pod is using more CPU resources than the CPU limits specified, it will be throttled by Kubernetes. For Pods without CPU limits, once idle CPU resources are running out, the amount of CPU resources allocated before will gradually decrease. In both situations, ultimately, Pods will be unable to handle external requests, resulting in a longer delay and response time.
Scenario 2
On the contrary, memory cannot be compressed and Pods cannot share memory resources. This means the allocation of new memory resources will definitely fail if memory is running out.
Some processes in a Pod need a certain amount of memory exclusively in initialization. For example, a JVM applies for a certain amount of memory upon start-up. If the specified memory request is less than the memory applied by the JVM, the memory application will fail (OOM-kill). As a result, the Pod will keep restarting and failing.
Scenario 3
When a Pod is being created, Kubernetes needs to allocate or provision different resources including CPU and memory in a balanced and comprehensive way. Meanwhile, the Kubernetes scheduling algorithm entails a variety of factors, such as NodeResourcesLeastAllocated and Pod affinity. The reason why memory resources are often unevenly distributed is that for apps, memory is considered scarcer than other resources.
Besides, a Kubernetes scheduler works based on the current status of a cluster. In other words, when new Pods are created, the scheduler selects an optimal node for Pods to run on according to the resource specification of the cluster at that moment. This is where potential issues may happen as Kubernetes clusters are highly dynamic. For example, to maintain a node, you may need to cordon it and all the Pods running on it will be scheduled to other nodes. The problem is, after the maintenance, these Pods will not be automatically scheduled back to the original node. This is because a running Pod cannot be rescheduled by Kubernetes itself to another node once it is bound to a node at the beginning.
Best Practices for Configuring Kubernetes Resource Requests and Limits
We can know from the above analysis that cluster stability has a direct bearing on your app’s performance. Temporary resource shortage is often the major cause of cluster instability, which cloud mean app malfunctions or even node failures. Here, we would like to introduce two ways to improve cluster stability.
First, reserve a certain amount of system resources by editing the kubelet configuration file. This is especially important when you are dealing with incompressible compute resources, such as memory or disk space.
Second, configure appropriate Quality of Service (QoS) classes for Pods. Kubernetes uses QoS classes to determine the scheduling and eviction priority of Pods. Different Pods can be assigned different QoS classes, including Guaranteed (highest priority), Burstable and BestEffort (lowest priority).
Guaranteed. Every container in the Pod, including init containers, must have requests and limits specified for CPU and memory, and they must be equal.Burstable. At least one container in the Pod has requests specified for CPU or memory.BestEffort. No container in the Pod has requests and limits specified for CPU and memory.
Note
When resources are running out, your cluster will first kill Pods with a QoS class of BestEffort, followed by Burstable. In other words, Pods that have the lowest priority are terminated first. If you have enough resources, you can assign all Pods the class of Guaranteed. This can be considered as a trade-off between compute resources and performance and stability. You may expect higher overheads but your cluster can work more efficiently. At the same time, to improve resource utilization, you can assign Pods running business services the class of Guaranteed. For other services, assign them the class of Burstable or BestEffort according to their priority.
Next, we will use the KubeSphere container platform as an example to see how to gracefully configure resources for Pods.
Use KubeSphere to Allocate Resources
As stated above, requests and limits are two important building blocks for cluster stability. As one of the major distributions of Kubernetes, KubeSphere boasts a concise, lucid, and interactive user interface, greatly reducing the learning curve of Kubernetes.
Before You Begin
KubeSphere features a highly functional multi-tenant system for fine-grained access control of different users. In KubeSphere 3.0, you can set requests and limits for namespaces (ResourceQuotas) and containers (LimitRanges) respectively. To perform these operations, you need to create a workspace, a project (i.e. namespace) and an account (ws-admin). For more information, see Create Workspaces, Projects, Accounts and Roles.
Set Resource Quotas
-
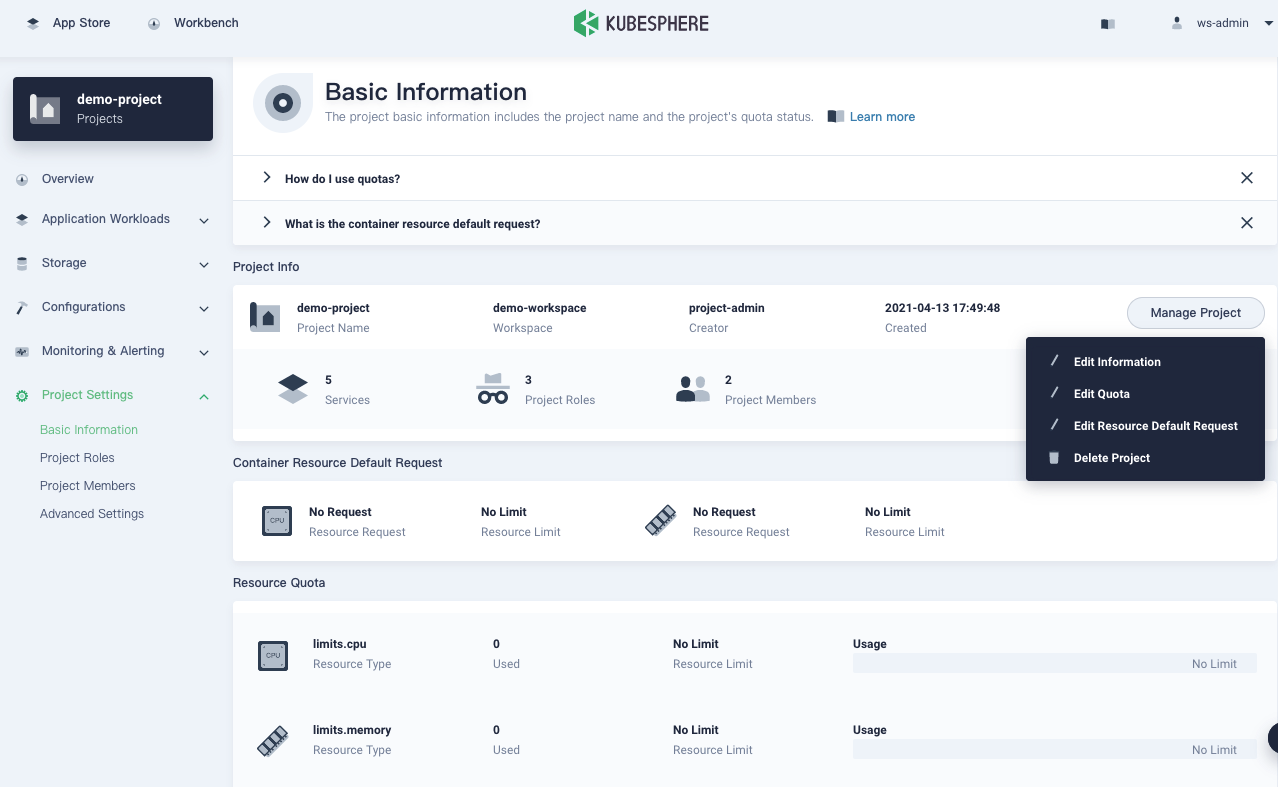
Go to the Overview page of your project, navigate to Basic Information in Project Settings, and select Edit Quota from the Manage Project drop-down menu.

-
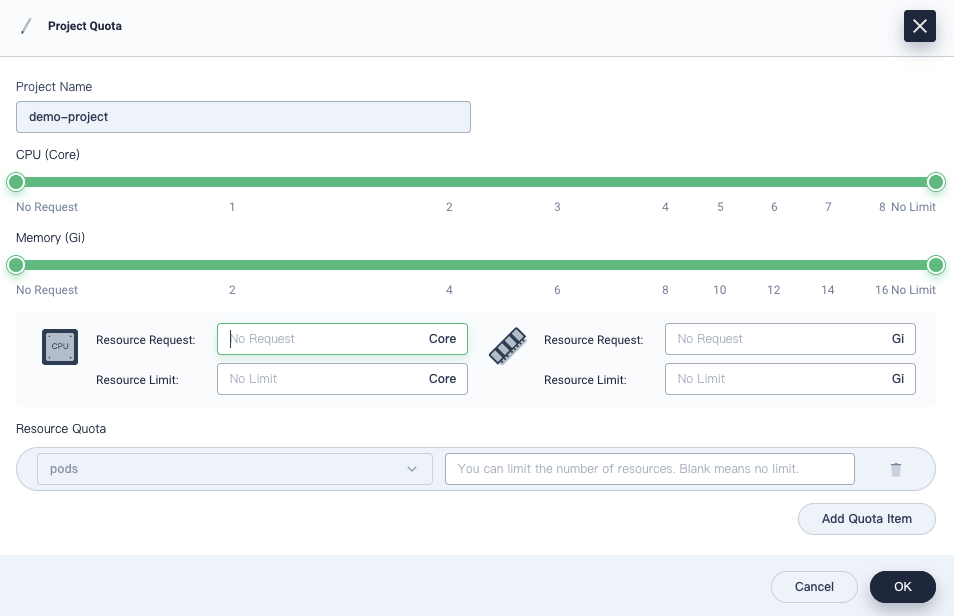
In the dialog that appears, set requests and limits for your project.

Keep in mind that:
- The requests or limits set on this page must be greater than the total requests or limits specified for all Pods in the project.
- When you create a container in the project without specifying requests or limits, you will see an error message (recorded in events) upon creation.
Once you have configured project quotas,
requestsandlimitsneed to be specified for all containers created in the project. As we always put it, “code is law”. Project quotas set a rule for all containers to obey.Note
Project quotas in KubeSphere are the same as ResourceQuotas in Kubernetes. Besides CPU and memory, you can also set resource quotas for other objects separately such as Deployments and ConfigMaps. For more information, see Project Quotas.
Set Default Requests and Limits
As mentioned above, if project quotas are specified, you need to configure requests and limits for Pods accordingly. In fact, in testing or even production, the value of requests and the value of limits are very close, or even equivalent for most Pods. To simplify the process of creating workloads, KubeSphere allows users to set default requests and limits beforehand for containers. In this way, you do not need to set requests and limits every time when Pods are created.
To set default requests and limits, perform the following steps:
-
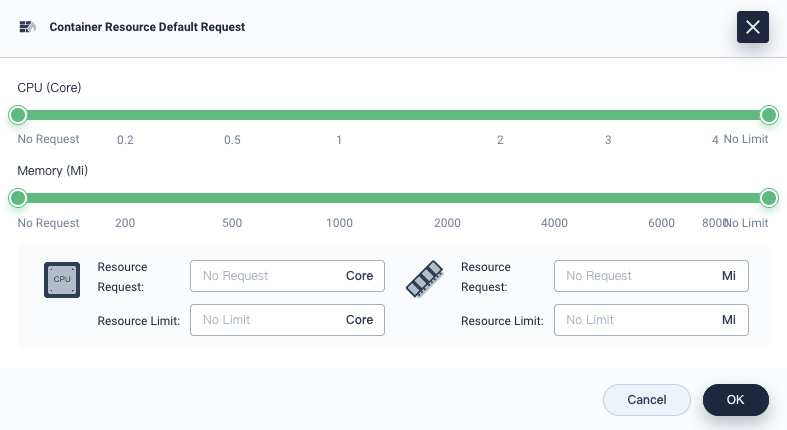
Also on the Basic Information page, click Edit Resource Default Request from the Manage Project drop-down menu.
-
In the dialog that appears, configure default requests and limits for containers.

Note
The default container requests and limits in KubeSphere are known as LimitRanges in Kubernetes. For more information, see Container Limit Ranges. -
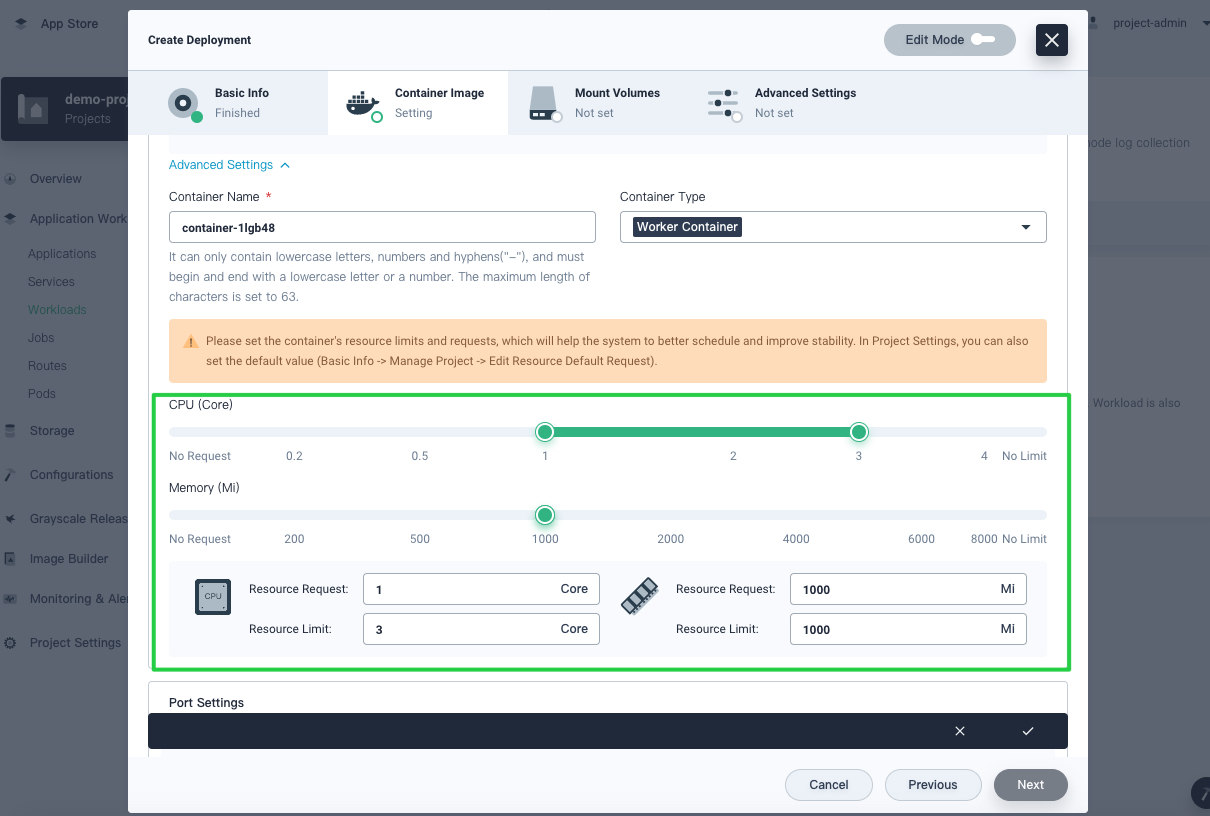
When you create workloads later, requests and limits will be prepopulated automatically. For more information about how to create workloads in KubeSphere, see the KubeSphere documentation.

For containers running key business processes, they need to handle more traffic than other containers. In reality, there is no panacea and you need to make careful and comprehensive decisions on requests and limits of these containers. Think about the following questions:
- Are your containers CPU-intensive or IO-intensive?
- Are they highly available?
- What are the upstream and downstream objects of your service?
If you look at the load of containers over a long period of time, you may find it periodic. In this connection, the historical monitoring data can serve as an important reference as you configure requests and limits. On the back of Prometheus, which is integrated into the platform, KubeSphere features a powerful and holistic observability system that monitors resources at a granular level. Vertically, it covers data from clusters to Pods. Horizontally, it tracks information about CPU, memory, network and storage. Generally, you can specify requests based on the average value of historical data while limits need to be higher than the average. That said, you may need to make some adjustments to your final decision as needed.
Source Code Analysis
Now that you know some best practices for configuring requests and limits, let’s dive deeper into the source code.
Requests and Scheduling
The following code shows the relation between the requests of a Pod and the requests of containers in the Pod.
func computePodResourceRequest(pod *v1.Pod) *preFilterState {
	result := &preFilterState{}
	for _, container := range pod.Spec.Containers {
		result.Add(container.Resources.Requests)
	}

	// take max_resource(sum_pod, any_init_container)
	for _, container := range pod.Spec.InitContainers {
		result.SetMaxResource(container.Resources.Requests)
	}

	// If Overhead is being utilized, add to the total requests for the pod
	if pod.Spec.Overhead != nil && utilfeature.DefaultFeatureGate.Enabled(features.PodOverhead) {
		result.Add(pod.Spec.Overhead)
	}

	return result
}
...
func (f *Fit) PreFilter(ctx context.Context, cycleState *framework.CycleState, pod *v1.Pod) *framework.Status {
	cycleState.Write(preFilterStateKey, computePodResourceRequest(pod))
	return nil
}
...
func getPreFilterState(cycleState *framework.CycleState) (*preFilterState, error) {
	c, err := cycleState.Read(preFilterStateKey)
	if err != nil {
		// preFilterState doesn't exist, likely PreFilter wasn't invoked.
		return nil, fmt.Errorf("error reading %q from cycleState: %v", preFilterStateKey, err)
	}

	s, ok := c.(*preFilterState)
	if !ok {
		return nil, fmt.Errorf("%+v  convert to NodeResourcesFit.preFilterState error", c)
	}
	return s, nil
}
...
func (f *Fit) Filter(ctx context.Context, cycleState *framework.CycleState, pod *v1.Pod, nodeInfo *framework.NodeInfo) *framework.Status {
	s, err := getPreFilterState(cycleState)
	if err != nil {
		return framework.NewStatus(framework.Error, err.Error())
	}

	insufficientResources := fitsRequest(s, nodeInfo, f.ignoredResources, f.ignoredResourceGroups)

	if len(insufficientResources) != 0 {
		// We will keep all failure reasons.
		failureReasons := make([]string, 0, len(insufficientResources))
		for _, r := range insufficientResources {
			failureReasons = append(failureReasons, r.Reason)
		}
		return framework.NewStatus(framework.Unschedulable, failureReasons...)
	}
	return nil
}
It can be seen from the code above that the scheduler (schedule thread) calculates the resources required by the Pod to be scheduled. Specifically, it calculates the total requests of init containers and the total requests of working containers respectively according to Pod specifications. The greater one will be used. Note that for lightweight virtual machines (for example, kata-container), their own resource consumption of virtualization needs to be counted in caches. In the following Filter stage, all nodes will be checked to see if they meet the conditions.
Note
Pre filter, Filter, Post filter and Score. For more information, see filter and score nodes.After the filtering, if there is only one applicable node, the Pod will be scheduled to it. If there are multiple applicable Pods, the scheduler will select the node with the highest weighted scores sum. Scoring is based on a variety of factors as scheduling plugins implement one or more extension points. Note that the value of requests and the value of limits impact directly on the ultimate result of the plugin NodeResourcesLeastAllocated. Here is the source code:
func leastResourceScorer(resToWeightMap resourceToWeightMap) func(resourceToValueMap, resourceToValueMap, bool, int, int) int64 {
	return func(requested, allocable resourceToValueMap, includeVolumes bool, requestedVolumes int, allocatableVolumes int) int64 {
		var nodeScore, weightSum int64
		for resource, weight := range resToWeightMap {
			resourceScore := leastRequestedScore(requested[resource], allocable[resource])
			nodeScore += resourceScore * weight
			weightSum += weight
		}
		return nodeScore / weightSum
	}
}
...
func leastRequestedScore(requested, capacity int64) int64 {
	if capacity == 0 {
		return 0
	}
	if requested > capacity {
		return 0
	}

	return ((capacity - requested) * int64(framework.MaxNodeScore)) / capacity
}
For NodeResourcesLeastAllocated, a node will get higher scores if it has more resources for the same Pod. In other words, a Pod will be more likely to be scheduled to the node with sufficient resources.
When a Pod is being created, Kubernetes needs to allocate different resources including CPU and memory. Each kind of resources has a weight (the resToWeightMap structure in the source code). As a whole, they tell the Kubernetes scheduler what the best decision may be to achieve resource balance. In the Score stage, the scheduler also uses other plugins for scoring in addition to NodeResourcesLeastAllocated, such as InterPodAffinity.
QoS and Scheduling
As a resource protection mechanism in Kubernetes, QoS is mainly used to control incompressible resources such as memory. It also impacts the OOM score of different Pods and containers. When a node is running out of memory, the kernel (OOM Killer) kills Pods of low priority (higher scores means lower priority). Here is the source code:
func GetContainerOOMScoreAdjust(pod *v1.Pod, container *v1.Container, memoryCapacity int64) int {
	if types.IsCriticalPod(pod) {
		// Critical pods should be the last to get killed.
		return guaranteedOOMScoreAdj
	}

	switch v1qos.GetPodQOS(pod) {
	case v1.PodQOSGuaranteed:
		// Guaranteed containers should be the last to get killed.
		return guaranteedOOMScoreAdj
	case v1.PodQOSBestEffort:
		return besteffortOOMScoreAdj
	}

	// Burstable containers are a middle tier, between Guaranteed and Best-Effort. Ideally,
	// we want to protect Burstable containers that consume less memory than requested.
	// The formula below is a heuristic. A container requesting for 10% of a system's
	// memory will have an OOM score adjust of 900. If a process in container Y
	// uses over 10% of memory, its OOM score will be 1000. The idea is that containers
	// which use more than their request will have an OOM score of 1000 and will be prime
	// targets for OOM kills.
	// Note that this is a heuristic, it won't work if a container has many small processes.
	memoryRequest := container.Resources.Requests.Memory().Value()
	oomScoreAdjust := 1000 - (1000*memoryRequest)/memoryCapacity
	// A guaranteed pod using 100% of memory can have an OOM score of 10. Ensure
	// that burstable pods have a higher OOM score adjustment.
	if int(oomScoreAdjust) < (1000 + guaranteedOOMScoreAdj) {
		return (1000 + guaranteedOOMScoreAdj)
	}
	// Give burstable pods a higher chance of survival over besteffort pods.
	if int(oomScoreAdjust) == besteffortOOMScoreAdj {
		return int(oomScoreAdjust - 1)
	}
	return int(oomScoreAdjust)
}
Summary
As a portable and extensible open-source platform, Kubernetes is born for managing containerized workloads and Services. It boasts a comprehensive, fast-growing ecosystem that has helped it secure its position as the de facto standard in container orchestration. That being said, it is not always easy for users to learn Kubernetes and this is where KubeSphere comes to play its part. KubeSphere empowers users to perform virtually all the operations on its dashboard while they also have the option to use the built-in web kubectl tool to run commands. This article focuses on Kubernetes resource requests and limits, their underlying logic in Kubernetes, as well as how to use KubeSphere to configure them for easy operation and maintenance of your cluster.
Reference
- https://learnk8s.io/setting-cpu-memory-limits-requests
- https://kubernetes.io/docs/tasks/configure-pod-container/quality-service-pod/
- https://docs.oracle.com/cd/E13150_01/jrockit_jvm/jrockit/jrdocs/refman/optionX.html
- https://kubernetes.io/docs/tasks/administer-cluster/out-of-resource/
- https://kubernetes.io/docs/concepts/policy/limit-range/
- https://www.kernel.org/doc/Documentation/scheduler/sched-bwc.txt
- https://www.kernel.org/doc/Documentation/scheduler/sched-design-CFS.txt
- https://access.redhat.com/documentation/en-us/red_hat_enterprise_linux/6/html/resource_management_guide/sec-cpu
- https://medium.com/omio-engineering/cpu-limits-and-aggressive-throttling-in-kubernetes-c5b20bd8a718


