


Published on:2019-06-25
Porter: An Open Source Load Balancer for Kubernetes in a Bare Metal Environment


We know that we can use the service of LoadBalancer in the Kubernetes cluster to expose backend workloads externally. Cloud providers often offer cloud LoadBalancer plugins, which requires the cluster to be deployed on a specific IaaS platform. However, many enterprise users often deploy the Kubernetes cluster on bare metal, especially when it is used for the production environment. For the local bare metal cluster, Kubernetes does not provide LB implementation. Porter is an open source load balancer designed specifically for the bare metal Kubernetes cluster, which serves as an excellent solution to this problem.
Kubernetes Service Introduction
In the Kubernetes cluster, network represents a very basic and important part. For large-scale nodes and containers, it entails very complicated and delicate design if it is to ensure the connectivity and efficiency in the network. What’s more, IP addresses and ports need to be automatically assigned and managed in the network, with a user-friendly approach in place for the direct and quick access to applications in need.
Kubernetes has made great efforts in this connection. With CNI, Service, DNS and Ingress, it has solved the problem of service discovery and load balancing, providing an easier way in usage and configuration. Among them, Service underlies Kubernetes microservices. And services are made possible through kube-proxy in Kubernetes.
This component runs on each node, monitoring the change in the service object in API Server and achieving network forwarding by managing iptables. Users can create different forms of Services such as those based on Label Selector, Headless or ExternalName. Kube-proxy will create a virtual IP (or cluster IP) for the service for the internal access of the cluster.
Three Methods to Expose Services
If the access is required outside the cluster, or to expose the service to users, Kubernetes Service provides two methods: NodePort and LoadBalancer. Besides, Ingress is also a very common option to expose services.
NodePort
If the service type is set to NodePort, kube-proxy will apply for a port for the service which is above 3000 (by default). Iptables rules will be configured for all the hosts in the cluster. In this way, users can access the service through any node in the cluster with the assigned port. Please see the image below:
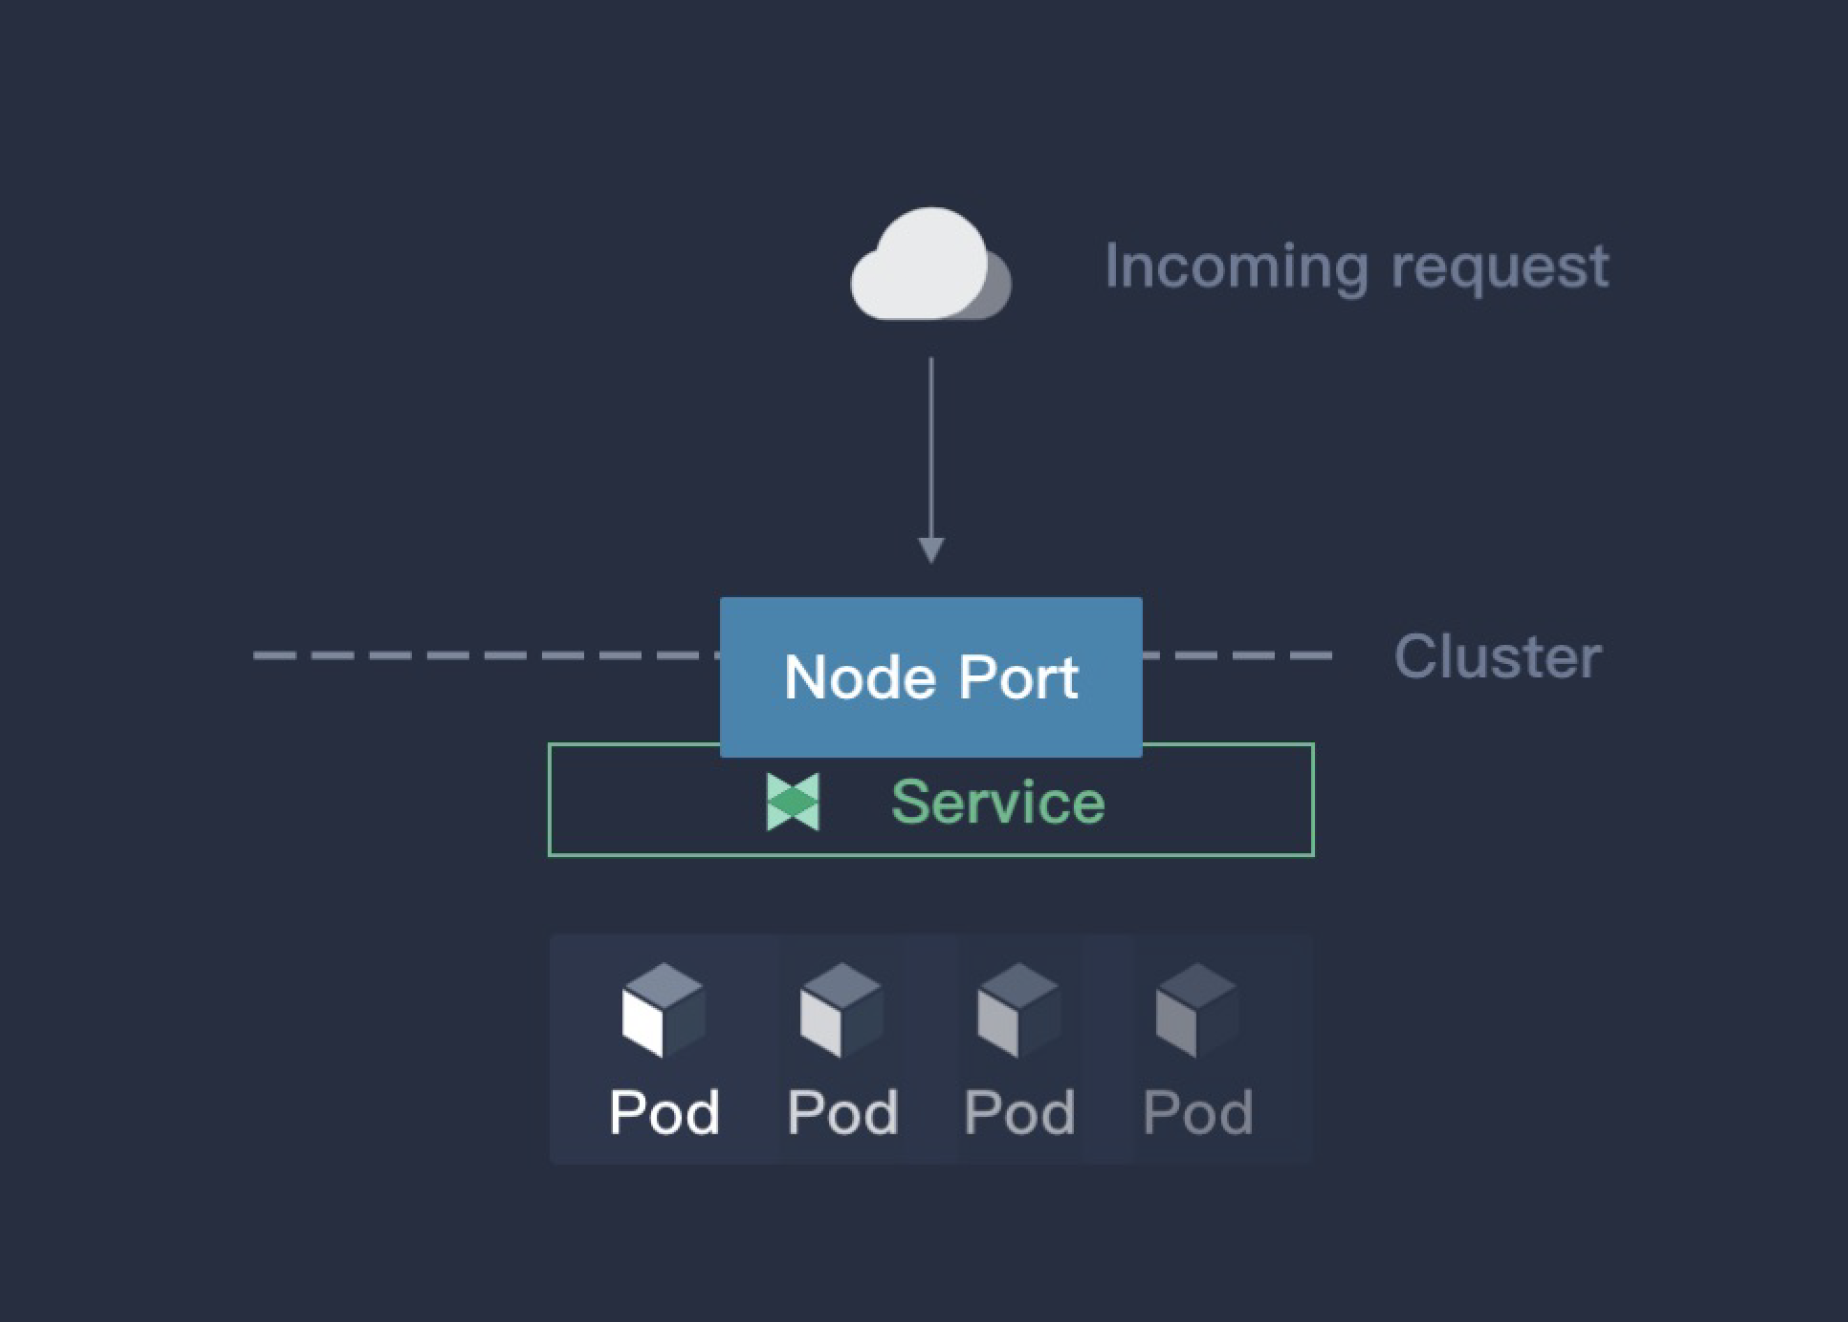
NodePort is the most convenient way to expose services while it also has obvious shortcomings:
- The real IP is not visible in Pod through the access based on SNAT.
- A host in the cluster is used as a jumper server to access the backend service, which means all the traffic will go to the server first. This can easily lead to performance bottlenecks and a single point of failure, making it difficult to be used in the production environment.
- Generally, NodePort uses large port numbers which are hard to remember.
Initially, NodePort is not designed for the exposure of services in the production environment which is why large port numbers are used by default.
LoadBalancer
LoadBalancer is a preferred solution by Kubernetes to service exposure. However, this cannot be done without the load balancer offered by cloud providers, which means the Kubernetes cluster has to be deployed in the cloud. Here is how LoadBalancer works:
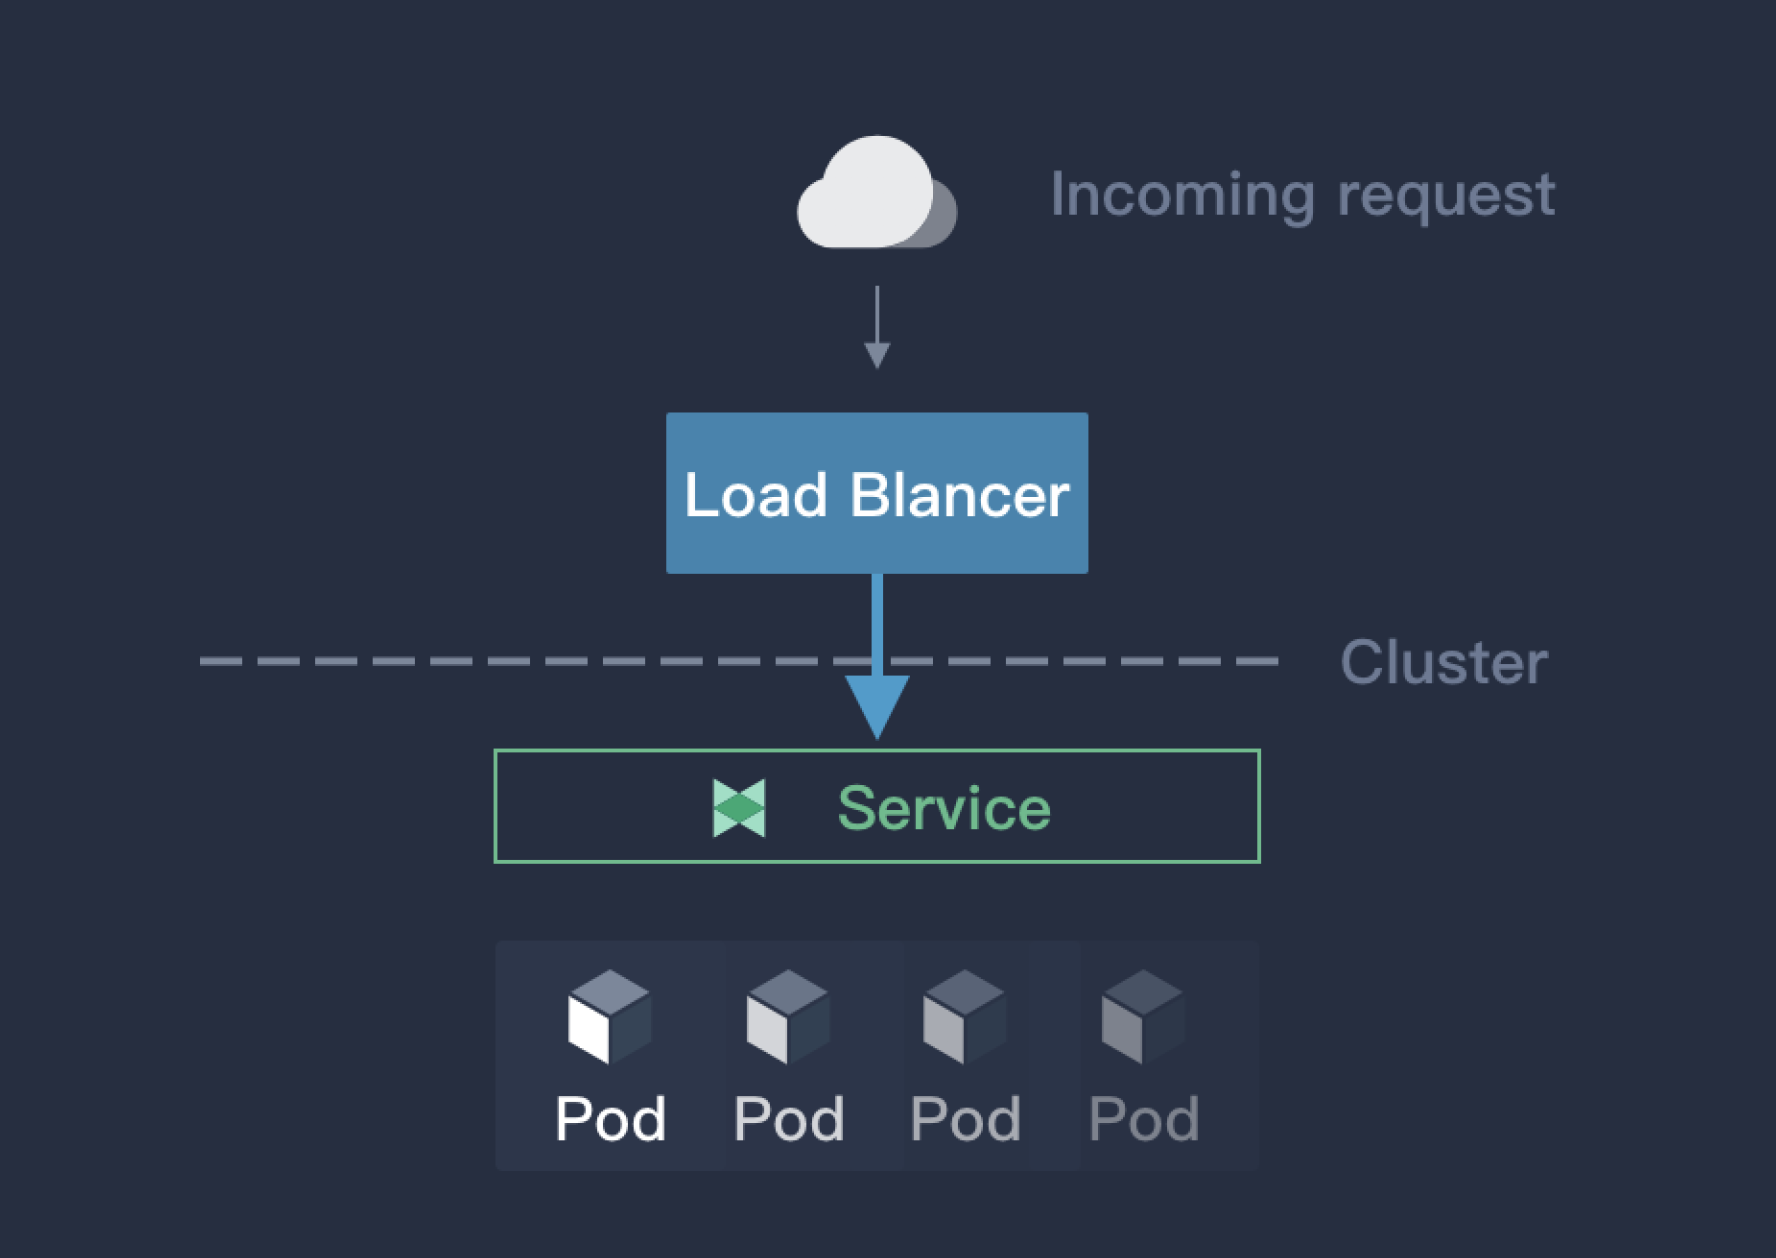
The LoadBalancer service is achieved through the LB plugin offered by cloud providers. The package Kubernetes.io/cloud-provider will choose the appropriate backend service and expose it to the LB plugin, which creates a load balancer accordingly. That means network traffic will be distributed in the cloud service, avoiding a single point of failure and performance bottlenecks that may occur in NodePort. As mentioned above, LoadBalancer is a preferred solution by Kubernetes to service exposure, but it is only limited to the Kubernetes service offered by cloud providers. For the Kubernetes cluster that is deployed in a bare metal environment or in a non-cloud environment, this approach may not be applicable.
Ingress
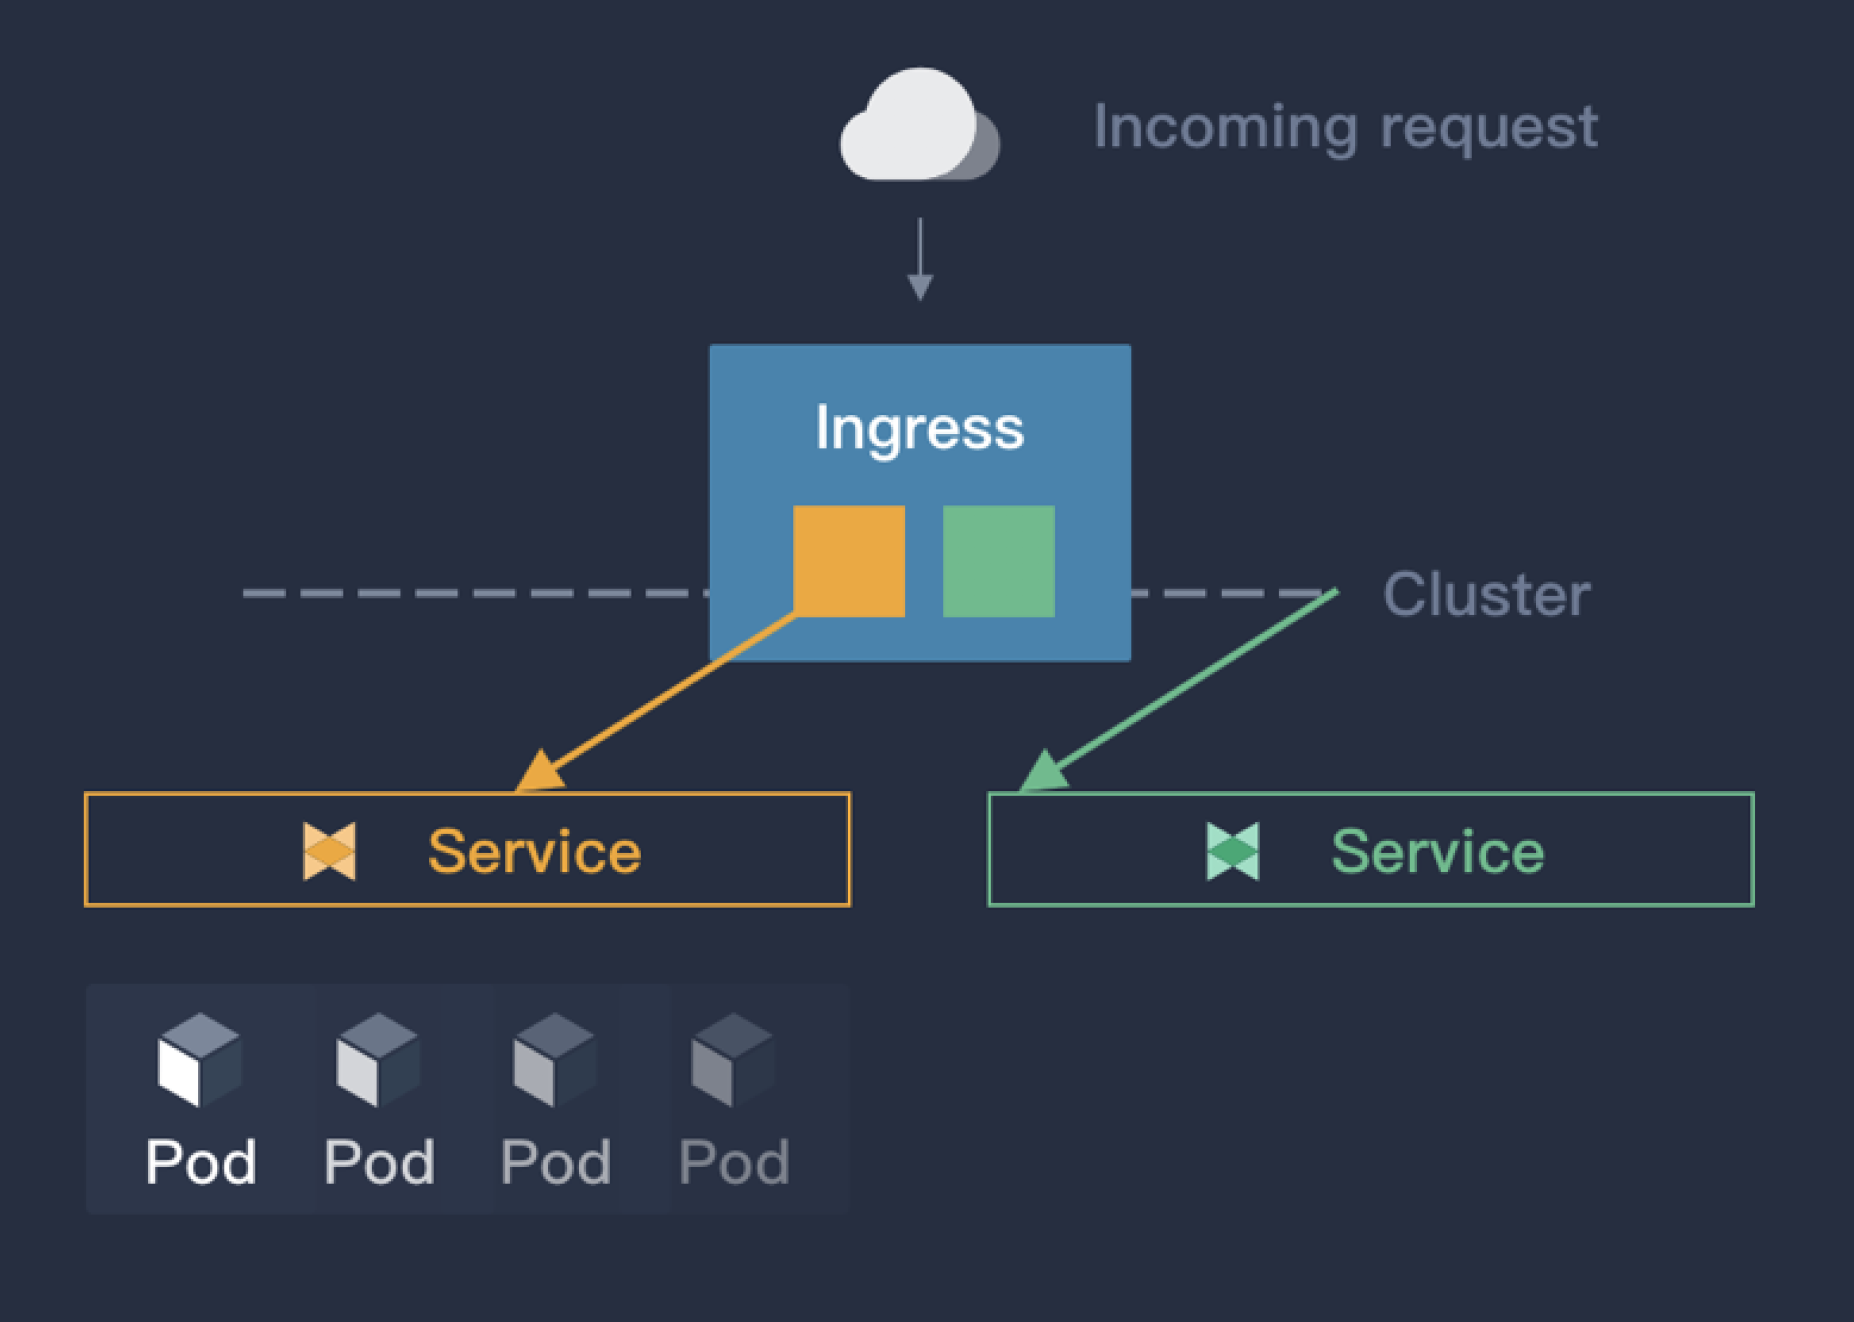
Kubernetes itself does not provide the way to expose services through Ingress. Rather, Ingress exposes multiple services simultaneously with the help of applications just like a router. This plugin identifies different services through domains and uses annotations to control the way services are exposed externally. Here is how it works:
Ingress is the most used method in a business environment than NodePort and LoadBalancer. The reasons include:
- Compared with the load balancing way of kube-proxy, Ingress Controller is more capable (for example, traffic control and security strategy).
- It is more direct to identify services through domains; large port numbers in NodePort are also not needed for Ingress.
Nevertheless, the following problems need to be solved for Ingress:
- Ingress is used more often for L7, with limited support for L4.
- All the traffic will go to Ingress Controller, which requires a LB to expose Ingress Controller.
For the first problem, Ingress can be used for L4 but the configuration of Ingress is too complicated for L4 applications. The best practice is to use LB directly for exposure. For the second problem, Ingress Controller can be exposed in a test environment with NodePort (or hostnetwork), while a single point of failure and performance bottlenecks may happen inevitably and the HA feature of Ingress-controller has not been properly used.
Porter Introduction
Porter is an open source cloud native load balancing plugin designed by the KubeSphere development team based on Border Gateway Protocol (BGP). It meanly features:
- ECMP routing load balancing
- BGP dynamic routing configuration
- VIP management

All Porter codes are open source and documents are available in GitHub. You are welcome to star and use it.
How to Install Porter
Porter has been deployed and tested in two environments so far as below. You can see more details in GitHub about the deployment, test and process by clicking the link below. It is recommended to have a try:
- Deploy Porter on Bare Metal Kubernetes Cluster
- Test in the QingCloud Platform Using a Simulated Router
Principle
ECMP
Equal-Cost Multi-Path (ECMP) means the package forwarding to a same destination can occur along multiple paths of equal cost. When the device supports ECMP, the three-layer traffic that is sent to the target IP or network segment can be distributed by different paths, achieving network load balancing. Besides, once a certain path malfunctions, other paths can finish the forwarding process instead, serving as the routing redundant backup. Please refer to the image below:
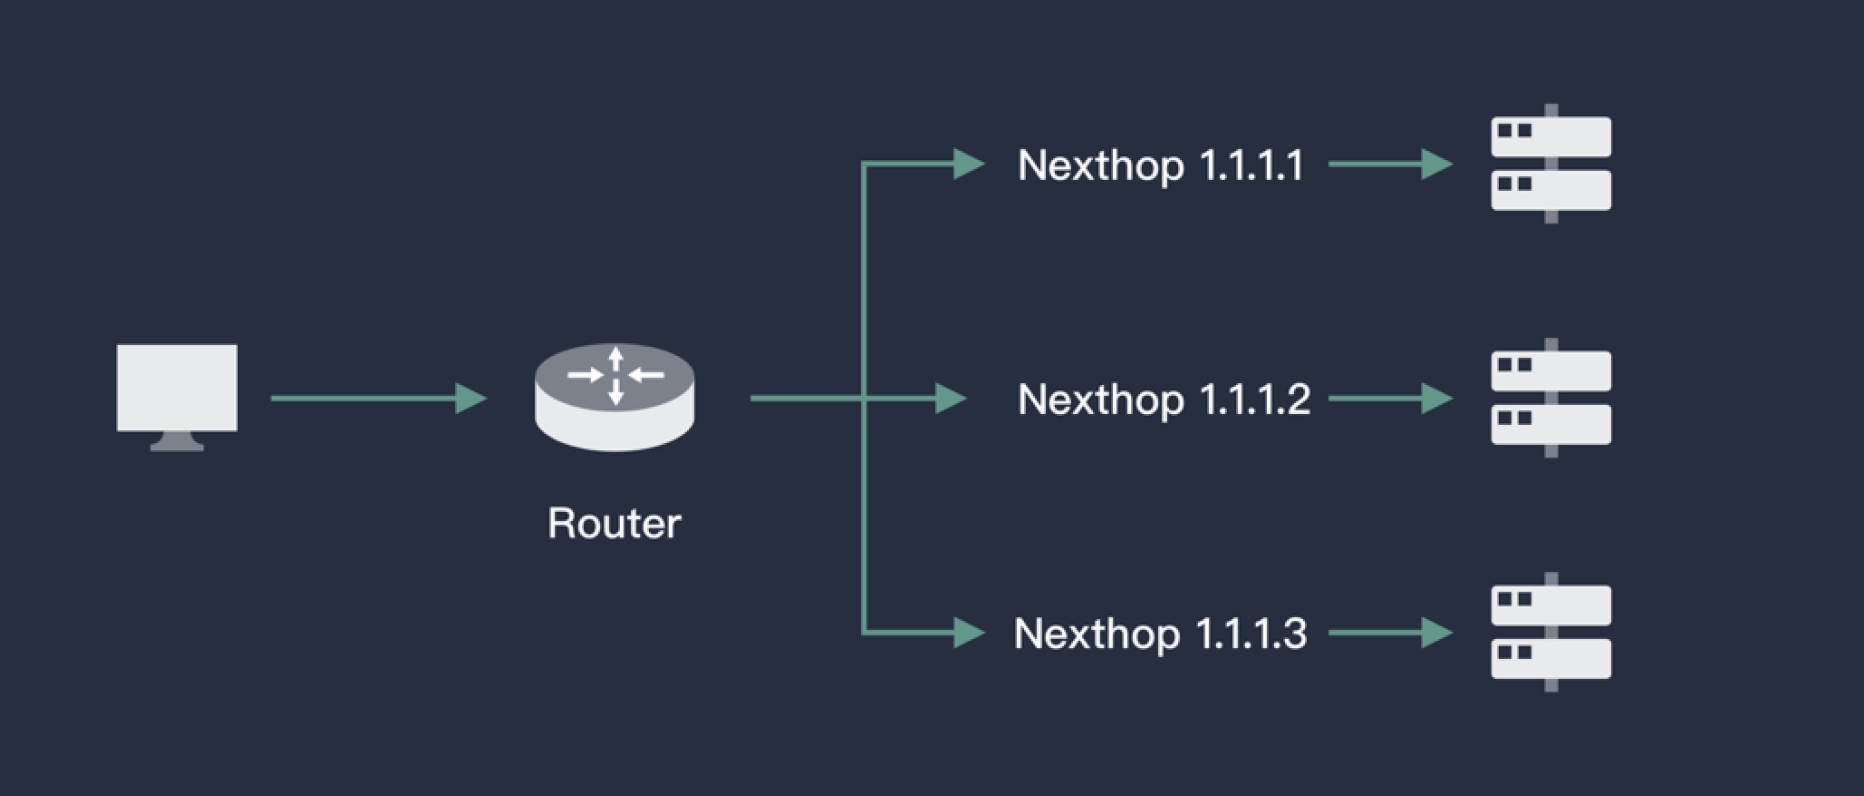
With the help of the virtual router, ECMP can select the next hop (Pod) according to Hash algorithm from the existing routing paths for a certain IP (the corresponding VIP of the service). This is how load balancing is achieved. As virtual routers support ECMP in general, Porter only needs to check the Kubernetes API server and deliver the corresponding information of backend Pod of a service to the router.
BGP
A Pod may be scheduled to other nodes in Kubernetes. For a router, the next hop of a service VIP is not fixed as the equal-cost routing information will often be updated. Calico, for example, uses BGP (Border Gateway Protocol) to advertise routes. BGP is a commonly used essential decentralized protocol to exchange routing information among autonomous systems on the Internet. Unlike other routing protocols, BGP uses L4 to ensure the update security of routing information. As BGP is decentralized, it is very easy to establish a routing layer of high availability to ensure network continuity.
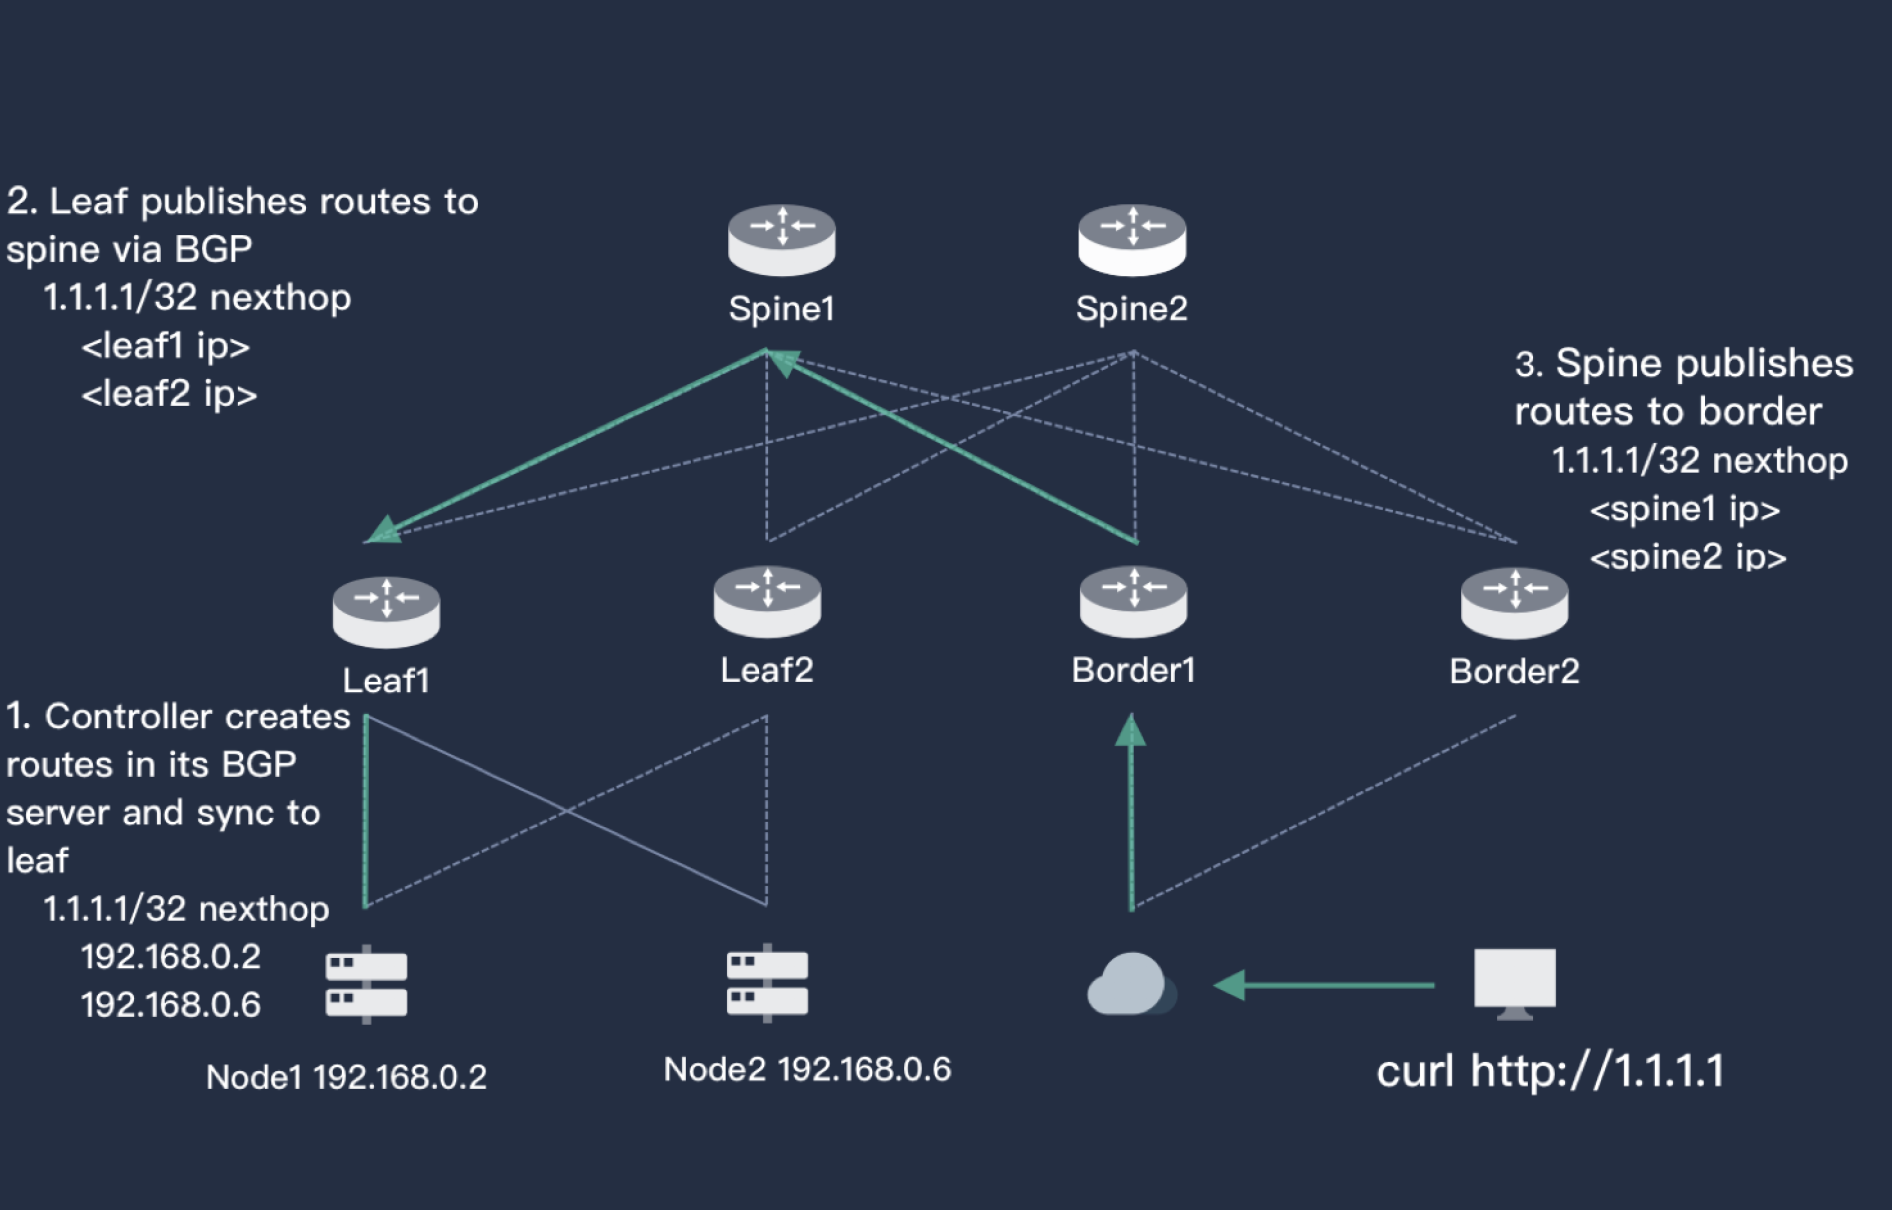
The image above briefly demonstrates how BGP works in Porter. In the bottom-left corner, it is a two-node Kubernetes cluster with two routers (Leaf1 and Leaf2) above it. These two routers are connected to two kernel switches (Spine layer). Users are on the right side, whose routers are Border1 and Border2 (also connected to Spine).
The three layers of users and Kubernetes server are reachable. Services are created in the Kubernetes cluster and Porter is also used. A VIP (or other manually assigned IP) 1.1.1.1 is assigned by Porter, which sends the information to Leaf1 and Leaf2 through BGP. The next hop to access 1.1.1.1 can be Node1 or Node2. Meanwhile, the Leaf layer also sends the message to the Spine layer, which also knows the next hop to access 1.1.1.1 can be Leaf1 or Leaf2 based on its BGP.
According to the same logic, the routing information will also be updated on Border, meaning the path for users to access 1.1.1.1 is complete. At the same time, as each layer in the image features HA, a total of 16 (2*2*2*2) paths are available to use for external access. Traffic can be distributed across the network and any downtime that occurs in the router in any layer will not affect user’s access.
Architecture
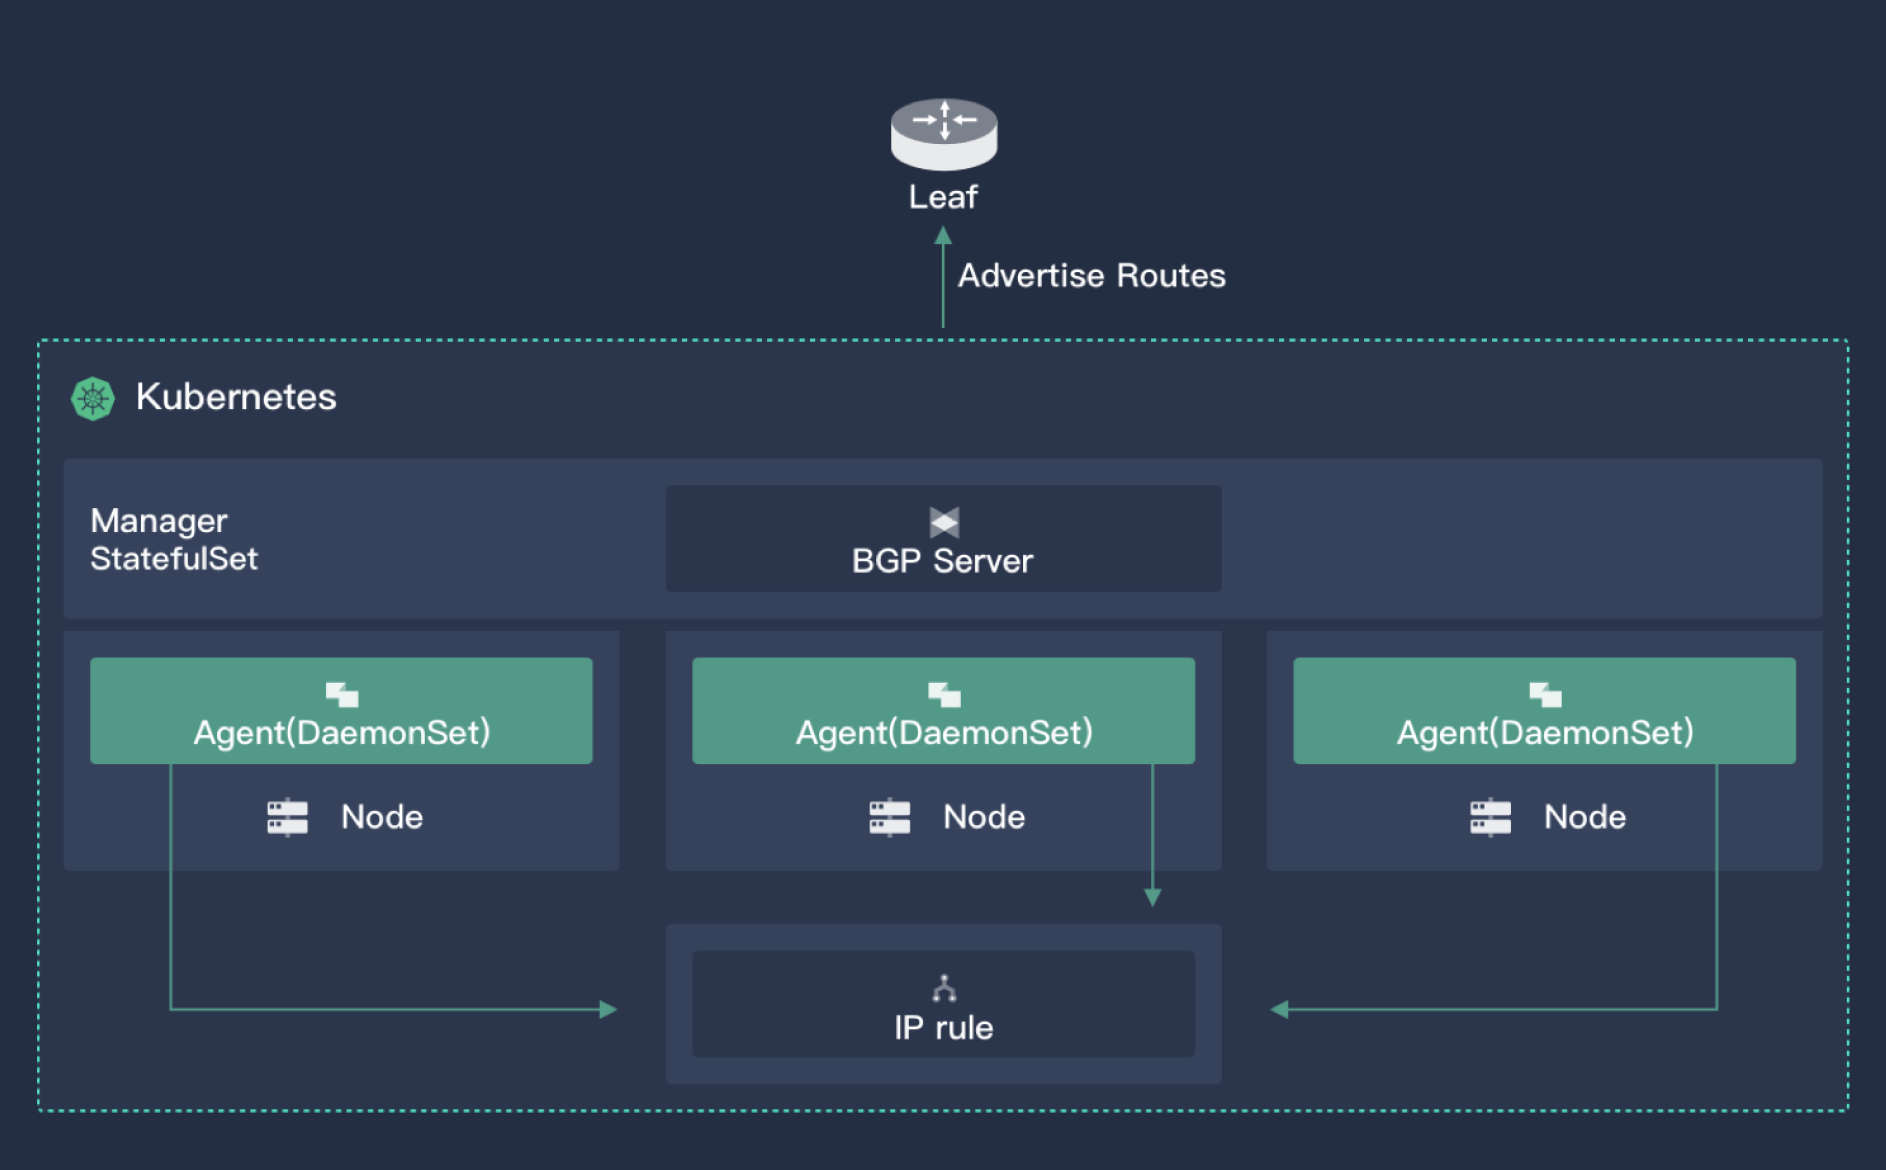
Porter has two components: a core controller and an agent deployed on each node. The main functions of the controller include:
- Monitor cluster Services and corresponding endpoints; acquire the Scheduling information of Pods
- VIP storage and assignment
- Establish BGP and advertise routes
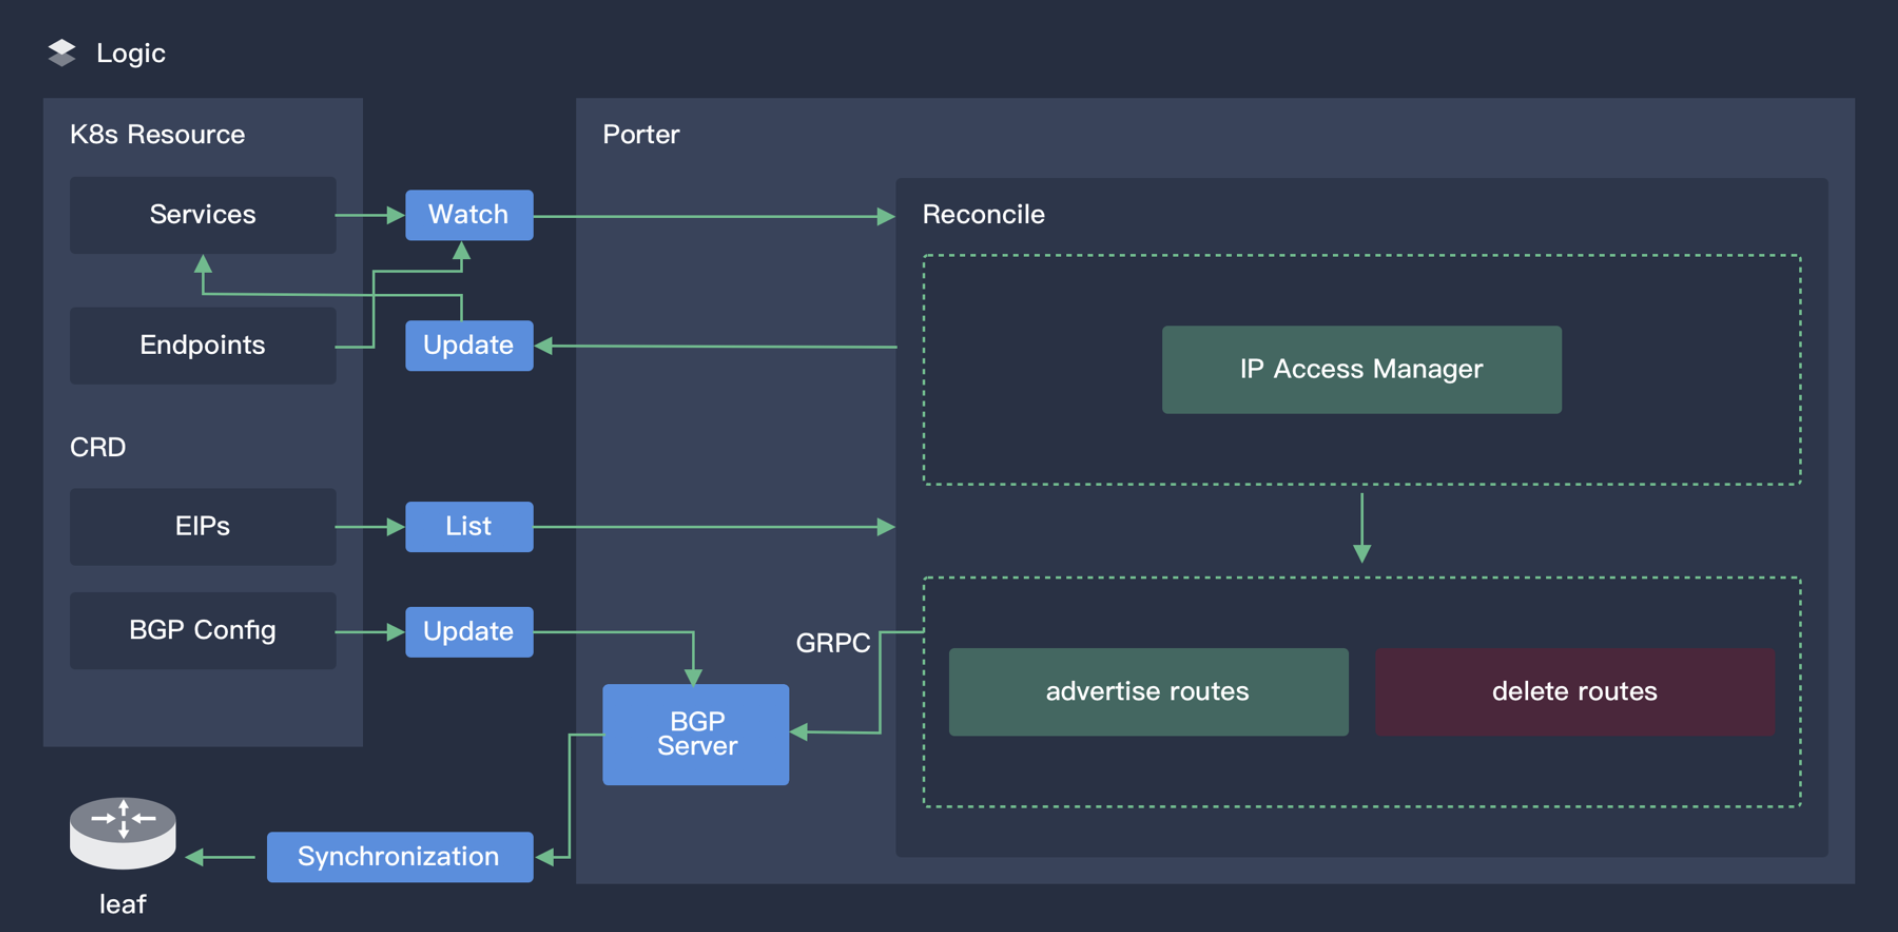
The image above shows the working principle of Porter’s core controller.
Agent is a lightweight component to monitor VIP resources and add Iptables rules for external access to the VIP. By default, the kernel Forward table will drop any external access to VIP.
Designed for Cloud Natives
All resources in Porter are CRD, including VIP, BGPPeer and BGPConfig. Users who are used to Kubectl will find Porter very easy to use. For advanced users who want to customize Porter, Kubernetes API can be called directly for tailor-made development. The core controller of Porter will soon support high availability (HA).
Cautions
The VIP traffic of user access will go to a node in the Kubernetes cluster under BGP. This is because the routes advertised by Porter are also nodes instead of Pod IP which is inaccessible externally. The path from a node to a pod is maintained by kube-proxy as below:
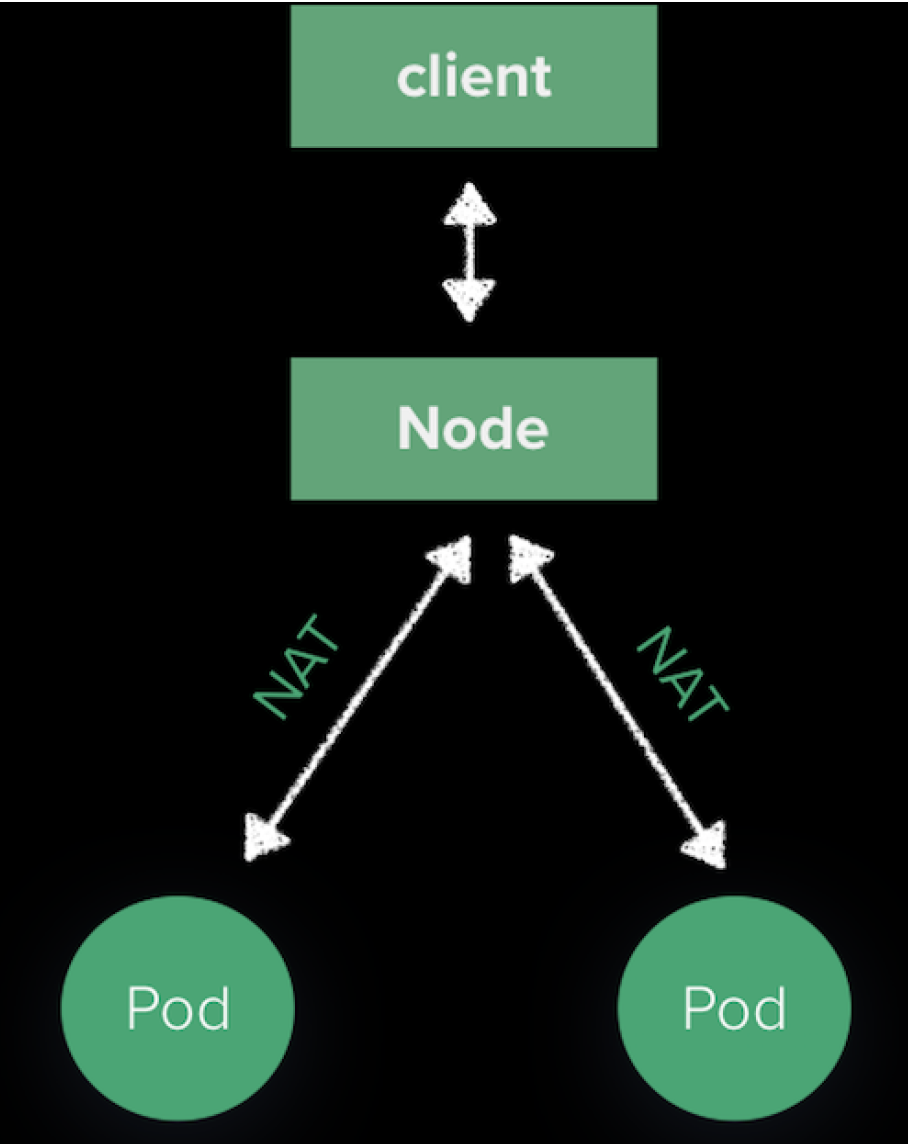
The traffic will be sent to a pod randomly after the SNAT process. As Port will adjust routes based on the dynamic change of Service Endpoints to make sure a pod is available in a node for the next hop, we can change kube-proxy which is set by default. You can set ExternalTrafficPolicy=local in a Service and the result is shown as follows:
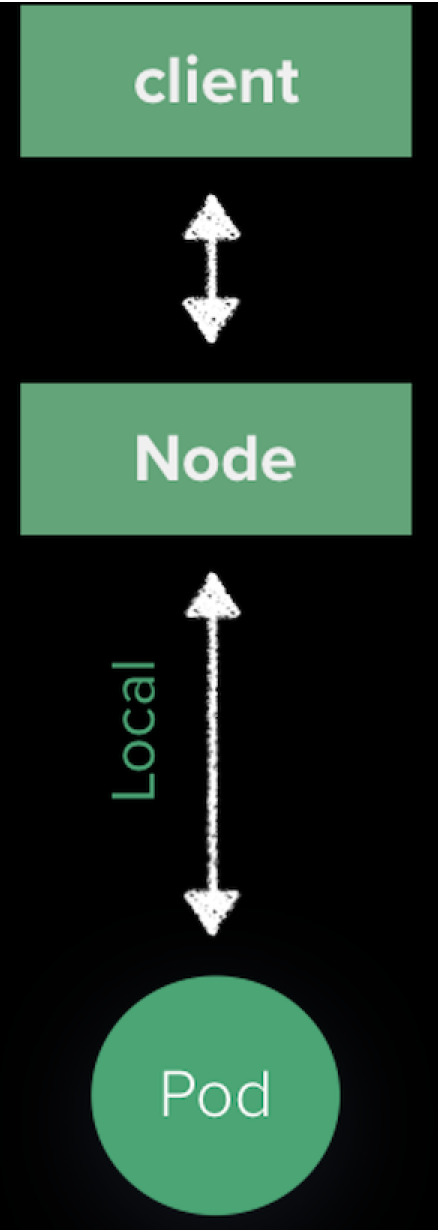
There are two advantages in this method:
- SourceIP will not go through the process of NAT
- Traffic will go locally, reducing a hop in the network
Future Plans
- Support of other simple routing protocols
- More convenient VIP management
- Policy support of BGP
- Integration into KubeSphere with UI provided
Related Resources
Table of Contents