


You are viewing documentation for KubeSphere version:v3.0.0
KubeSphere v3.0.0 documentation is no longer actively maintained. The version you are currently viewing is a static snapshot. For up-to-date documentation, see the latest version.


Air-gapped Installation On Linux
The air-gapped installation is almost the same as the online installation except that you must create a local registry to host Docker images. This tutorial demonstrates how to install KubeSphere and Kubernetes in an air-gapped environment.
Step 1: Prepare Linux Hosts
Please see the requirements for hardware and operating system shown below. To get started with multi-node installation, you need to prepare at least three hosts according to the following requirements.
System requirements
| Systems | Minimum Requirements (Each node) |
|---|---|
| Ubuntu 16.04, 18.04 | CPU: 2 Cores, Memory: 4 G, Disk Space: 100 G |
| Debian Buster, Stretch | CPU: 2 Cores, Memory: 4 G, Disk Space: 100 G |
| CentOS 7.x | CPU: 2 Cores, Memory: 4 G, Disk Space: 100 G |
| Red Hat Enterprise Linux 7 | CPU: 2 Cores, Memory: 4 G, Disk Space: 100 G |
| SUSE Linux Enterprise Server 15/openSUSE Leap 15.2 | CPU: 2 Cores, Memory: 4 G, Disk Space: 100 G |
Note
Node requirements
- It’s recommended that your OS be clean (without any other software installed). Otherwise, there may be conflicts.
- Ensure your disk of each node is at least 100G.
- All nodes must be accessible through
SSH. - Time synchronization for all nodes.
sudo/curl/opensslshould be used in all nodes.dockermust be installed by yourself in an offline environment.
KubeKey can install Kubernetes and KubeSphere together. The dependency that needs to be installed may be different based on the Kubernetes version to be installed. You can refer to the list below to see if you need to install relevant dependencies on your node in advance.
| Dependency | Kubernetes Version ≥ 1.18 | Kubernetes Version < 1.18 |
|---|---|---|
socat |
Required | Optional but recommended |
conntrack |
Required | Optional but recommended |
ebtables |
Optional but recommended | Optional but recommended |
ipset |
Optional but recommended | Optional but recommended |
Note
- In an air-gapped environment, you can install these dependencies using a private package, a RPM package (for CentOS) or a Deb package (for Debian).
- It is recommended you create an OS image file with all relevant dependencies installed in advance. In this way, you can use the image file directly for the installation of OS on each machine, improving deployment efficiency while not worrying about any dependency issues.
Network and DNS requirements
- Make sure the DNS address in
/etc/resolv.confis available. Otherwise, it may cause some issues of DNS in clusters. - If your network configuration uses Firewall or Security Group, you must ensure infrastructure components can communicate with each other through specific ports. It’s recommended that you turn off the firewall. For more information, refer to Port Requirements.
Example machines
This example includes three hosts as below with the master node serving as the taskbox.
| Host IP | Host Name | Role |
|---|---|---|
| 192.168.0.2 | master | master, etcd |
| 192.168.0.3 | node1 | worker |
| 192.168.0.4 | node2 | worker |
Step 2: Prepare a Private Image Registry
You can use Harbor or any other private image registries. This tutorial uses Docker registry as an example with self-signed certificates (If you have your own private image registry, you can skip this step).
Use self-signed certificates
-
Generate your own certificate by executing the following commands:
mkdir -p certsopenssl req \ -newkey rsa:4096 -nodes -sha256 -keyout certs/domain.key \ -x509 -days 36500 -out certs/domain.crt -
Make sure you specify a domain name in the field
Common Namewhen you are generating your own certificate. For instance, the field is set todockerhub.kubekey.localin this example.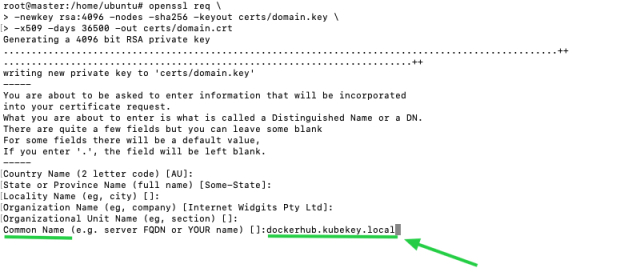
Start the Docker registry
Run the following commands to start the Docker registry:
docker run -d \
  --restart=always \
  --name registry \
  -v "$(pwd)"/certs:/certs \
  -v /mnt/registry:/var/lib/registry \
  -e REGISTRY_HTTP_ADDR=0.0.0.0:443 \
  -e REGISTRY_HTTP_TLS_CERTIFICATE=/certs/domain.crt \
  -e REGISTRY_HTTP_TLS_KEY=/certs/domain.key \
  -p 443:443 \
  registry:2
Configure the registry
-
Add an entry to
/etc/hoststo map the hostname (i.e. the registry domain name; in this case, it isdockerhub.kubekey.local) to the private IP address of your machine as below.# docker registry 192.168.0.2 dockerhub.kubekey.local -
Execute the following commands to copy the certificate to a specified directory and make Docker trust it.
mkdir -p /etc/docker/certs.d/dockerhub.kubekey.localcp certs/domain.crt /etc/docker/certs.d/dockerhub.kubekey.local/ca.crtNote
The path of the certificate is related to the domain name. When you copy the path, use your actual domain name if it is different from the one set above. -
To verify whether the private registry is effective, you can copy an image to your local machine first, and use
docker pushanddocker pullto test it.
Step 3: Download KubeKey
Similar to installing KubeSphere on Linux in an online environment, you also need to download KubeKey first. Download the tar.gz file, and transfer it to your local machine which serves as the taskbox for installation. After you uncompress the file, execute the following command to make kk executable:
chmod +x kk
Step 4: Prepare Installation Images
As you install KubeSphere and Kubernetes on Linux, you need to prepare an image package containing all the necessary images and download the Kubernetes binary file in advance.
-
Download the image list file
images-list.txtfrom a machine that has access to the Internet through the following command:curl -L -O https://github.com/kubesphere/ks-installer/releases/download/v3.0.0/images-list.txtNote
This file lists images under##+modulenamebased on different modules. You can add your own images to this file following the same rule. To view the complete file, see Appendix. -
Download
offline-installation-tool.sh.curl -L -O https://github.com/kubesphere/ks-installer/releases/download/v3.0.0/offline-installation-tool.sh -
Make the
.shfile executable.chmod +x offline-installation-tool.sh -
You can execute the command
./offline-installation-tool.sh -hto see how to use the script:root@master:/home/ubuntu# ./offline-installation-tool.sh -h Usage: ./offline-installation-tool.sh [-l IMAGES-LIST] [-d IMAGES-DIR] [-r PRIVATE-REGISTRY] [-v KUBERNETES-VERSION ] Description: -b : save kubernetes' binaries. -d IMAGES-DIR : the dir of files (tar.gz) which generated by `docker save`. default: ./kubesphere-images -l IMAGES-LIST : text file with list of images. -r PRIVATE-REGISTRY : target private registry:port. -s : save model will be applied. Pull the images in the IMAGES-LIST and save images as a tar.gz file. -v KUBERNETES-VERSION : download kubernetes' binaries. default: v1.17.9 -h : usage message -
Download the Kubernetes binary file.
./offline-installation-tool.sh -b -v v1.17.9If you cannot access the object storage service of Google, run the following command instead to add the environment variable to change the source.
export KKZONE=cn;./offline-installation-tool.sh -b -v v1.17.9Note
-
You can change the Kubernetes version downloaded based on your needs. Supported versions: v1.15.12, v1.16.13, v1.17.9 (default) and v1.18.6.
-
After you run the script, a folder
kubekeyis automatically created. Note that this file andkkmust be placed in the same directory when you create the cluster later.
-
-
Pull images in
offline-installation-tool.sh../offline-installation-tool.sh -s -l images-list.txt -d ./kubesphere-imagesNote
You can choose to pull images as needed. For example, you can delete##k8s-imagesand related images under it inimages-list.textif you already have a Kubernetes cluster.
Step 5: Push Images to Your Private Registry
Transfer your packaged image file to your local machine and execute the following command to push it to the registry.
./offline-installation-tool.sh -l images-list.txt -d ./kubesphere-images -r dockerhub.kubekey.local
Note
The domain name is
dockerhub.kubekey.local in the command. Make sure you use your own registry address.Step 6: Create a Cluster
In this tutorial, KubeSphere is installed on multiple nodes, so you need to specify a configuration file to add host information. Besides, for air-gapped installation, pay special attention to .spec.registry.privateRegistry, which must be set to your own registry address. See the complete YAML file below for more information.
Create an example configuration file
Execute the following command to generate an example configuration file for installation:
./kk create config [--with-kubernetes version] [--with-kubesphere version] [(-f | --file) path]
For example:
./kk create config --with-kubesphere -f config-sample.yaml
Note
-
Make sure the Kubernetes version is the one you downloaded.
-
If you do not add the flag
--with-kubespherein the command in this step, KubeSphere will not be deployed unless you install it using theaddonsfield in the configuration file or add this flag again when you use./kk create clusterlater.
Edit the configuration file
Edit the generated configuration file config-sample.yaml. Here is an example for your reference:
Warning
For air-gapped installation, you must specify
privateRegistry, which is dockerhub.kubekey.local in this example.apiVersion: kubekey.kubesphere.io/v1alpha1
kind: Cluster
metadata:
name: sample
spec:
hosts:
- {name: master, address: 192.168.0.2, internalAddress: 192.168.0.2, password: Qcloud@123}
- {name: node1, address: 192.168.0.3, internalAddress: 192.168.0.3, password: Qcloud@123}
- {name: node2, address: 192.168.0.4, internalAddress: 192.168.0.4, password: Qcloud@123}
roleGroups:
etcd:
- master
master:
- master
worker:
- master
- node1
- node2
controlPlaneEndpoint:
domain: lb.kubesphere.local
address: ""
port: "6443"
kubernetes:
version: v1.17.9
imageRepo: kubesphere
clusterName: cluster.local
network:
plugin: calico
kubePodsCIDR: 10.233.64.0/18
kubeServiceCIDR: 10.233.0.0/18
registry:
registryMirrors: []
insecureRegistries: []
privateRegistry: dockerhub.kubekey.local # Add the private image registry address here.
addons: []
---
apiVersion: installer.kubesphere.io/v1alpha1
kind: ClusterConfiguration
metadata:
name: ks-installer
namespace: kubesphere-system
labels:
version: v3.0.0
spec:
local_registry: ""
persistence:
storageClass: ""
authentication:
jwtSecret: ""
etcd:
monitoring: true
endpointIps: localhost
port: 2379
tlsEnable: true
common:
es:
elasticsearchDataVolumeSize: 20Gi
elasticsearchMasterVolumeSize: 4Gi
elkPrefix: logstash
logMaxAge: 7
mysqlVolumeSize: 20Gi
minioVolumeSize: 20Gi
etcdVolumeSize: 20Gi
openldapVolumeSize: 2Gi
redisVolumSize: 2Gi
console:
enableMultiLogin: false # enable/disable multi login
port: 30880
alerting:
enabled: false
auditing:
enabled: false
devops:
enabled: false
jenkinsMemoryLim: 2Gi
jenkinsMemoryReq: 1500Mi
jenkinsVolumeSize: 8Gi
jenkinsJavaOpts_Xms: 512m
jenkinsJavaOpts_Xmx: 512m
jenkinsJavaOpts_MaxRAM: 2g
events:
enabled: false
ruler:
enabled: true
replicas: 2
logging:
enabled: false
logsidecarReplicas: 2
metrics_server:
enabled: true
monitoring:
prometheusMemoryRequest: 400Mi
prometheusVolumeSize: 20Gi
multicluster:
clusterRole: none # host | member | none
networkpolicy:
enabled: false
notification:
enabled: false
openpitrix:
enabled: false
servicemesh:
enabled: false
Info
For more information about these parameters, see Multi-node Installation and Kubernetes Cluster Configuration. To enable pluggable components in
config-sample.yaml, refer to Enable Pluggle Components for more details.Step 7: Start Installation
You can execute the following command after you make sure that all steps above are completed.
./kk create cluster -f config-sample.yaml
Warning
After you transfer the executable file
kk and the folder kubekey that contains the Kubernetes binary file to the taskbox machine for installation, they must be placed in the same directory before you execute the command above.Step 8: Verify Installation
When the installation finishes, you can see the content as follows:
#####################################################
###              Welcome to KubeSphere!           ###
#####################################################

Console: http://192.168.0.2:30880
Account: admin
Password: P@88w0rd

NOTES:
  1. After logging into the console, please check the
     monitoring status of service components in
     the "Cluster Management". If any service is not
     ready, please wait patiently until all components
     are ready.
  2. Please modify the default password after login.

#####################################################
https://kubesphere.io             20xx-xx-xx xx:xx:xx
#####################################################
Now, you will be able to access the web console of KubeSphere through http://{IP}:30880 with the default account and password admin/P@88w0rd.
Note
To access the console, make sure port 30880 is opened in your security group.

Appendix
Image list of KubeSphere v3.0.0
##k8s-images
kubesphere/kube-apiserver:v1.17.9
kubesphere/kube-scheduler:v1.17.9
kubesphere/kube-proxy:v1.17.9
kubesphere/kube-controller-manager:v1.17.9
kubesphere/kube-apiserver:v1.18.6
kubesphere/kube-scheduler:v1.18.6
kubesphere/kube-proxy:v1.18.6
kubesphere/kube-controller-manager:v1.18.6
kubesphere/kube-apiserver:v1.16.13
kubesphere/kube-scheduler:v1.16.13
kubesphere/kube-proxy:v1.16.13
kubesphere/kube-controller-manager:v1.16.13
kubesphere/kube-apiserver:v1.15.12
kubesphere/kube-scheduler:v1.15.12
kubesphere/kube-proxy:v1.15.12
kubesphere/kube-controller-manager:v1.15.12
kubesphere/pause:3.1
kubesphere/pause:3.2
kubesphere/etcd:v3.3.12
calico/kube-controllers:v3.15.1
calico/node:v3.15.1
calico/cni:v3.15.1
calico/pod2daemon-flexvol:v3.15.1
coredns/coredns:1.6.9
kubesphere/k8s-dns-node-cache:1.15.12
kubesphere/node-disk-manager:0.5.0
kubesphere/node-disk-operator:0.5.0
kubesphere/provisioner-localpv:1.10.0
kubesphere/linux-utils:1.10.0
kubesphere/nfs-client-provisioner:v3.1.0-k8s1.11

##ks-core-images
kubesphere/ks-apiserver:v3.0.0
kubesphere/ks-console:v3.0.0
kubesphere/ks-controller-manager:v3.0.0
kubesphere/ks-installer:v3.0.0
kubesphere/etcd:v3.2.18
kubesphere/kubectl:v1.0.0
kubesphere/ks-upgrade:v3.0.0
kubesphere/ks-devops:flyway-v3.0.0
redis:5.0.5-alpine
alpine:3.10.4
haproxy:2.0.4
mysql:8.0.11
nginx:1.14-alpine
minio/minio:RELEASE.2019-08-07T01-59-21Z
minio/mc:RELEASE.2019-08-07T23-14-43Z
mirrorgooglecontainers/defaultbackend-amd64:1.4
kubesphere/nginx-ingress-controller:0.24.1
osixia/openldap:1.3.0
csiplugin/snapshot-controller:v2.0.1
kubesphere/kubefed:v0.3.0
kubesphere/tower:v0.1.0
kubesphere/prometheus-config-reloader:v0.38.3
kubesphere/prometheus-operator:v0.38.3
prom/alertmanager:v0.21.0
prom/prometheus:v2.20.1
kubesphere/node-exporter:ks-v0.18.1
jimmidyson/configmap-reload:v0.3.0
kubesphere/notification-manager-operator:v0.1.0
kubesphere/notification-manager:v0.1.0
kubesphere/metrics-server:v0.3.7
kubesphere/kube-rbac-proxy:v0.4.1
kubesphere/kube-state-metrics:v1.9.6

##ks-logging-images
kubesphere/elasticsearch-oss:6.7.0-1
kubesphere/elasticsearch-curator:v5.7.6
kubesphere/fluentbit-operator:v0.2.0
kubesphere/fluentbit-operator:migrator
kubesphere/fluent-bit:v1.4.6
elastic/filebeat:6.7.0
kubesphere/kube-auditing-operator:v0.1.0
kubesphere/kube-auditing-webhook:v0.1.0
kubesphere/kube-events-exporter:v0.1.0
kubesphere/kube-events-operator:v0.1.0
kubesphere/kube-events-ruler:v0.1.0
kubesphere/log-sidecar-injector:1.1
docker:19.03

##istio-images
istio/citadel:1.4.8
istio/galley:1.4.8
istio/kubectl:1.4.8
istio/mixer:1.4.8
istio/pilot:1.4.8
istio/proxyv2:1.4.8
istio/sidecar_injector:1.4.8
jaegertracing/jaeger-agent:1.17
jaegertracing/jaeger-collector:1.17
jaegertracing/jaeger-operator:1.17.1
jaegertracing/jaeger-query:1.17
jaegertracing/jaeger-es-index-cleaner:1.17.1

##ks-devops-images
jenkins/jenkins:2.176.2
jenkins/jnlp-slave:3.27-1
kubesphere/jenkins-uc:v3.0.0
kubesphere/s2ioperator:v2.1.1
kubesphere/s2irun:v2.1.1
kubesphere/builder-base:v2.1.0
kubesphere/builder-nodejs:v2.1.0
kubesphere/builder-maven:v2.1.0
kubesphere/builder-go:v2.1.0
kubesphere/s2i-binary:v2.1.0
kubesphere/tomcat85-java11-centos7:v2.1.0
kubesphere/tomcat85-java11-runtime:v2.1.0
kubesphere/tomcat85-java8-centos7:v2.1.0
kubesphere/tomcat85-java8-runtime:v2.1.0
kubesphere/java-11-centos7:v2.1.0
kubesphere/java-8-centos7:v2.1.0
kubesphere/java-8-runtime:v2.1.0
kubesphere/java-11-runtime:v2.1.0
kubesphere/nodejs-8-centos7:v2.1.0
kubesphere/nodejs-6-centos7:v2.1.0
kubesphere/nodejs-4-centos7:v2.1.0
kubesphere/python-36-centos7:v2.1.0
kubesphere/python-35-centos7:v2.1.0
kubesphere/python-34-centos7:v2.1.0
kubesphere/python-27-centos7:v2.1.0
kubesphere/notification:flyway_v2.1.2
kubesphere/notification:v2.1.2
kubesphere/alert-adapter:v3.0.0
kubesphere/alerting-dbinit:v3.0.0
kubesphere/alerting:v2.1.2

##openpitrix-images
openpitrix/generate-kubeconfig:v0.5.0
openpitrix/openpitrix:flyway-v0.5.0
openpitrix/openpitrix:v0.5.0
openpitrix/release-app:v0.5.0

##example-images
kubesphere/examples-bookinfo-productpage-v1:1.13.0
kubesphere/examples-bookinfo-reviews-v1:1.13.0
kubesphere/examples-bookinfo-reviews-v2:1.13.0
kubesphere/examples-bookinfo-reviews-v3:1.13.0
kubesphere/examples-bookinfo-details-v1:1.13.0
kubesphere/examples-bookinfo-ratings-v1:1.13.0
busybox:1.31.1
joosthofman/wget:1.0
kubesphere/netshoot:v1.0
nginxdemos/hello:plain-text
wordpress:4.8-apache
mirrorgooglecontainers/hpa-example:latest
java:openjdk-8-jre-alpine
fluent/fluentd:v1.4.2-2.0
perl:latest

##csi-images
csiplugin/csi-neonsan:v1.2.0
csiplugin/csi-neonsan-ubuntu:v1.2.0
csiplugin/csi-neonsan-centos:v1.2.0
csiplugin/csi-provisioner:v1.5.0
csiplugin/csi-attacher:v2.1.1
csiplugin/csi-resizer:v0.4.0
csiplugin/csi-snapshotter:v2.0.1
csiplugin/csi-node-driver-registrar:v1.2.0
csiplugin/csi-qingcloud:v1.2.0
 Previous

What’s on this Page