


You are viewing documentation for KubeSphere version:v3.0.0
KubeSphere v3.0.0 documentation is no longer actively maintained. The version you are currently viewing is a static snapshot. For up-to-date documentation, see the latest version.


Deploy KubeSphere on VMware vSphere
Introduction
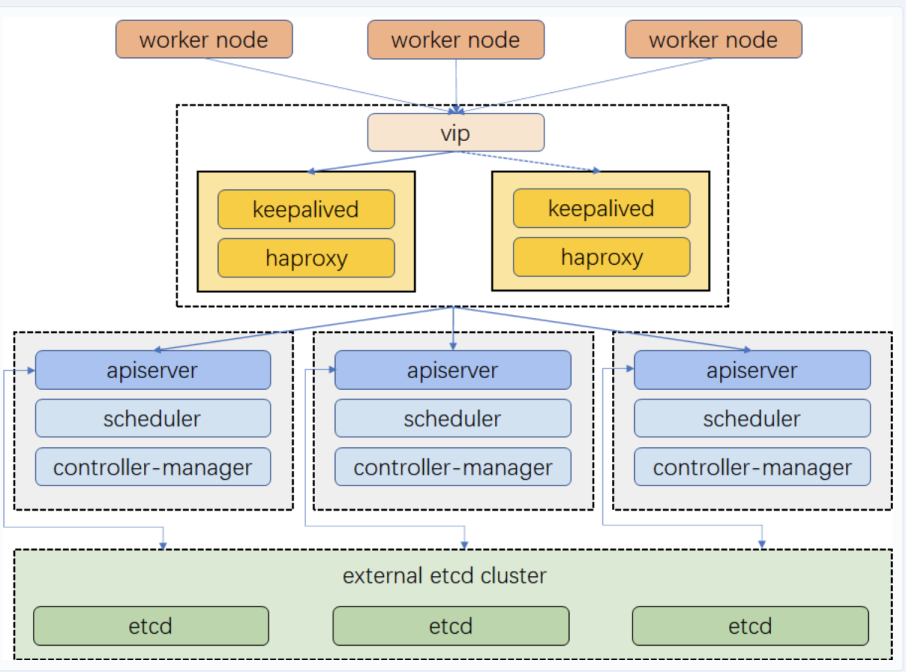
For a production environment, we need to consider the high availability of the cluster. If the key components (for example, kube-apiserver, kube-scheduler, and kube-controller-manager) are all running on the same master node, Kubernetes and KubeSphere will be unavailable once the master node goes down. Therefore, we need to set up a high-availability cluster by provisioning load balancers with multiple master nodes. You can use any cloud load balancer, or any hardware load balancer (for example, F5). In addition, Keepalived and HAProxy, or Nginx is also an alternative for creating high-availability clusters.
This tutorial walks you through an example of how to create Keepalived and HAProxy, and implement high availability of master and etcd nodes using the load balancers on VMware vSphere.
Prerequisites
- Please make sure that you already know how to install KubeSphere with a multi-node cluster by following the guide. This tutorial focuses more on how to configure load balancers.
- You need a VMware vSphere account to create VMs.
- Considering data persistence, for a production environment, we recommend you to prepare persistent storage and create a default StorageClass in advance. For development and testing, you can use the integrated OpenEBS to provision LocalPV as the storage service directly.
Architecture
Prepare Linux Hosts
This tutorial creates 8 virtual machines of CentOS Linux release 7.6.1810 (Core) for the default minimal installation. Every machine has 2 Cores, 4 GB memory and 40 G disk space.
| Host IP | Host Name | Role |
|---|---|---|
| 10.10.71.214 | master1 | master, etcd |
| 10.10.71.73 | master2 | master, etcd |
| 10.10.71.62 | master3 | master, etcd |
| 10.10.71.75 | node1 | worker |
| 10.10.71.76 | node2 | worker |
| 10.10.71.79 | node3 | worker |
| 10.10.71.67 | vip | vip (No need to create a VM) |
| 10.10.71.77 | lb-0 | lb (Keepalived + HAProxy) |
| 10.10.71.66 | lb-1 | lb (Keepalived + HAProxy) |
Note
You do not need to create a virtual machine for
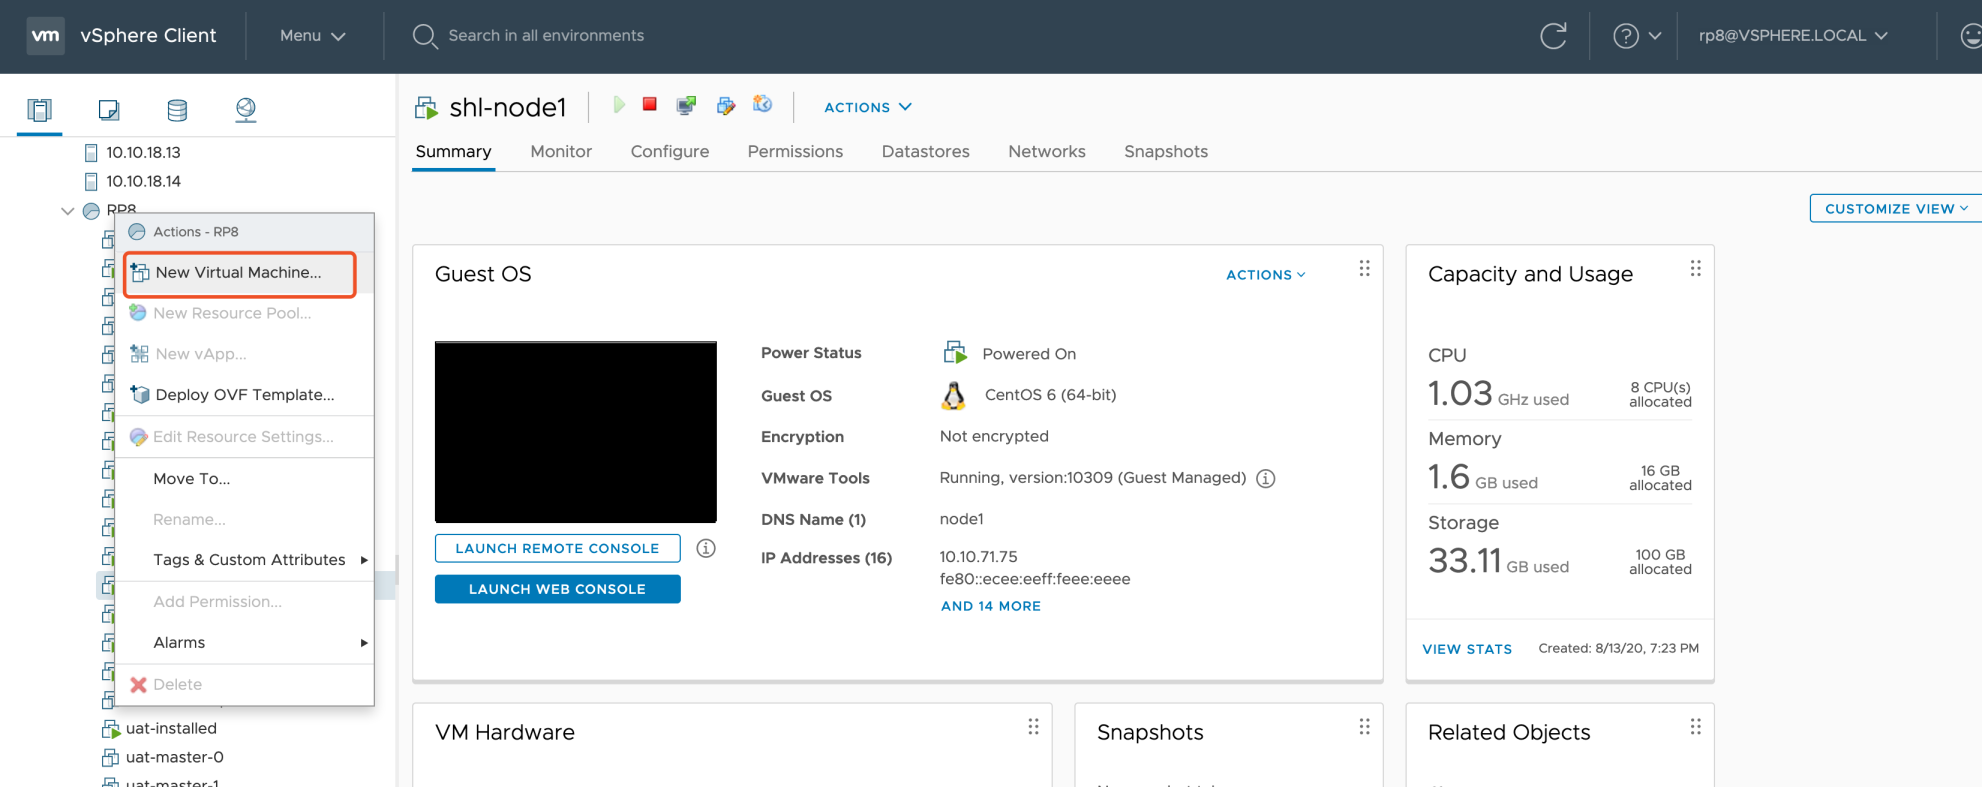
vip (i.e. Virtual IP) above, so only 8 virtual machines need to be created.You can follow the New Virtual Machine wizard to create a virtual machine to place in the VMware Host Client inventory.
-
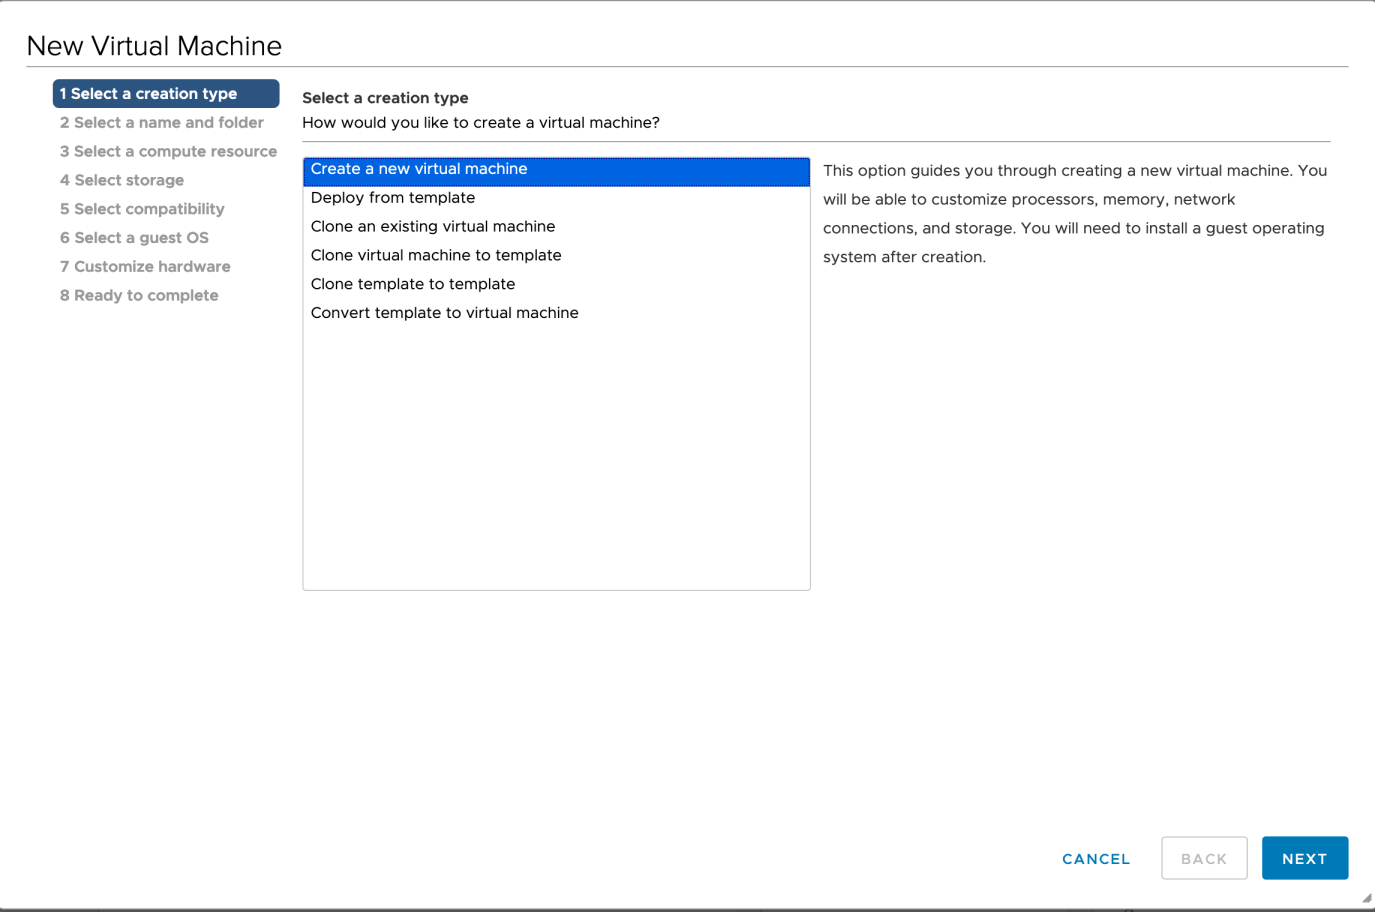
In the first step Select a creation type, you can deploy a virtual machine from an OVF or OVA file, or register an existing virtual machine directly.
-
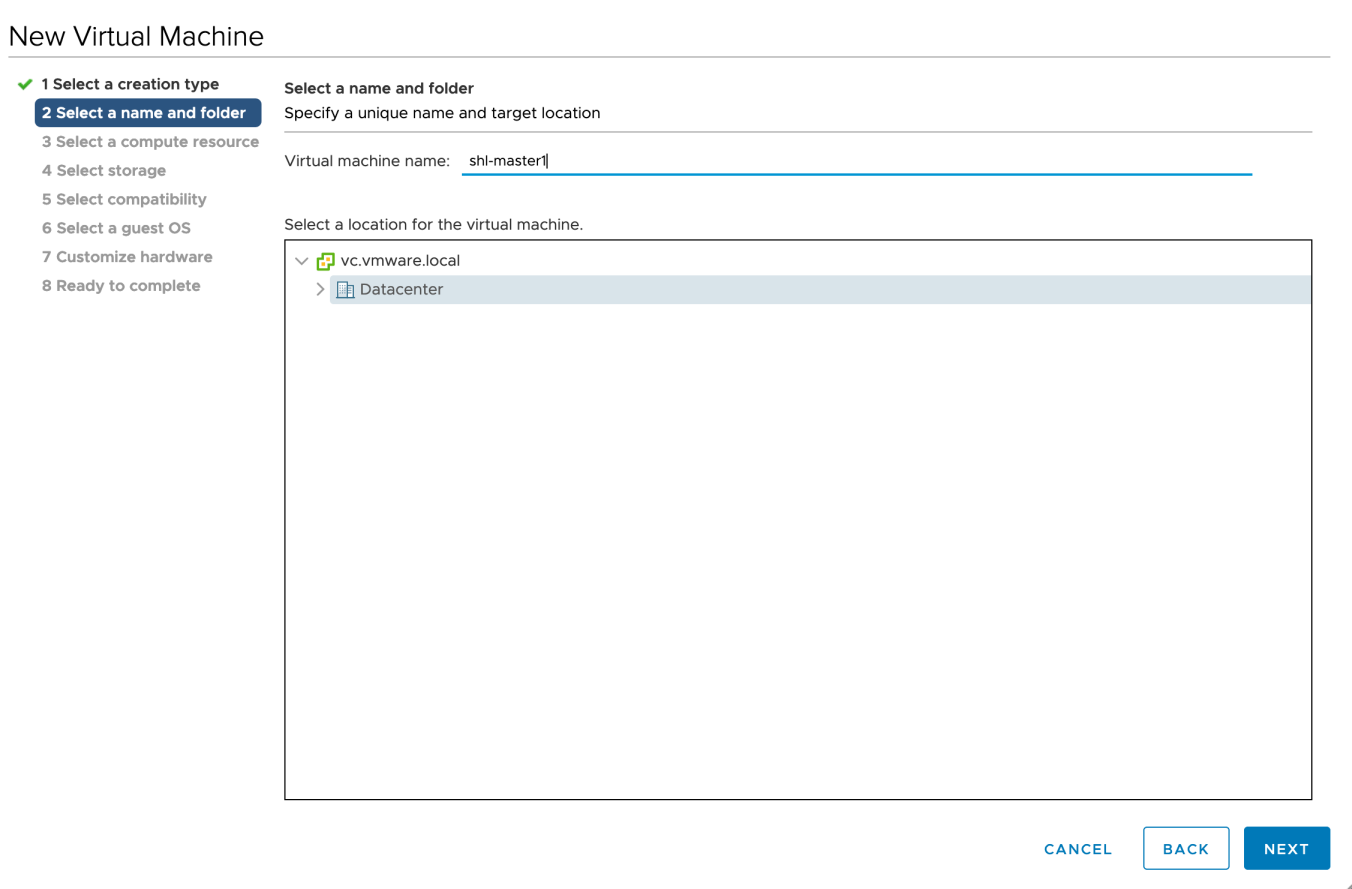
When you create a new virtual machine, provide a unique name for the virtual machine to distinguish it from existing virtual machines on the host you are managing.
-
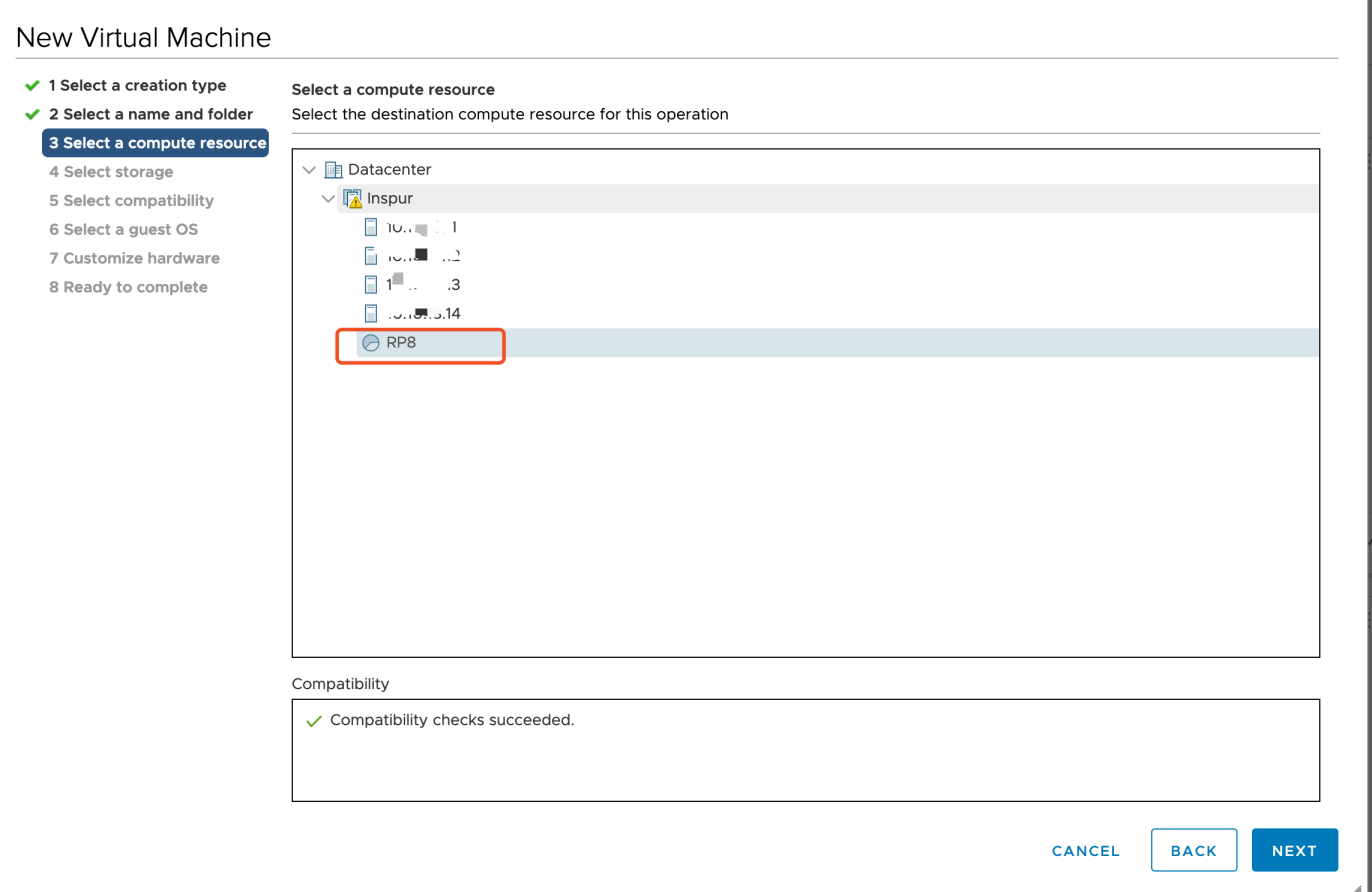
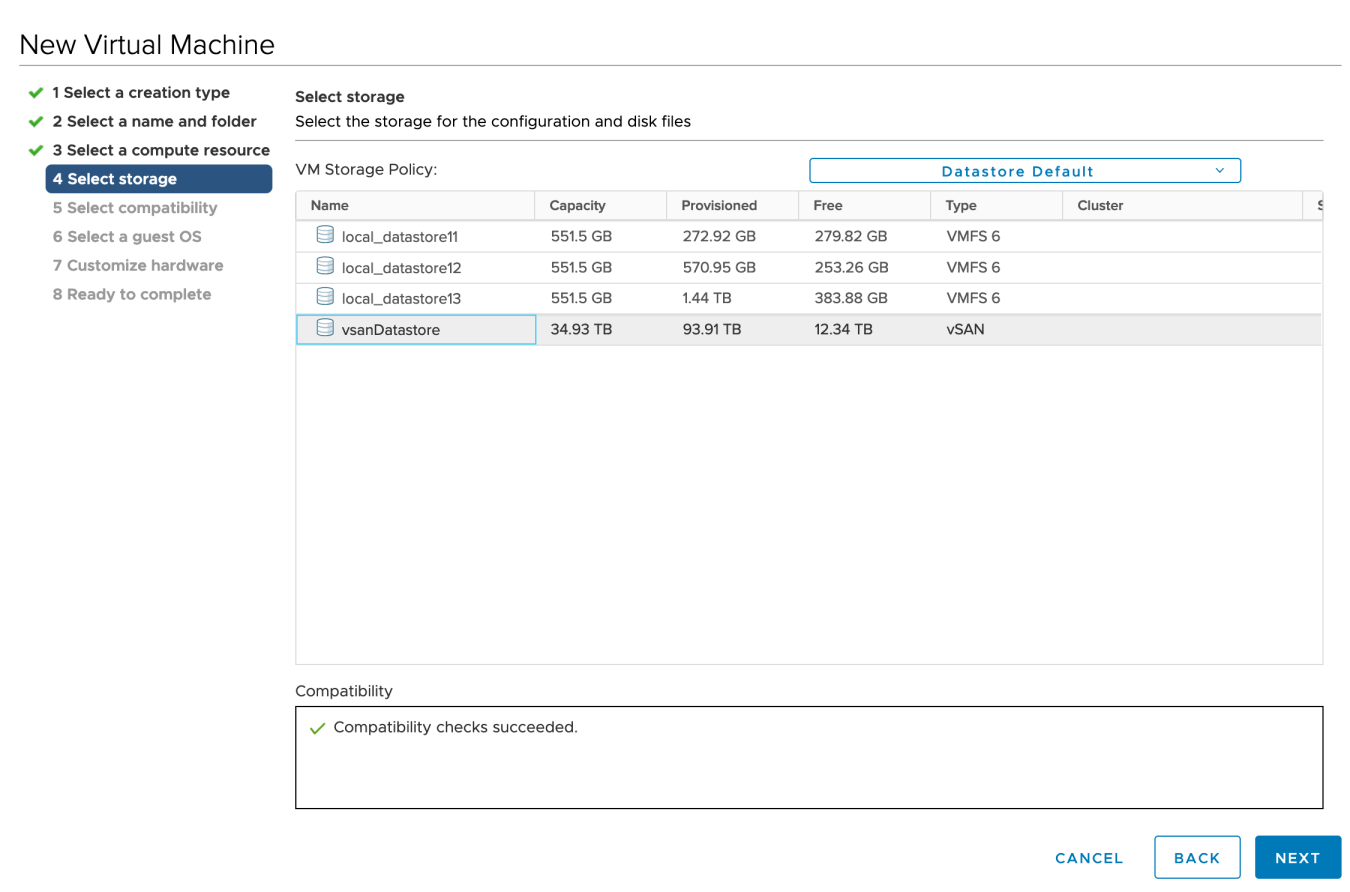
Select a compute resource and storage (datastore) for the configuration and disk files. You can select the datastore that has the most suitable properties, such as size, speed, and availability, for your virtual machine storage.
-
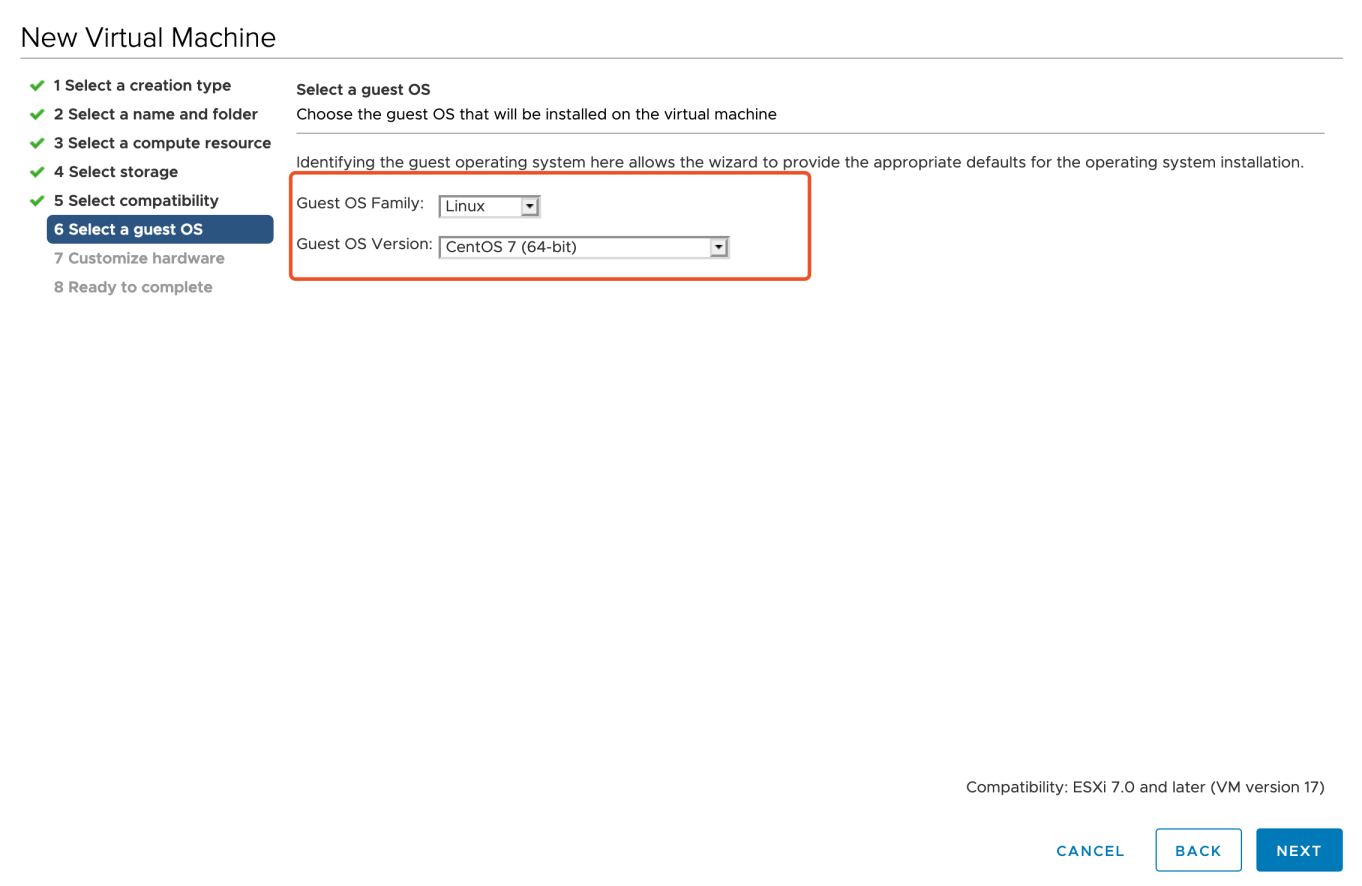
Select a guest operating system. The wizard will provide the appropriate defaults for the operating system installation.
-
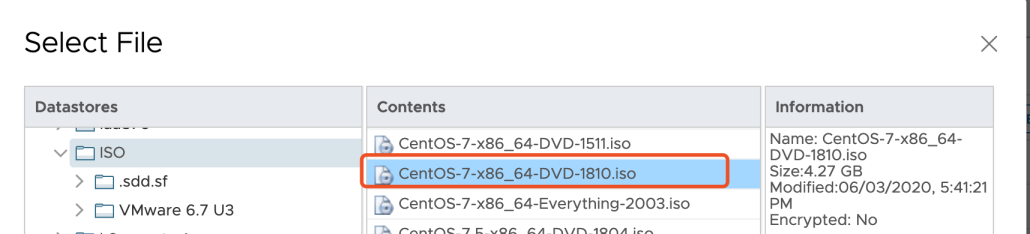
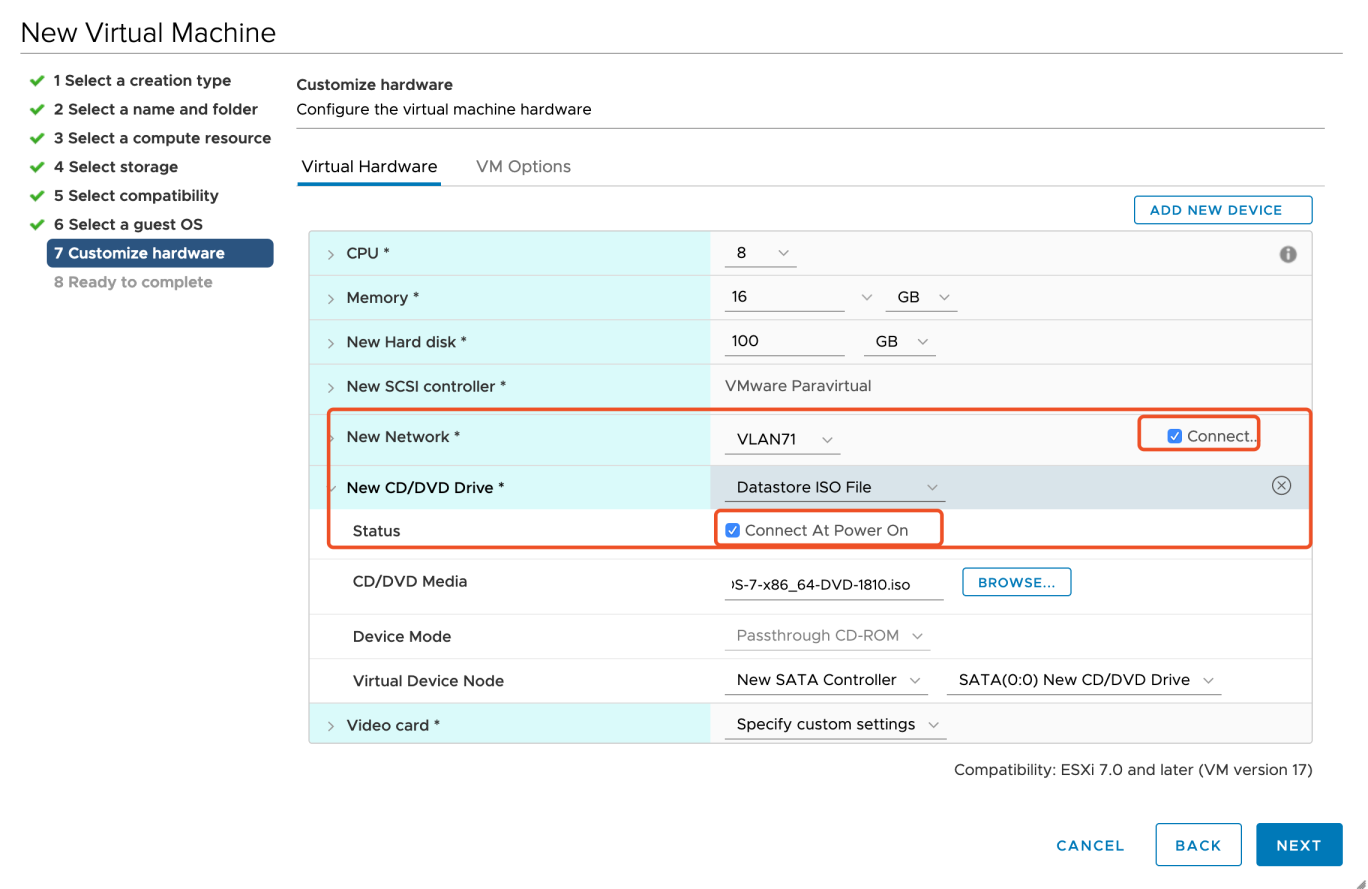
Before you finish deploying a new virtual machine, you have the option to set Virtual Hardware and VM Options. You can refer to the images below for part of the fields.
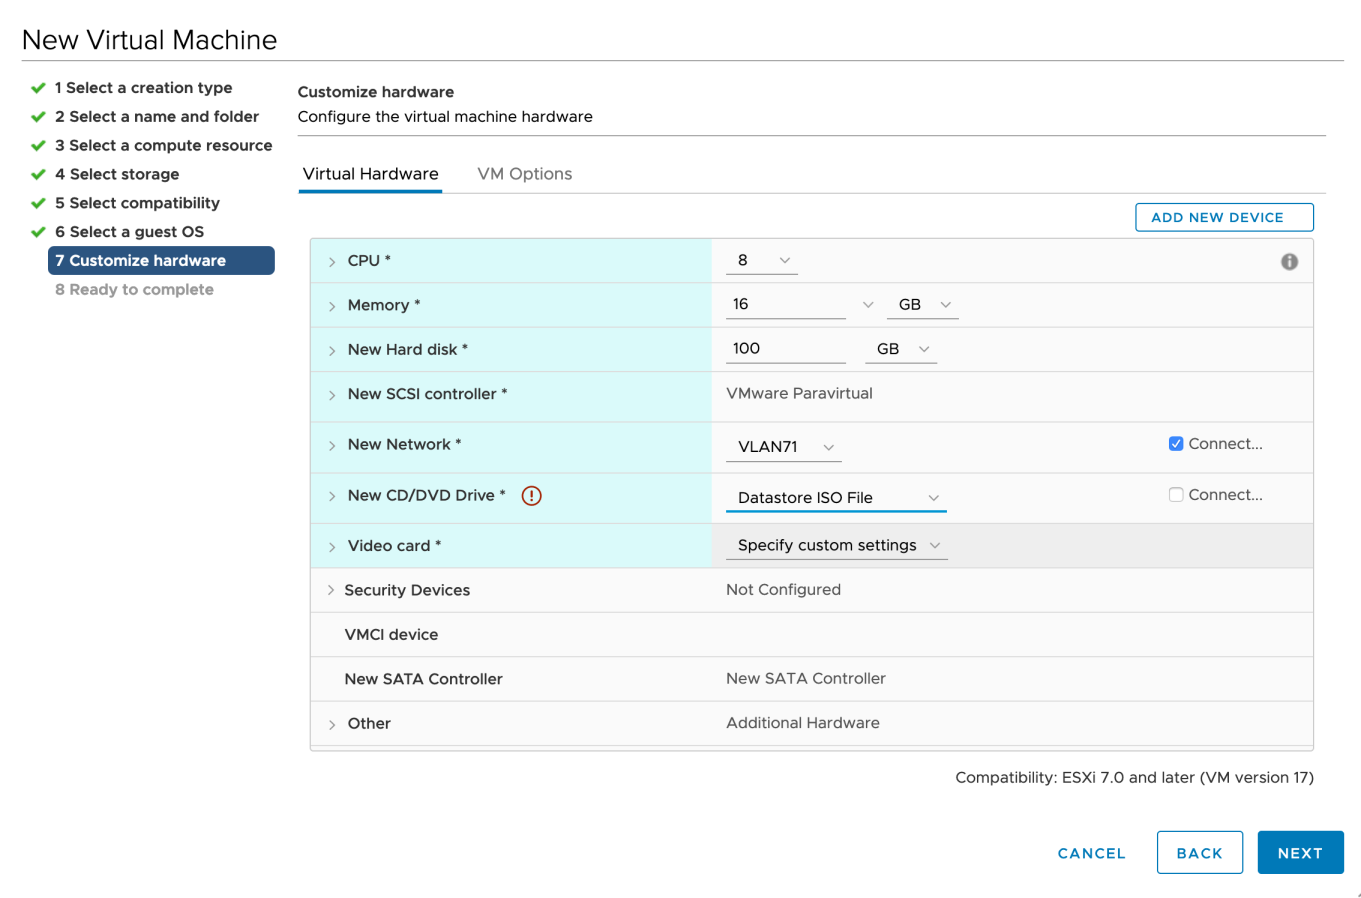

-
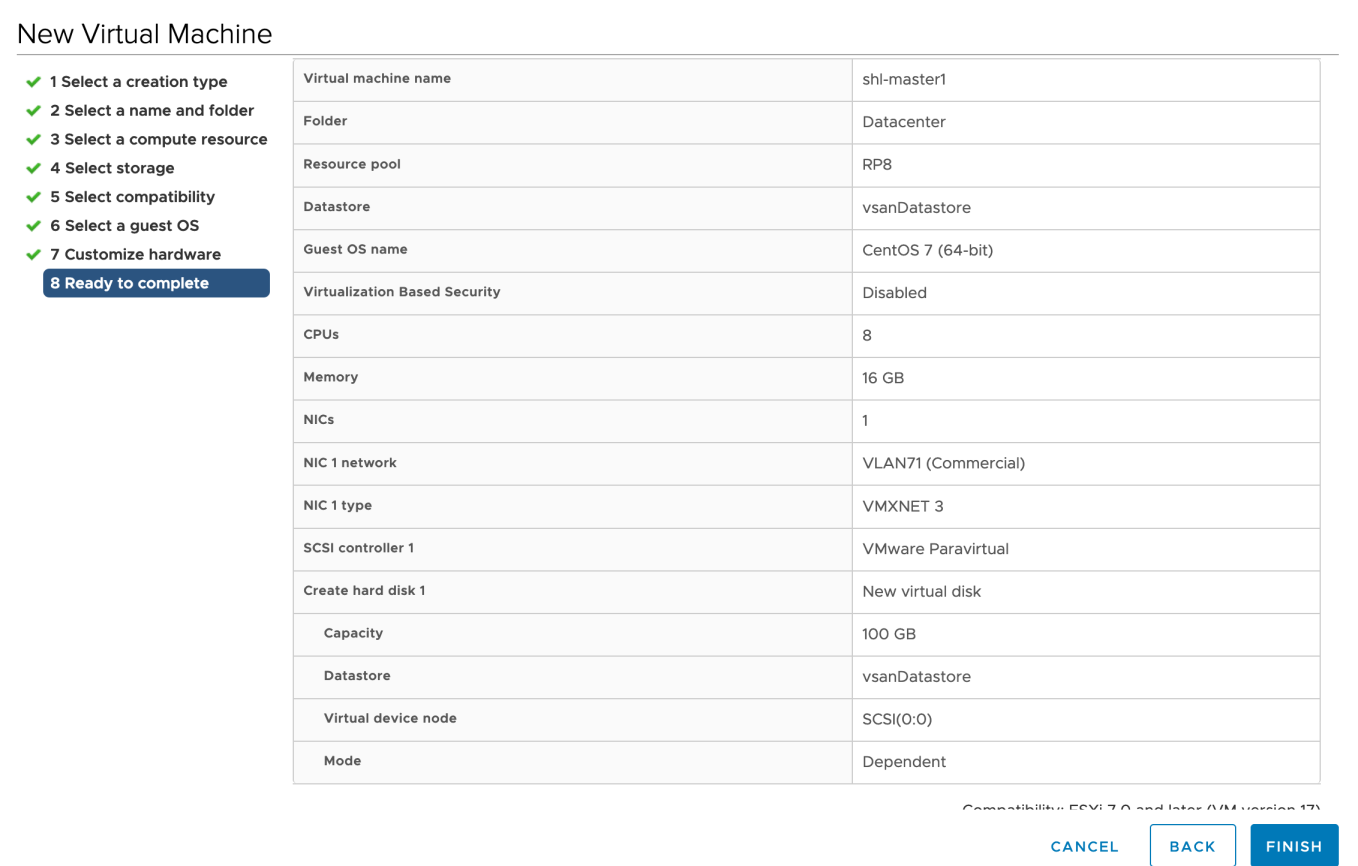
In Ready to complete page, you review the configuration selections that you have made for the virtual machine. Click Finish at the bottom right corner to continue.
Install a Load Balancer using Keepalived and HAProxy
For a production environment, you have to prepare an external load balancer for your multiple-master cluster. If you do not have a load balancer, you can install it using Keepalived and HAProxy. If you are provisioning a development or testing environment by installing a single-master cluster, please skip this section.
Yum Install
host lb-0 (10.10.71.77) and host lb-1 (10.10.71.66).
yum install keepalived haproxy psmisc -y
Configure HAProxy
On the servers with IP 10.10.71.77 and 10.10.71.66, configure HAProxy as follows.
Note
The configuration of the two lb machines is the same. Please pay attention to the backend service address.
# HAProxy Configure /etc/haproxy/haproxy.cfg
global
    log         127.0.0.1 local2
    chroot      /var/lib/haproxy
    pidfile     /var/run/haproxy.pid
    maxconn     4000
    user        haproxy
    group       haproxy
    daemon
    # turn on stats unix socket
    stats socket /var/lib/haproxy/stats
#---------------------------------------------------------------------
# common defaults that all the 'listen' and 'backend' sections will
# use if not designated in their block
#---------------------------------------------------------------------
defaults
    log                     global
    option                  httplog
    option                  dontlognull
    timeout connect         5000
    timeout client          5000
    timeout server          5000
#---------------------------------------------------------------------
# main frontend which proxys to the backends
#---------------------------------------------------------------------
frontend  kube-apiserver
    bind *:6443
    mode tcp
    option tcplog
    default_backend kube-apiserver
#---------------------------------------------------------------------
# round robin balancing between the various backends
#---------------------------------------------------------------------
backend kube-apiserver
    mode tcp
    option tcplog
    balance     roundrobin
    default-server inter 10s downinter 5s rise 2 fall 2 slowstart 60s maxconn 250 maxqueue 256 weight 100
    server kube-apiserver-1 10.10.71.214:6443 check
    server kube-apiserver-2 10.10.71.73:6443 check
    server kube-apiserver-3 10.10.71.62:6443 check
Check grammar first before you start it.
haproxy -f /etc/haproxy/haproxy.cfg -c
Restart HAProxy and execute the command below to enable HAProxy.
systemctl restart haproxy && systemctl enable haproxy
Stop HAProxy.
systemctl stop haproxy
Configure Keepalived
Main HAProxy 77 lb-0-10.10.71.77 (/etc/keepalived/keepalived.conf).
global_defs {
  notification_email {
  }
  smtp_connect_timeout 30
  router_id LVS_DEVEL01
  vrrp_skip_check_adv_addr
  vrrp_garp_interval 0
  vrrp_gna_interval 0
}
vrrp_script chk_haproxy {
  script "killall -0 haproxy"
  interval 2
  weight 20
}
vrrp_instance haproxy-vip {
  state MASTER
  priority 100
  interface ens192
  virtual_router_id 60
  advert_int 1
  authentication {
    auth_type PASS
    auth_pass 1111
  }
  unicast_src_ip 10.10.71.77
  unicast_peer {
    10.10.71.66
  }
  virtual_ipaddress {
    #vip
    10.10.71.67/24
  }
  track_script {
    chk_haproxy
  }
}
Remark HAProxy 66 lb-1-10.10.71.66 (/etc/keepalived/keepalived.conf).
global_defs {
  notification_email {
  }
  router_id LVS_DEVEL02
  vrrp_skip_check_adv_addr
  vrrp_garp_interval 0
  vrrp_gna_interval 0
}
vrrp_script chk_haproxy {
  script "killall -0 haproxy"
  interval 2
  weight 20
}
vrrp_instance haproxy-vip {
  state BACKUP
  priority 90
  interface ens192
  virtual_router_id 60
  advert_int 1
  authentication {
    auth_type PASS
    auth_pass 1111
  }
  unicast_src_ip 10.10.71.66
  unicast_peer {
    10.10.71.77
  }
  virtual_ipaddress {
    10.10.71.67/24
  }
  track_script {
    chk_haproxy
  }
}
Start keepalived and enable keepalived.
systemctl restart keepalived && systemctl enable keepalived
systemctl stop keepalived
systemctl start keepalived
Verify Availability
Use ip a s to view the vip binding status of each lb node:
ip a s
Pause VIP node HAProxy through the following command:
systemctl stop haproxy
Use ip a s again to check the vip binding of each lb node, and check whether vip drifts:
ip a s
Alternatively, use the command below:
systemctl status -l keepalived
Download KubeKey
Kubekey is the brand-new installer which provides an easy, fast and flexible way to install Kubernetes and KubeSphere v3.0.0.
Follow the step below to download KubeKey.
Download KubeKey from its GitHub Release Page or use the following command directly.
curl -sfL https://get-kk.kubesphere.io | VERSION=v1.0.1 sh -
Run the following command first to make sure you download KubeKey from the correct zone.
export KKZONE=cn
Run the following command to download KubeKey:
curl -sfL https://get-kk.kubesphere.io | VERSION=v1.0.1 sh -
Note
After you download KubeKey, if you transfer it to a new machine also with poor network connections to Googleapis, you must run
export KKZONE=cn again before you proceed with the steps below.Note
The commands above download the latest release (v1.0.1) of KubeKey. You can change the version number in the command to download a specific version.
Make kk executable:
chmod +x kk
Create a High Availability Cluster
With KubeKey, you can install Kubernetes and KubeSphere together. You have the option to create a multi-node cluster by customizing parameters in the configuration file.
Create a Kubernetes cluster with KubeSphere installed (for example, --with-kubesphere v3.0.0):
./kk create config --with-kubernetes v1.17.9 --with-kubesphere v3.0.0
Note
-
The following Kubernetes versions have been fully tested with KubeSphere: v1.15.12, v1.16.13, v1.17.9 (default) and v1.18.6.
-
If you do not add the flag
--with-kubespherein the command in this step, KubeSphere will not be deployed unless you install it using theaddonsfield in the configuration file or add this flag again when you use./kk create clusterlater. -
If you add the flag
--with-kubespherewithout specifying a KubeSphere version, the latest version of KubeSphere will be installed.
A default file config-sample.yaml will be created. Modify it according to your environment.
vi config-sample.yaml
apiVersion: kubekey.kubesphere.io/v1alpha1
kind: Cluster
metadata:
  name: config-sample
spec:
  hosts:
  - {name: master1, address: 10.10.71.214, internalAddress: 10.10.71.214, password: P@ssw0rd!}
  - {name: master2, address: 10.10.71.73, internalAddress: 10.10.71.73, password: P@ssw0rd!}
  - {name: master3, address: 10.10.71.62, internalAddress: 10.10.71.62, password: P@ssw0rd!}
  - {name: node1, address: 10.10.71.75, internalAddress: 10.10.71.75, password: P@ssw0rd!}
  - {name: node2, address: 10.10.71.76, internalAddress: 10.10.71.76, password: P@ssw0rd!}
  - {name: node3, address: 10.10.71.79, internalAddress: 10.10.71.79, password: P@ssw0rd!}
  roleGroups:
    etcd:
    - master1
    - master2
    - master3
    master:
    - master1
    - master2
    - master3
    worker:
    - node1
    - node2
    - node3
  controlPlaneEndpoint:
    domain: lb.kubesphere.local
    # vip
    address: "10.10.71.67"
    port: "6443"
  kubernetes:
    version: v1.17.9
    imageRepo: kubesphere
    clusterName: cluster.local
    masqueradeAll: false  # masqueradeAll tells kube-proxy to SNAT everything if using the pure iptables proxy mode. [Default: false]
    maxPods: 110  # maxPods is the number of pods that can run on this Kubelet. [Default: 110]
    nodeCidrMaskSize: 24  # internal network node size allocation. This is the size allocated to each node on your network. [Default: 24]
    proxyMode: ipvs  # mode specifies which proxy mode to use. [Default: ipvs]
  network:
    plugin: calico
    calico:
      ipipMode: Always  # IPIP Mode to use for the IPv4 POOL created at start up. If set to a value other than Never, vxlanMode should be set to "Never". [Always | CrossSubnet | Never] [Default: Always]
      vxlanMode: Never  # VXLAN Mode to use for the IPv4 POOL created at start up. If set to a value other than Never, ipipMode should be set to "Never". [Always | CrossSubnet | Never] [Default: Never]
      vethMTU: 1440  # The maximum transmission unit (MTU) setting determines the largest packet size that can be transmitted through your network. [Default: 1440]
    kubePodsCIDR: 10.233.64.0/18
    kubeServiceCIDR: 10.233.0.0/18
  registry:
    registryMirrors: []
    insecureRegistries: []
    privateRegistry: ""
  storage:
    defaultStorageClass: localVolume
    localVolume:
      storageClassName: local

---
apiVersion: installer.kubesphere.io/v1alpha1
kind: ClusterConfiguration
metadata:
  name: ks-installer
  namespace: kubesphere-system
  labels:
    version: v3.0.0
spec:
  local_registry: ""
  persistence:
    storageClass: ""
  authentication:
    jwtSecret: ""
  etcd:
    monitoring: true        # Whether to install etcd monitoring dashboard
    endpointIps: 192.168.0.7,192.168.0.8,192.168.0.9  # etcd cluster endpointIps
    port: 2379              # etcd port
    tlsEnable: true
  common:
    mysqlVolumeSize: 20Gi # MySQL PVC size
    minioVolumeSize: 20Gi # Minio PVC size
    etcdVolumeSize: 20Gi  # etcd PVC size
    openldapVolumeSize: 2Gi   # openldap PVC size
    redisVolumSize: 2Gi # Redis PVC size
    es:  # Storage backend for logging, tracing, events and auditing.
      elasticsearchMasterReplicas: 1   # total number of master nodes, it's not allowed to use even number
      elasticsearchDataReplicas: 1     # total number of data nodes
      elasticsearchMasterVolumeSize: 4Gi   # Volume size of Elasticsearch master nodes
      elasticsearchDataVolumeSize: 20Gi    # Volume size of Elasticsearch data nodes
      logMaxAge: 7                     # Log retention time in built-in Elasticsearch, it is 7 days by default.
      elkPrefix: logstash              # The string making up index names. The index name will be formatted as ks-<elk_prefix>-log
      # externalElasticsearchUrl:
      # externalElasticsearchPort:
  console:
    enableMultiLogin: false  # enable/disable multiple sing on, it allows an account can be used by different users at the same time.
    port: 30880
  alerting:                # Whether to install KubeSphere alerting system. It enables Users to customize alerting policies to send messages to receivers in time with different time intervals and alerting levels to choose from.
    enabled: false
  auditing:                # Whether to install KubeSphere audit log system. It provides a security-relevant chronological set of records,recording the sequence of activities happened in platform, initiated by different tenants.
    enabled: false
  devops:                  # Whether to install KubeSphere DevOps System. It provides out-of-box CI/CD system based on Jenkins, and automated workflow tools including Source-to-Image & Binary-to-Image
    enabled: false
    jenkinsMemoryLim: 2Gi      # Jenkins memory limit
    jenkinsMemoryReq: 1500Mi   # Jenkins memory request
    jenkinsVolumeSize: 8Gi     # Jenkins volume size
    jenkinsJavaOpts_Xms: 512m  # The following three fields are JVM parameters
    jenkinsJavaOpts_Xmx: 512m
    jenkinsJavaOpts_MaxRAM: 2g
  events:                  # Whether to install KubeSphere events system. It provides a graphical web console for Kubernetes Events exporting, filtering and alerting in multi-tenant Kubernetes clusters.
    enabled: false
  logging:                 # Whether to install KubeSphere logging system. Flexible logging functions are provided for log query, collection and management in a unified console. Additional log collectors can be added, such as Elasticsearch, Kafka and Fluentd.
    enabled: false
    logsidecarReplicas: 2
  metrics_server:                    # Whether to install metrics-server. IT enables HPA (Horizontal Pod Autoscaler).
    enabled: true
  monitoring:                        #
    prometheusReplicas: 1            # Prometheus replicas are responsible for monitoring different segments of data source and provide high availability as well.
    prometheusMemoryRequest: 400Mi   # Prometheus request memory
    prometheusVolumeSize: 20Gi       # Prometheus PVC size
    alertmanagerReplicas: 1          # AlertManager Replicas
  multicluster:
    clusterRole: none  # host | member | none  # You can install a solo cluster, or specify it as the role of host or member cluster
  networkpolicy:       # Network policies allow network isolation within the same cluster, which means firewalls can be set up between certain instances (Pods).
    enabled: false
  notification:        # It supports notification management in multi-tenant Kubernetes clusters. It allows you to set AlertManager as its sender, and receivers include Email, Wechat Work, and Slack.
    enabled: false
  openpitrix:          # Whether to install KubeSphere App Store. It provides an application store for Helm-based applications, and offer application lifecycle management
    enabled: false
  servicemesh:         # Whether to install KubeSphere Service Mesh (Istio-based). It provides fine-grained traffic management, observability and tracing, and offer visualization for traffic topology
    enabled: false
Create a cluster using the configuration file you customized above:
./kk create cluster -f config-sample.yaml
Verify the Multi-node Installation
Inspect the logs of installation by executing the command below:
kubectl logs -n kubesphere-system $(kubectl get pod -n kubesphere-system -l app=ks-install -o jsonpath='{.items[0].metadata.name}') -f
If you can see the welcome log return, it means the installation is successful. Your cluster is up and running.
**************************************************
#####################################################
###              Welcome to KubeSphere!           ###
#####################################################
Console: http://10.10.71.214:30880
Account: admin
Password: P@88w0rd
NOTES:
  1. After logging into the console, please check the
     monitoring status of service components in
     the "Cluster Management". If any service is not
     ready, please wait patiently until all components
     are ready.
  2. Please modify the default password after login.
#####################################################
https://kubesphere.io             2020-08-15 23:32:12
#####################################################
Log in to the Console
You will be able to use default account and password admin/P@88w0rd to log in to the console http://{$IP}:30880 to take a tour of KubeSphere. Please change the default password after login.
Enable Pluggable Components (Optional)
The example above demonstrates the process of a default minimal installation. To enable other components in KubeSphere, see Enable Pluggable Components for more details.
 Previous

What’s on this Page