


You are viewing documentation for KubeSphere version:v3.0.0
KubeSphere v3.0.0 documentation is no longer actively maintained. The version you are currently viewing is a static snapshot. For up-to-date documentation, see the latest version.


Create a Pipeline Using Graphical Editing Panels
A graphical editing panel in KubeSphere contains all the necessary operations used in Jenkins stages and steps. You can directly define these stages and steps on the interactive panel without creating any Jenkinsfile.
This tutorial demonstrates how to create a pipeline through graphical editing panels in KubeSphere. During the whole process, you do not need to create any Jenkinsfile manually as KubeSphere will automatically generate one based on your settings on the editing panels. When the pipeline successful runs, it creates a Deployment and a Service accordingly in your development environment and pushes an image to Docker Hub.
Prerequisites
- You need to enable the KubeSphere DevOps System.
- You need to have a Docker Hub account.
- You need to create a workspace, a DevOps project, and an account (
project-regular). This account must be invited to the DevOps project with theoperatorrole. See Create Workspaces, Projects, Accounts and Roles if they are not ready. - Set CI dedicated nodes to run the pipeline. For more information, see Set CI Node for Dependency Cache.
- Configure your email server for pipeline notifications (Optional). For more information, see Set Email Server for KubeSphere Pipelines.
- Configure SonarQube to include code analysis as part of the pipeline (Optional). For more information, see Integrate SonarQube into Pipelines.
Pipeline Overview
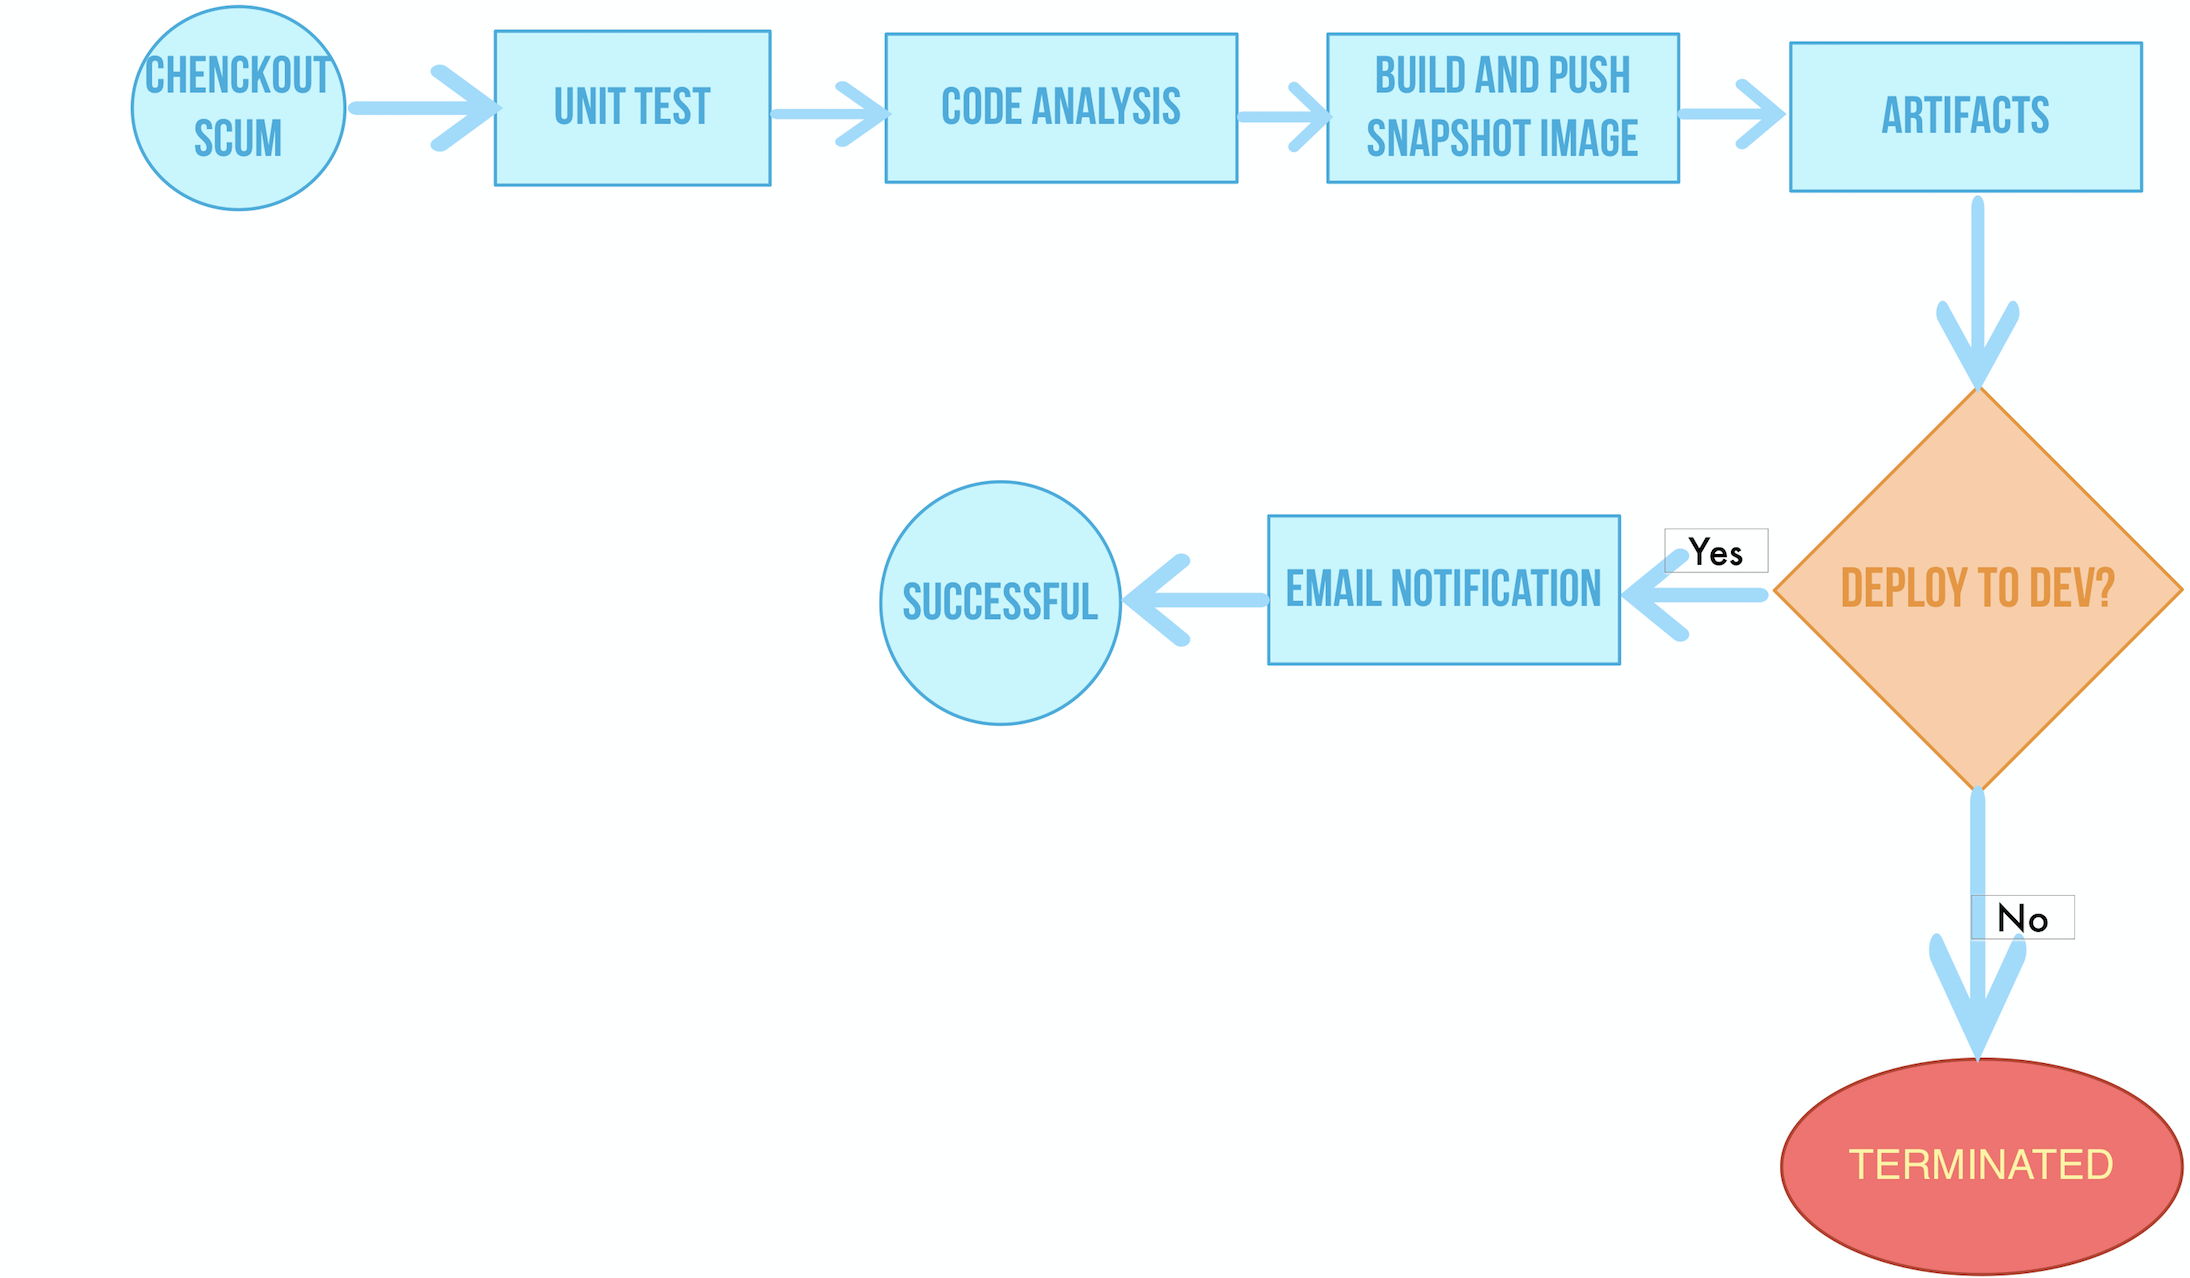
This example pipeline includes the following six stages.
Note
- Stage 1. Checkout SCM: Pull source code from a GitHub repository.
- Stage 2. Unit test: It will not proceed with the next stage unit the test is passed.
- Stage 3. Code analysis: Configure SonarQube for static code analysis.
- Stage 4. Build and push: Build an image and push it to Docker Hub with the tag
snapshot-$BUILD_NUMBER, the$BUILD_NUMBERof which is the record serial number in the pipeline’s activity list. - Stage 5. Artifacts: Generate an artifact (jar package) and save it.
- Stage 6. Deploy to DEV: Create a Deployment and a Service in the development environment. It requires review in this stage. An email notification will be sent after the Deployment is successful.
Hands-on Lab
Step 1: Create credentials
-
Log in to the KubeSphere console as
project-regular. Go to your DevOps project and create the following credentials in Credentials under Project Management. For more information about how to create credentials, see Credential Management.Note
If there are any special characters such as@and$in your account or password, they can cause errors as a pipeline runs because they may not be recognized. In this case, you need to encode your account or password on some third-party websites first, such as urlencoder. After that, copy and paste the output for your credential information.Credential ID Type Where to use dockerhub-id Account Credentials Docker Hub demo-kubeconfig kubeconfig Kubernetes -
You need to create an additional credential ID (
sonar-token) for SonarQube, which is used in stage 3 (Code analysis) mentioned above. Refer to Create SonarQube Token for New Project to use the token for the secret field below. Click OK to finish.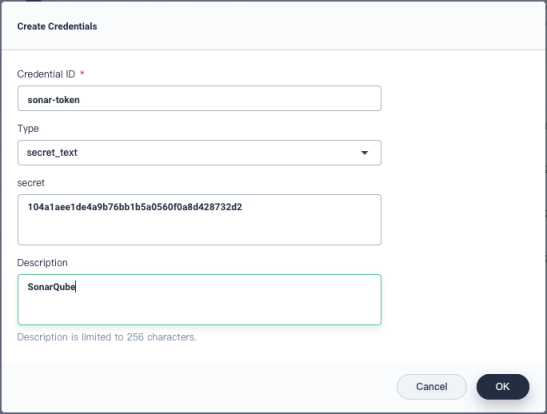
-
In total, you have three credentials in the list.

Step 2: Create a project
In this tutorial, the example pipeline will deploy the sample app to a project. Hence, you must create the project (for example, kubesphere-sample-dev) in advance. The Deployment and Service of the app will be created automatically in the project once the pipeline runs successfully.
You can use the account project-admin to create the project. Besides, this account is also the reviewer of the CI/CD pipeline. Make sure the account project-regular is invited to the project with the role of operator. For more information, see Create Workspaces, Projects, Accounts and Roles.
Step 3: Create a pipeline
-
Make sure you have logged in to KubeSphere as
project-regular, and then go to your DevOps project. Click Create in Pipelines.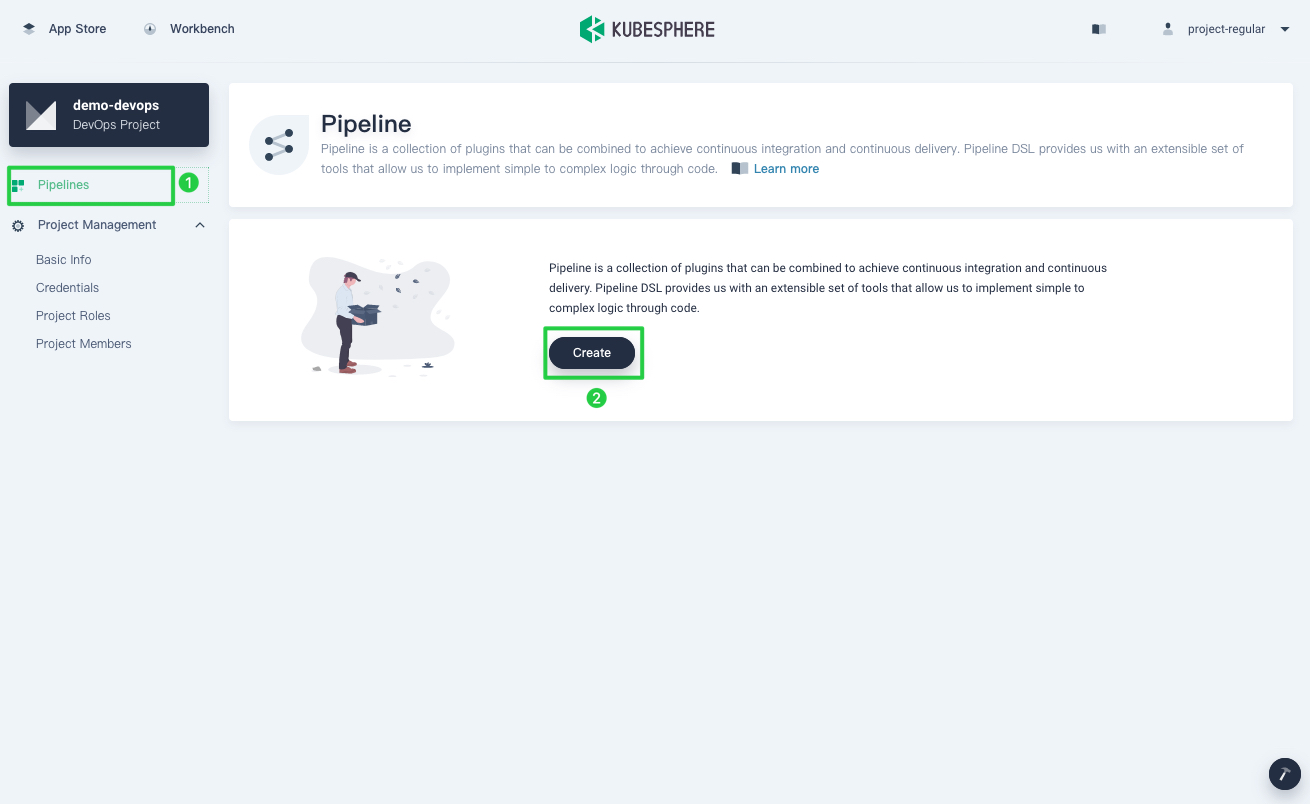
-
In the dialog that appears, name it
graphical-pipelineand click Next.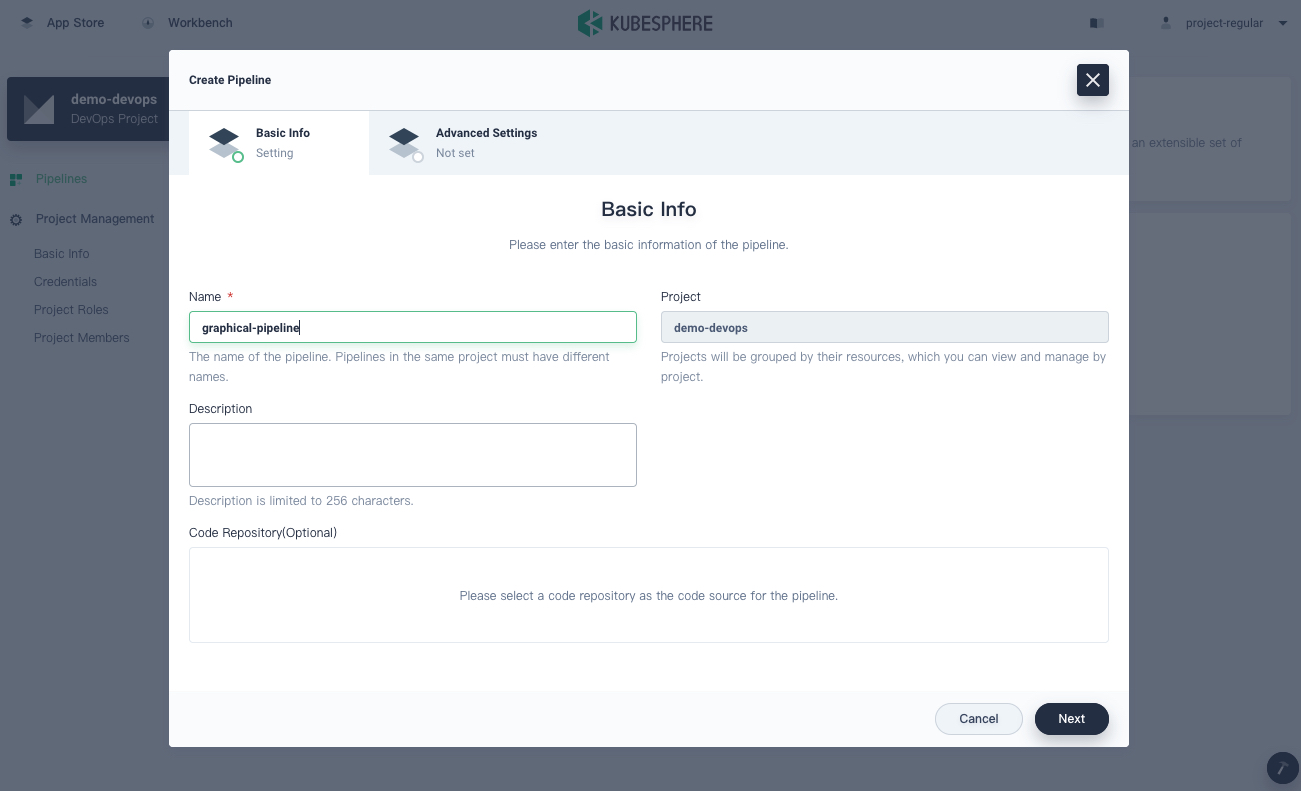
-
On the Advanced Settings page, click Add Parameter to add three string parameters as follows. These parameters will be used in the Docker command of the pipeline. Click Create when you finish adding.
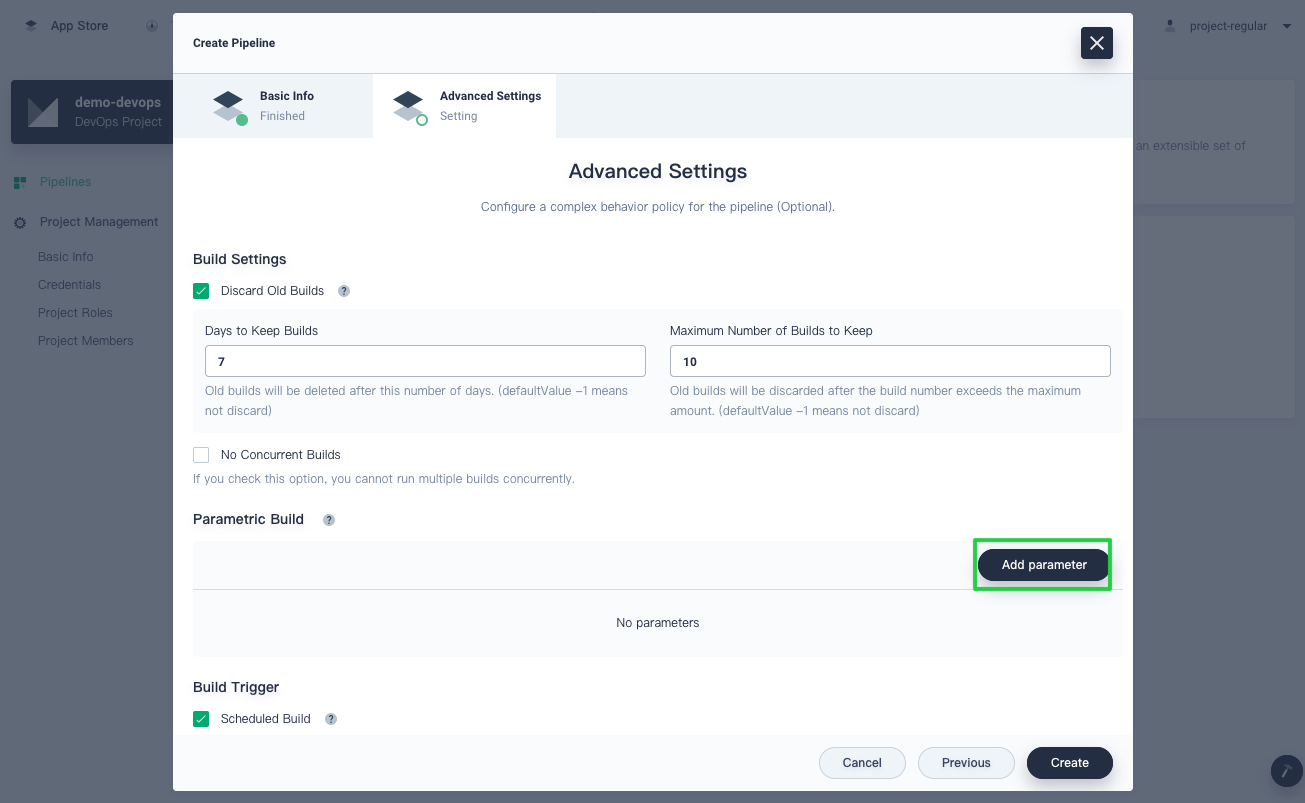
Parameter Type Name Value Description String REGISTRY docker.ioThis is the image registry address. This example uses docker.io.String DOCKERHUB_NAMESPACE Docker ID You Docker Hub account or the organization name under the account. String APP_NAME devops-sampleThe app name. Note
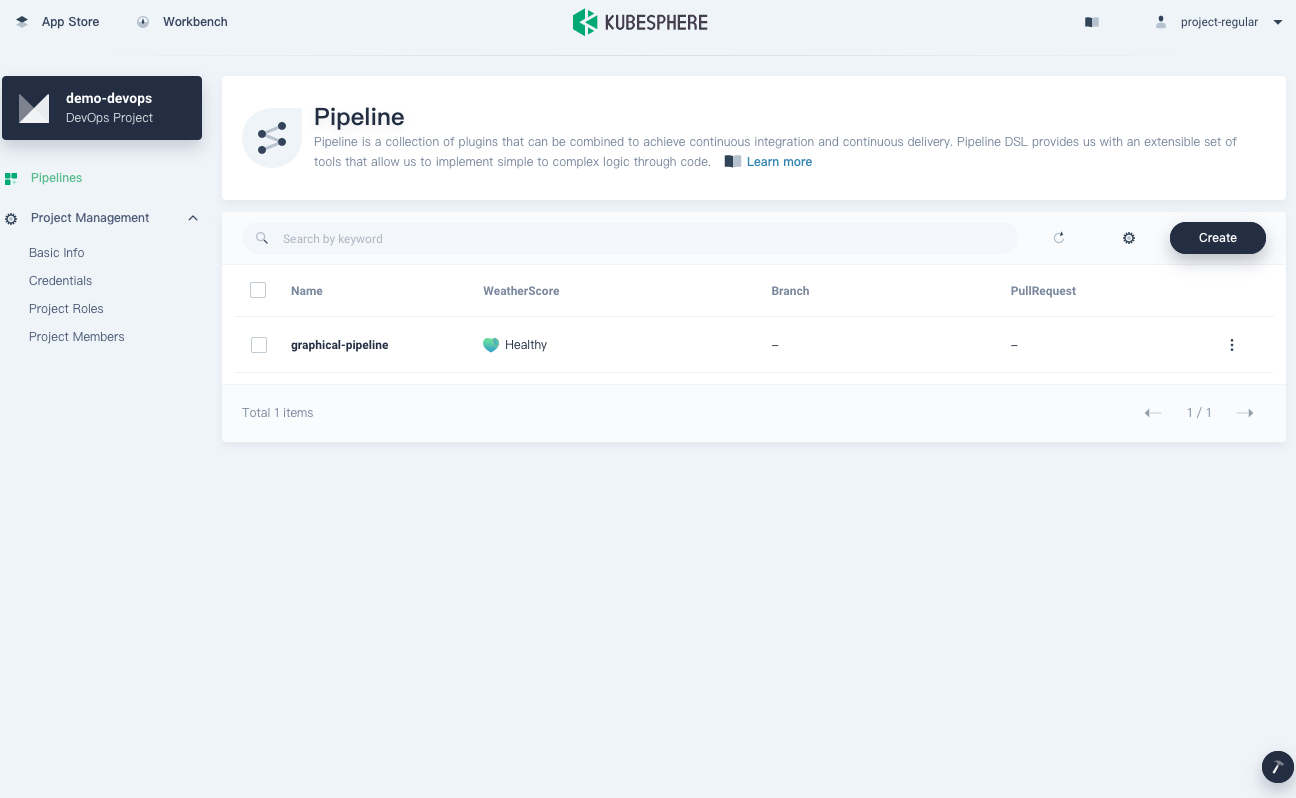
For other fields, use the default values directly or refer to Pipeline Settings to customize the configuration. -
The pipeline created will appear in the list.
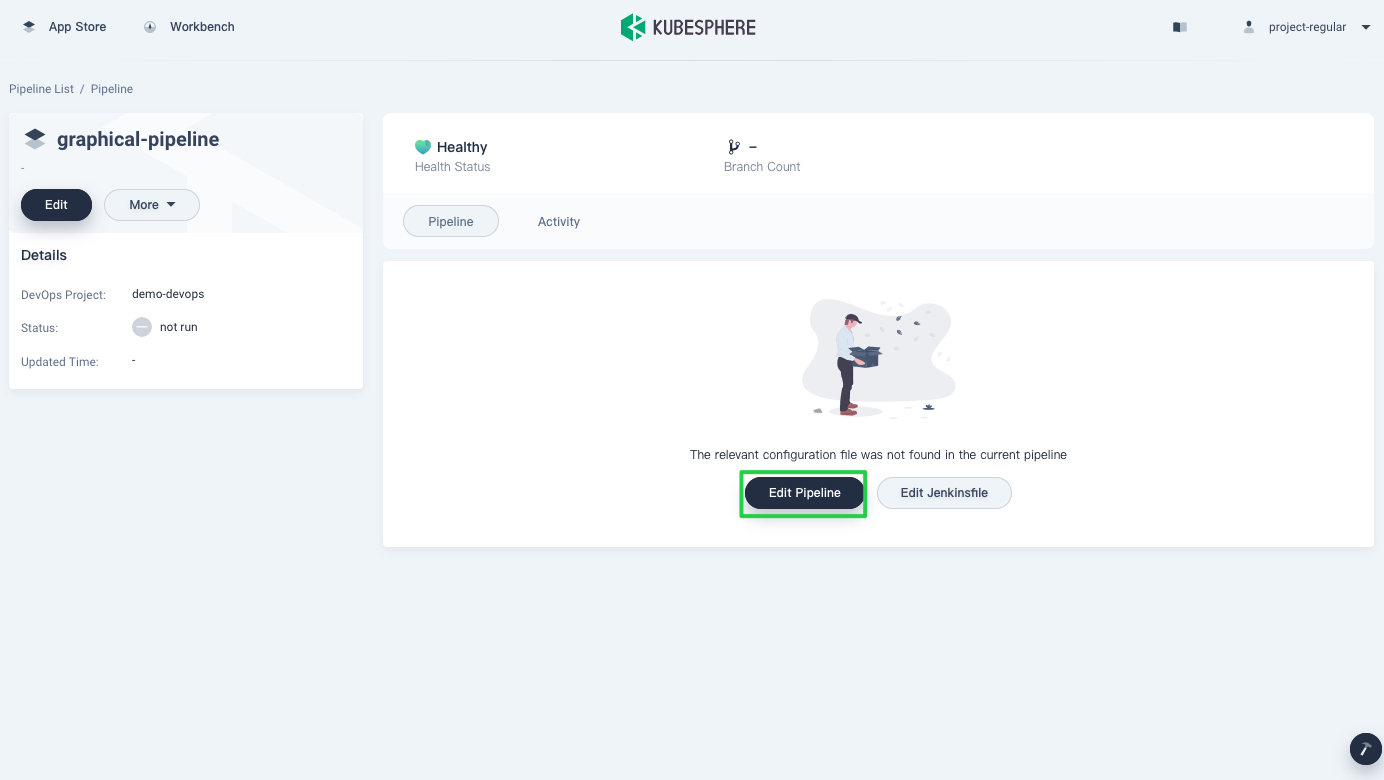
Step 4: Edit the pipeline
Click the pipeline to go to its detail page. To use graphical editing panels, click Edit Pipeline under the tab Pipeline. This pipeline consists of six stages. Follow the steps below to set each stage.
Note
You can also click Edit Jenkinsfile to create a Jenkinsfile manually for your pipeline.
Stage 1: Pull source code (Checkout SCM)
A graphical editing panel includes two areas - canvas on the left and content on the right. It automatically generates a Jenkinsfile based on how you configure different stages and steps, which is much more user-friendly for developers.
Note
Pipelines include declarative pipelines and scripted pipelines. Currently, you can create declarative pipelines through the panel. For more information about pipeline syntax, see Jenkins Documentation.
-
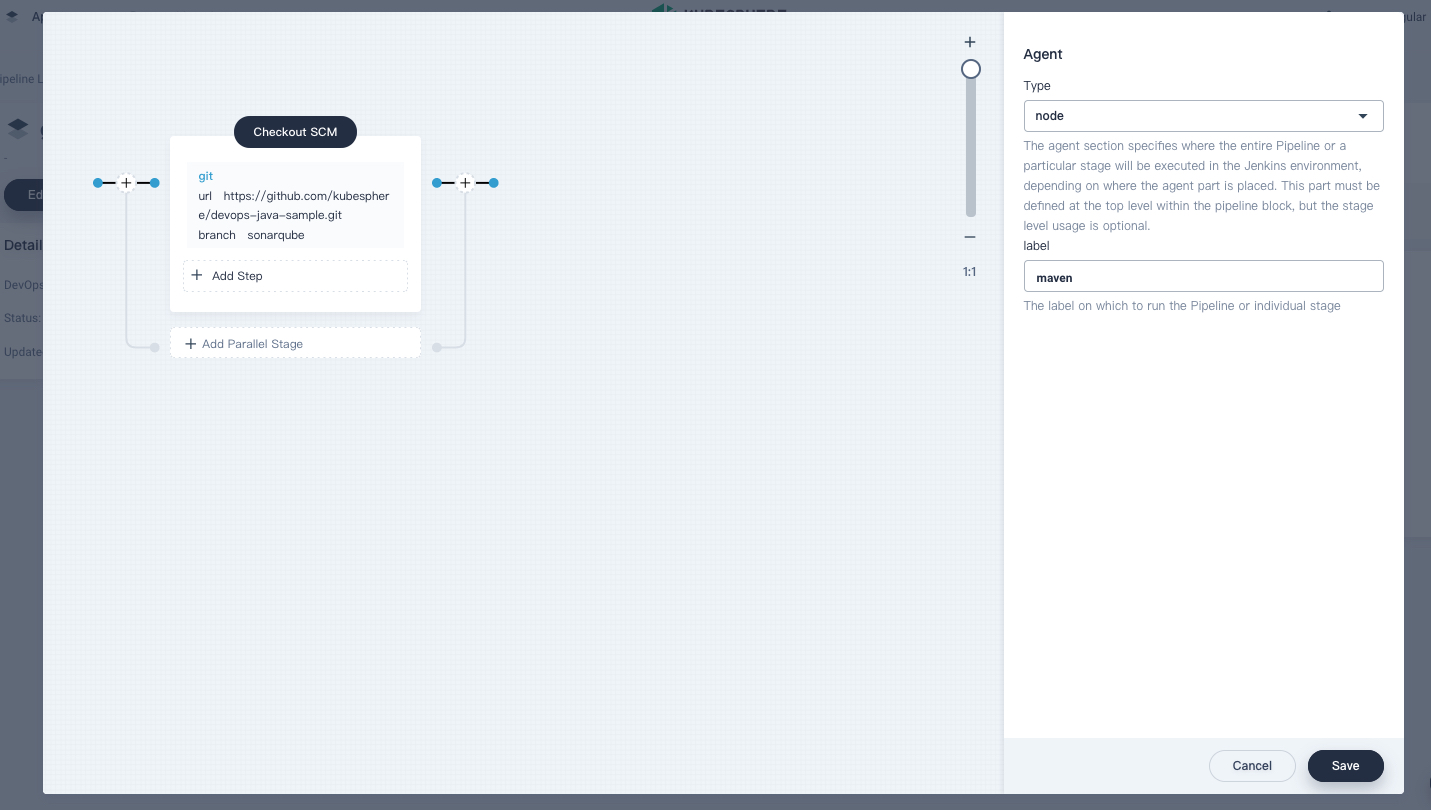
On the graphical editing panel, select node from the Type drop-down list and input
mavenfor label.Note
agentis used to define the execution environment. Theagentdirective tells Jenkins where and how to execute the pipeline. For more information, see Choose Jenkins Agent.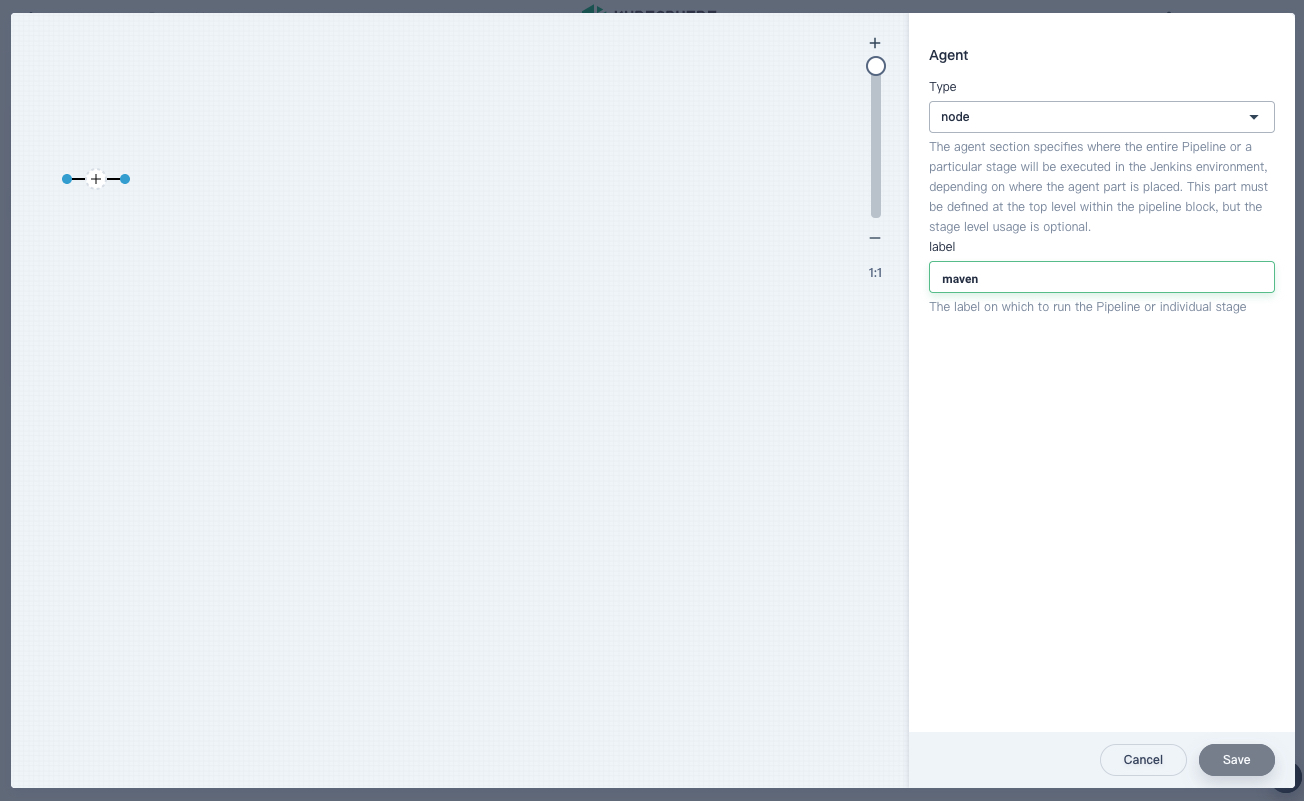
-
To add a stage, click the plus icon on the left. Click the box above the Add Step area and set a name (for example,
Checkout SCM) for the stage in the field Name on the right.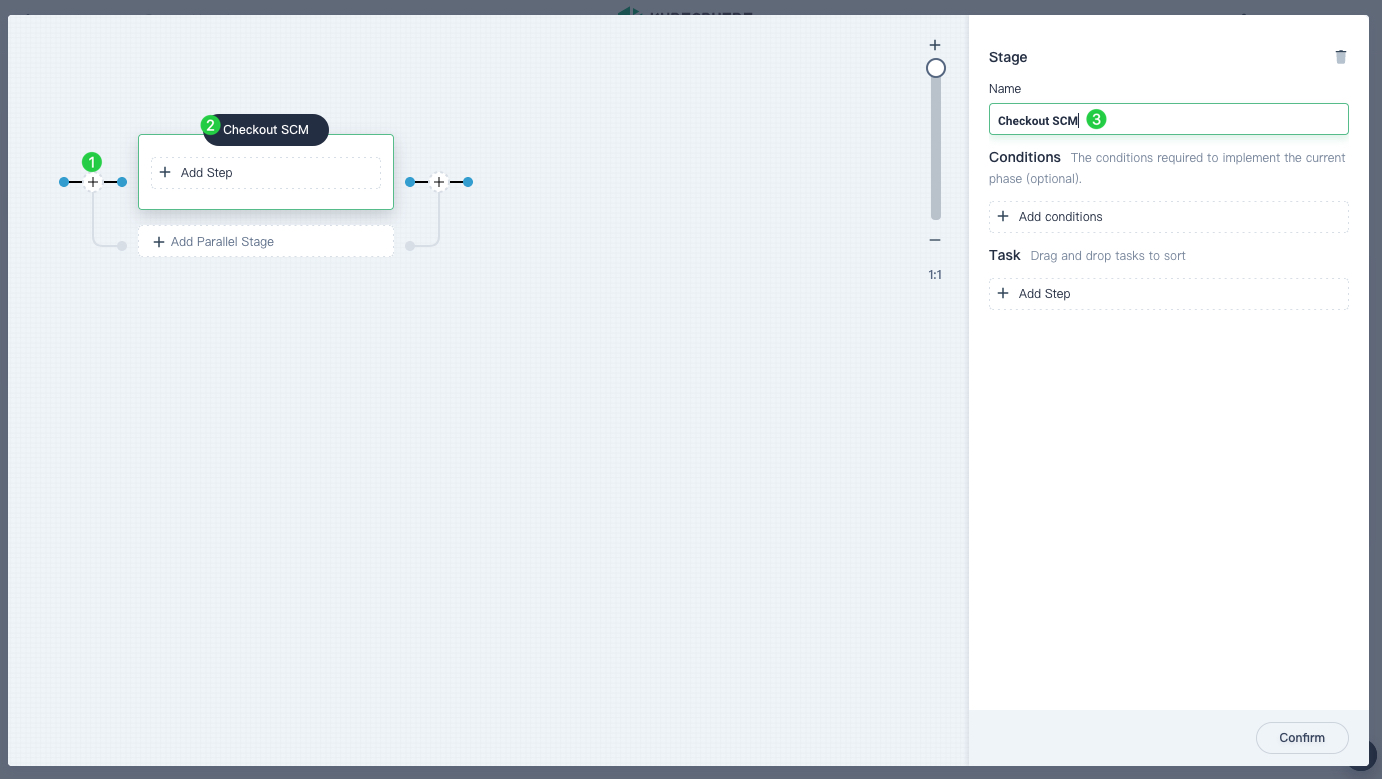
-
Click Add Step. Select git from the list as the example code is pulled from GitHub. In the dialog that appears, fill in the required field. Click OK to finish.
- Url. Enter the GitHub repository address
https://github.com/kubesphere/devops-java-sample.git. Note that this is an example and you need to use your own repository address. - Credential ID. You do not need to enter the Credential ID for this tutorial.
- Branch. It defaults to the master branch if you leave it blank. Enter
sonarqubeor leave it blank if you do not need the code analysis stage.
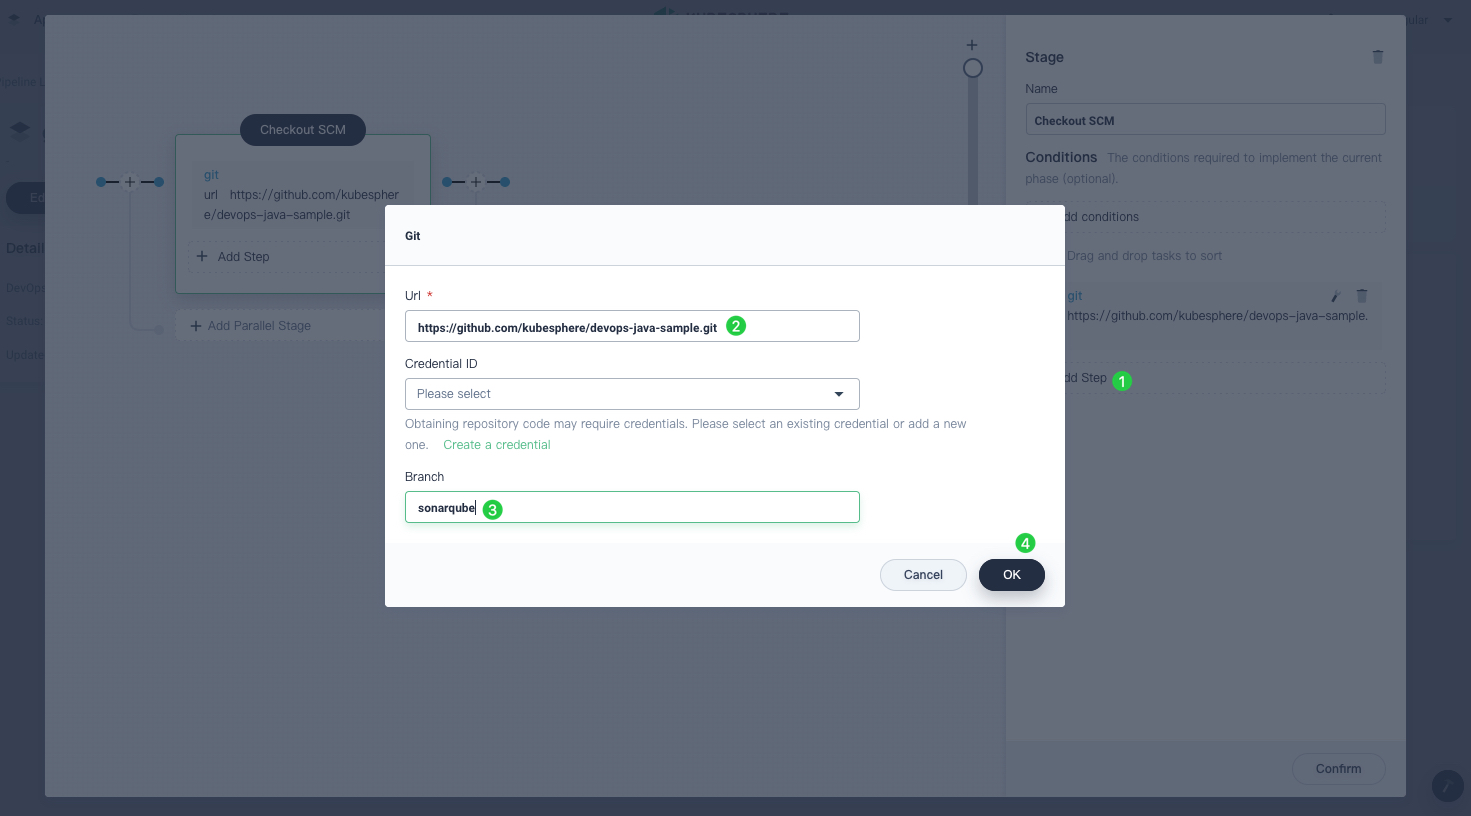
- Url. Enter the GitHub repository address
-
The first stage is now set.
Stage 2: Unit test
-
Click the plus icon on the right of stage 1 to add a new stage to perform a unit test in the container. Name it
Unit Test.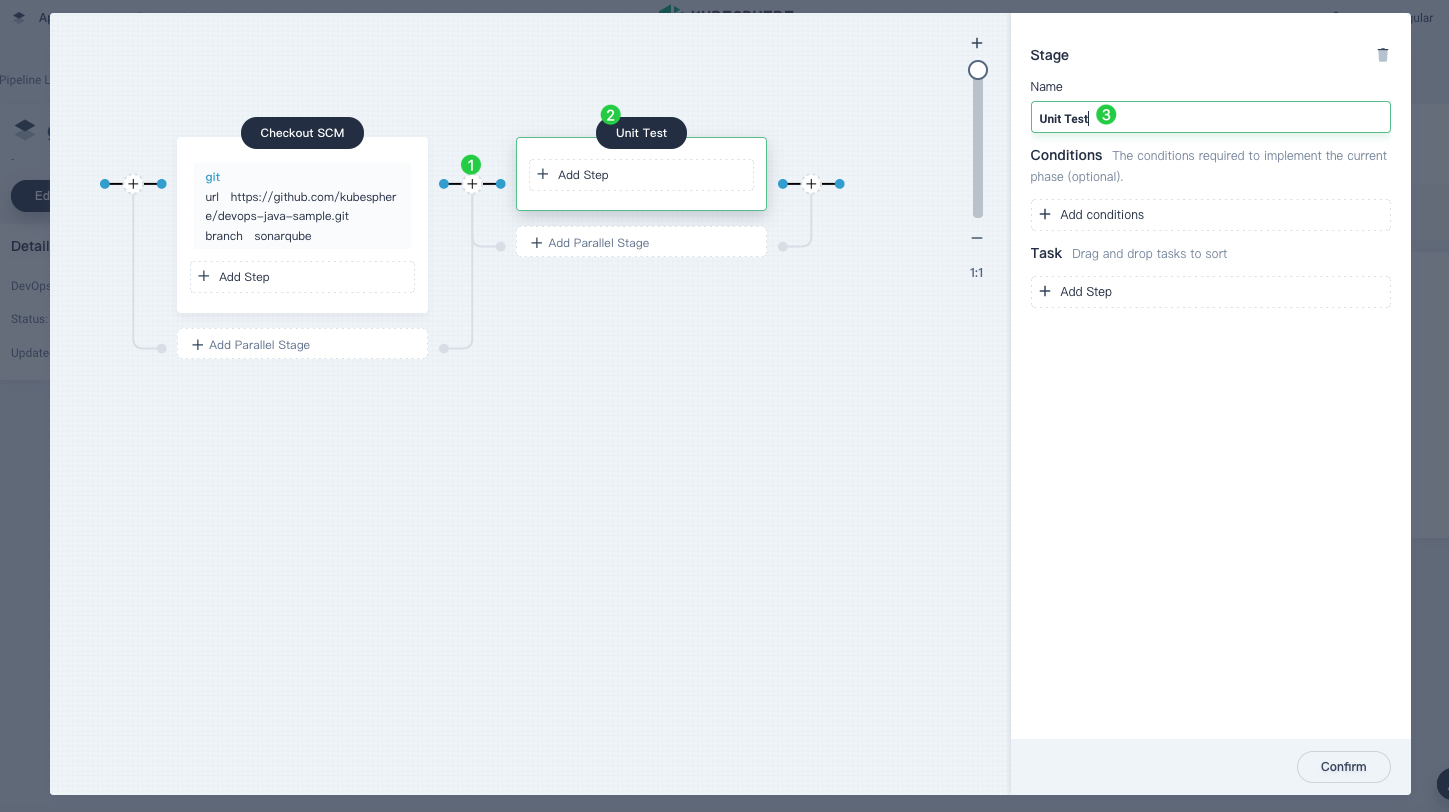
-
Click Add Step and select container from the list. Name it
mavenand then click OK.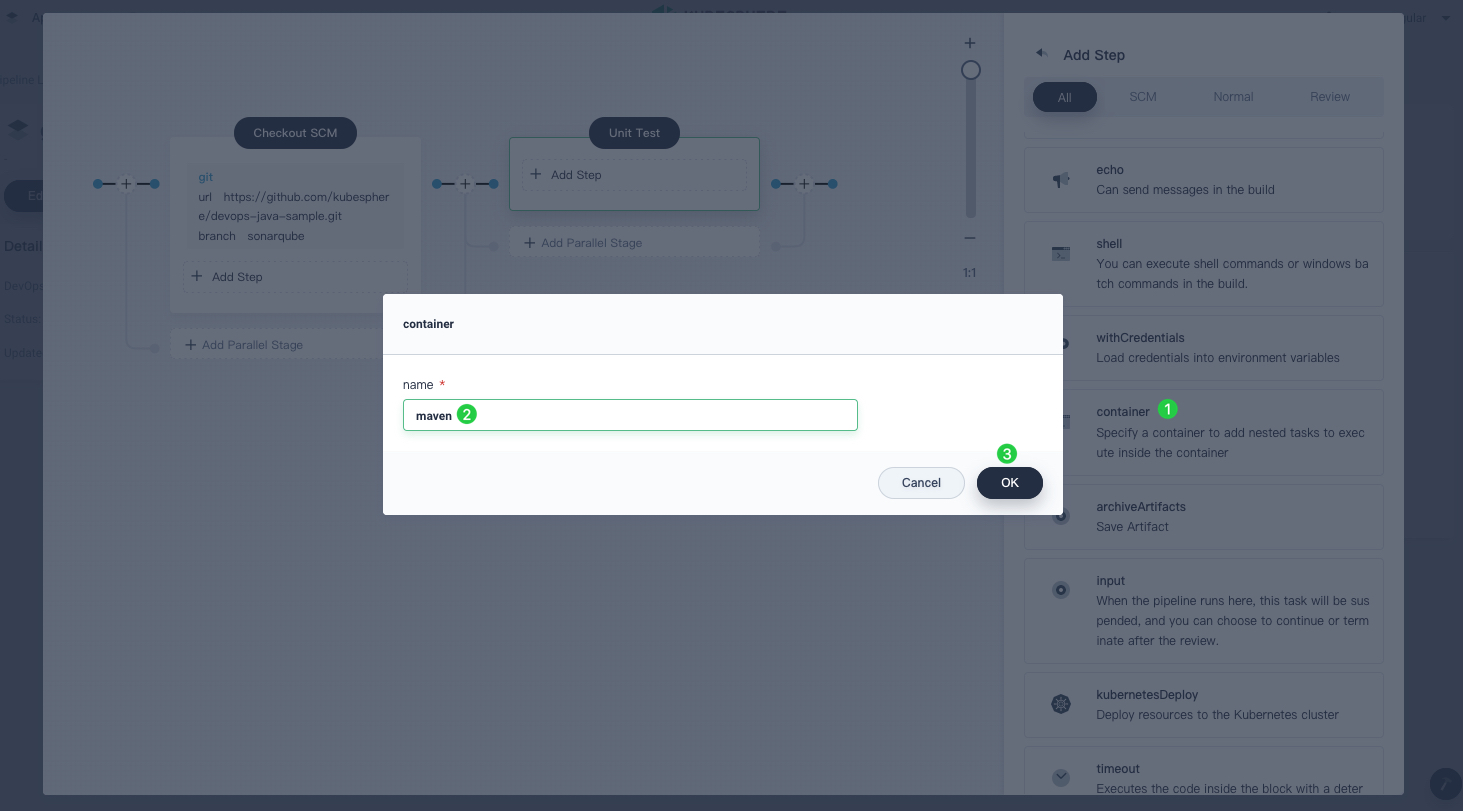
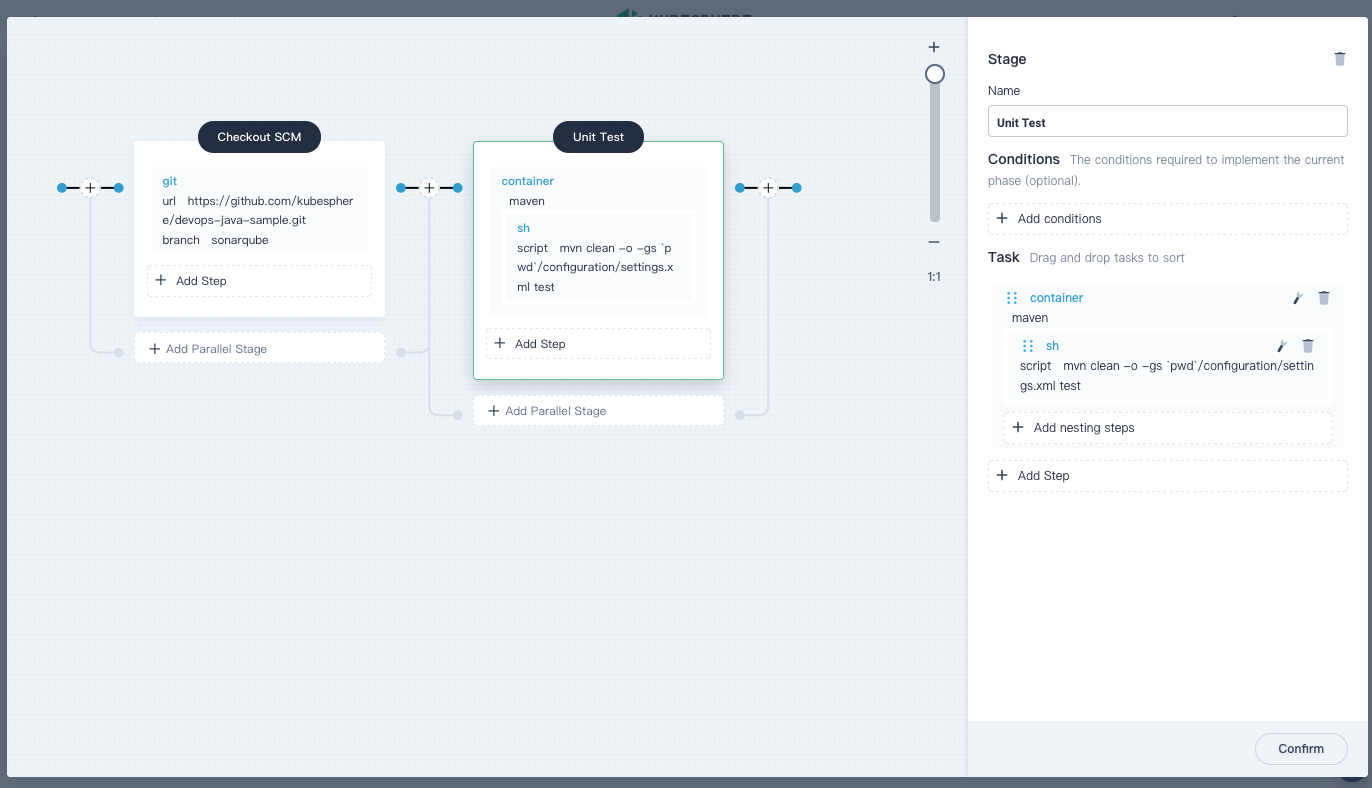
-
Click Add nesting steps to add a nested step under the
mavencontainer. Select shell from the list and enter the following command in the command line. Click OK to save it.mvn clean -o -gs `pwd`/configuration/settings.xml testNote
You can specify a series of steps to be executed in a given stage directive on the graphical editing panel.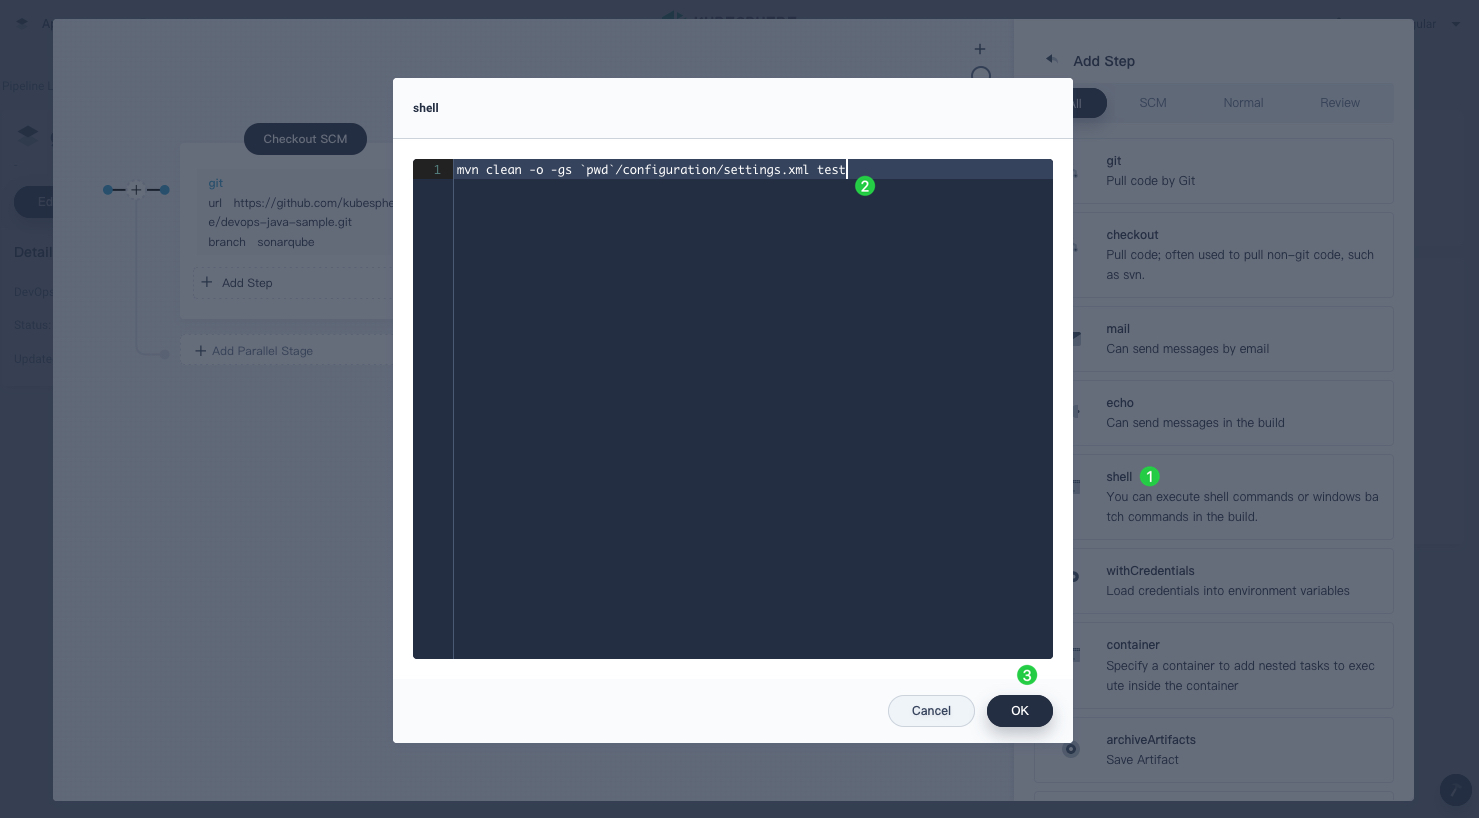
Stage 3: Code analysis (Optional)
This stage uses SonarQube to test your code. You can skip this stage if you do not need the analysis.
-
Click the plus icon on the right of the
Unit Teststage to add a stage for SonarQube code analysis in the container. Name itCode Analysis.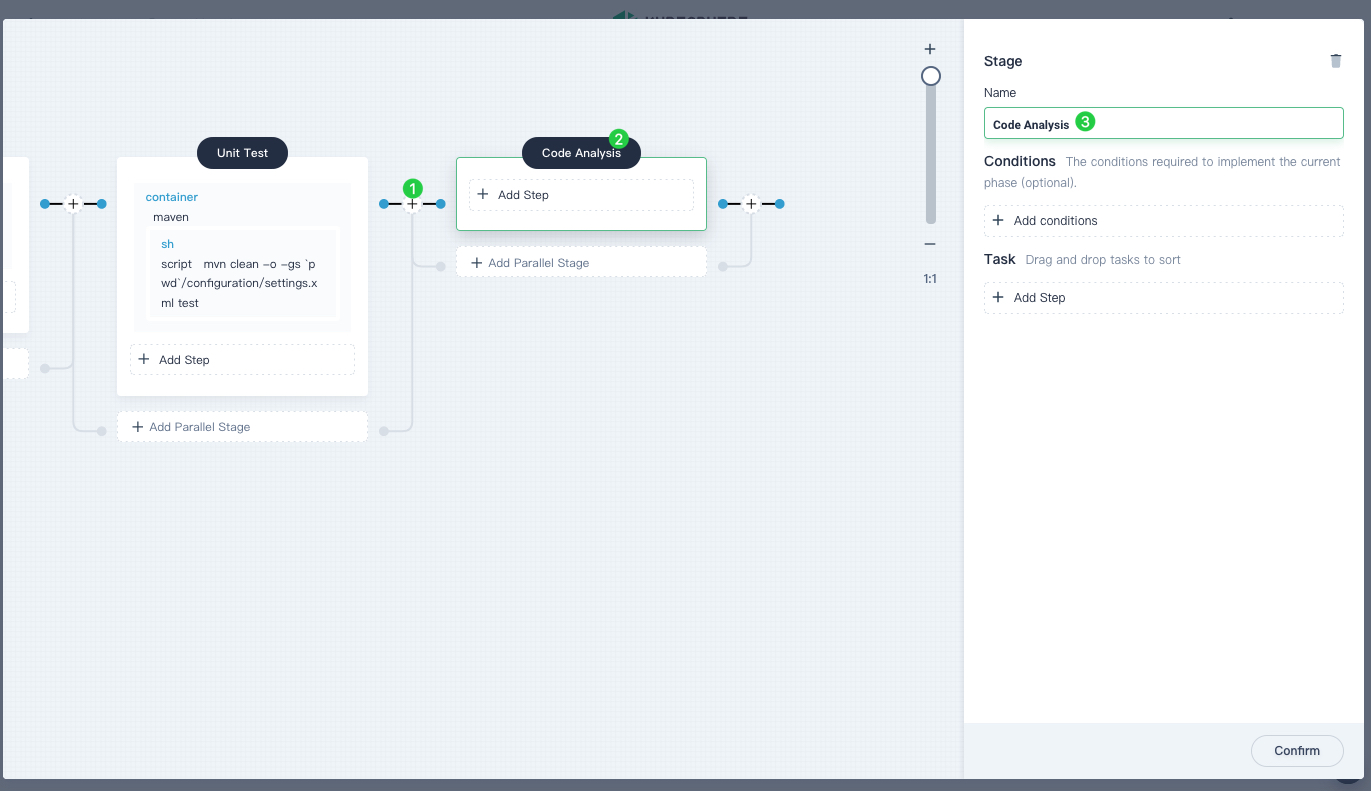
-
Click Add Step under Task in Code Analysis and select container. Name it
mavenand click OK.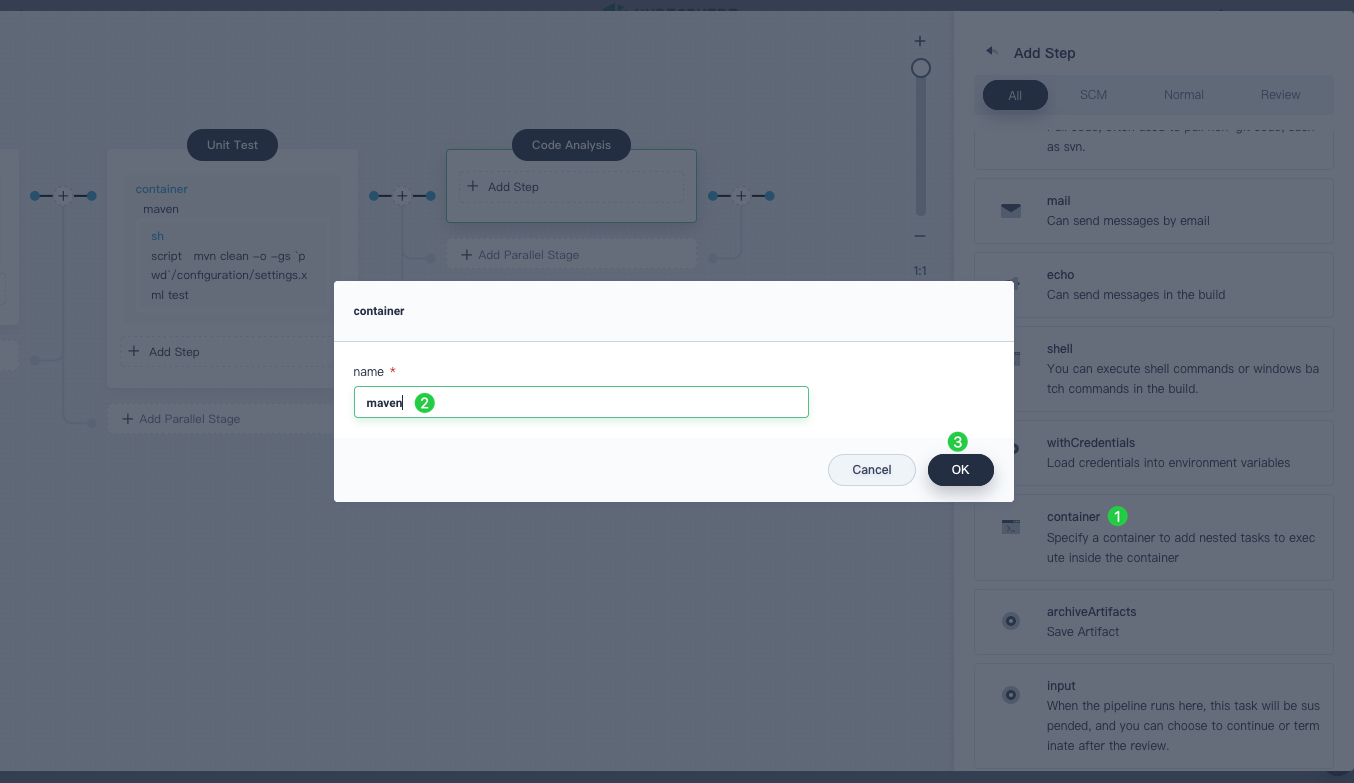
-
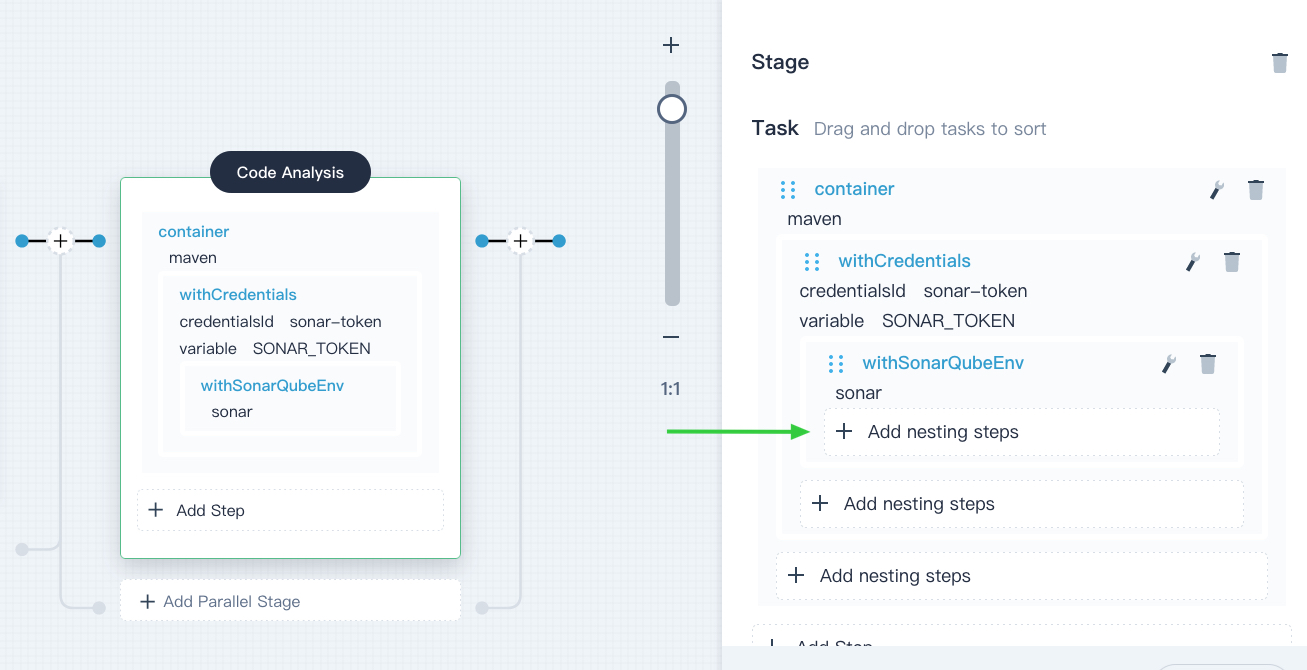
Click Add nesting steps under the
mavencontainer to add a nested step. Click withCredentials and select the SonarQube token (sonar-token) from the Credential ID list. InputSONAR_TOKENfor Text Variable, then click OK.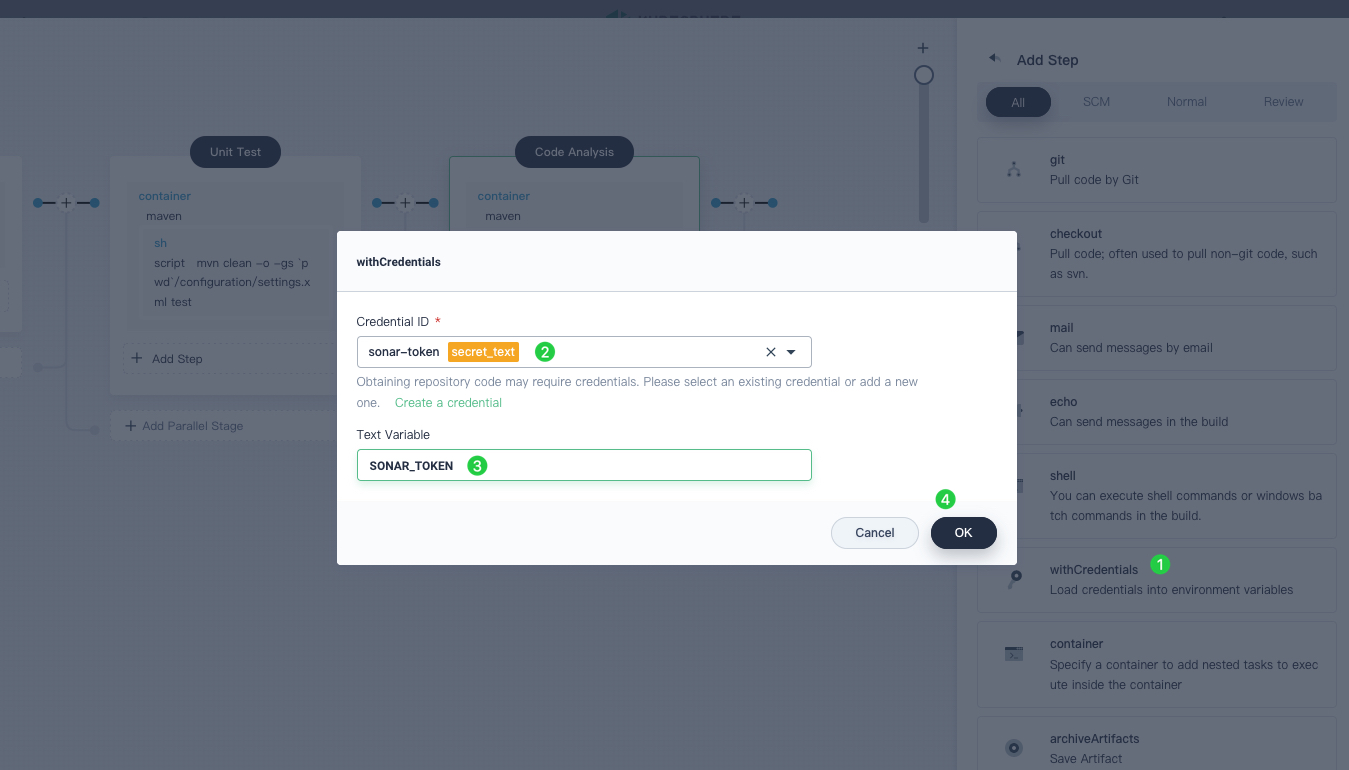
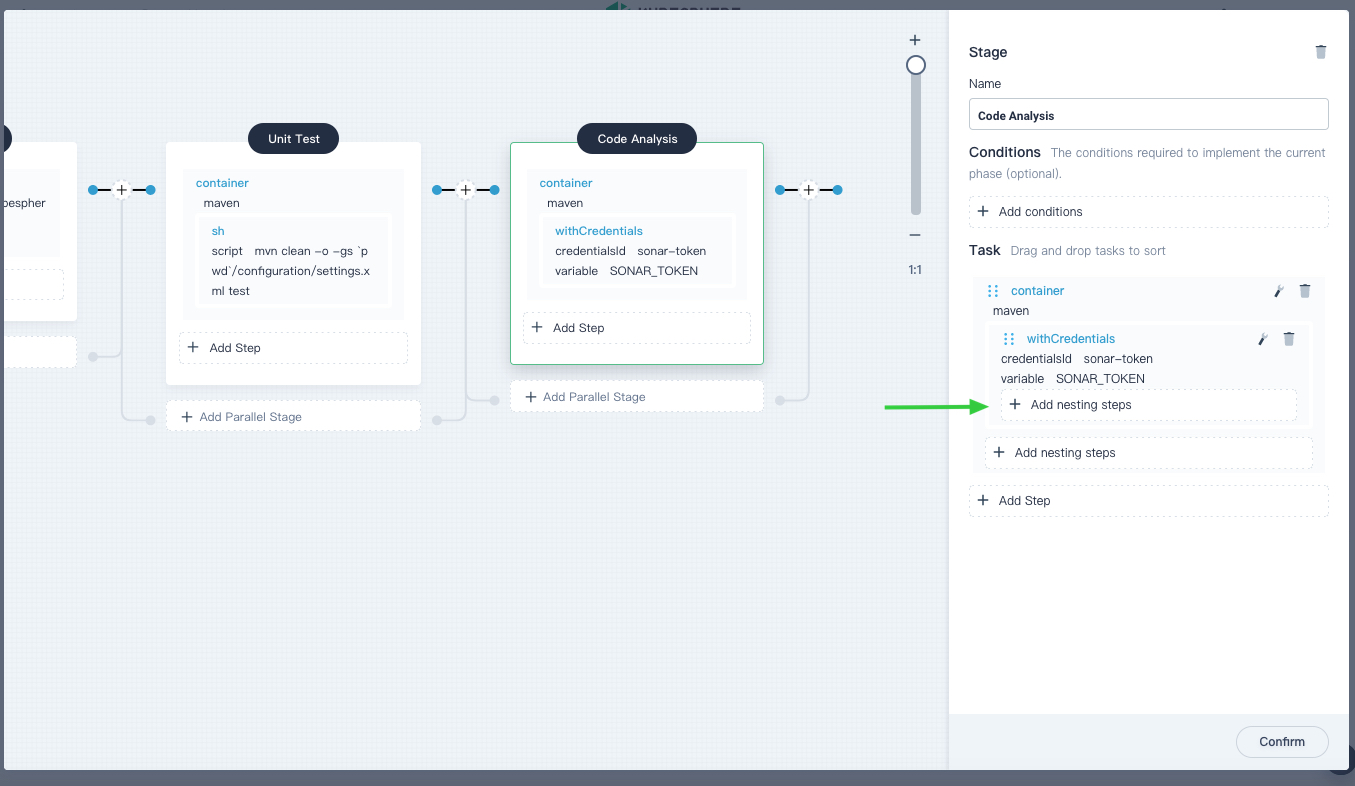
-
Under the withCredentials step, click Add Nesting steps to add a nested step for it.
-
Click withSonarQubeEnv. In the dialog that appears, do not change the default name
sonarand click OK to save it.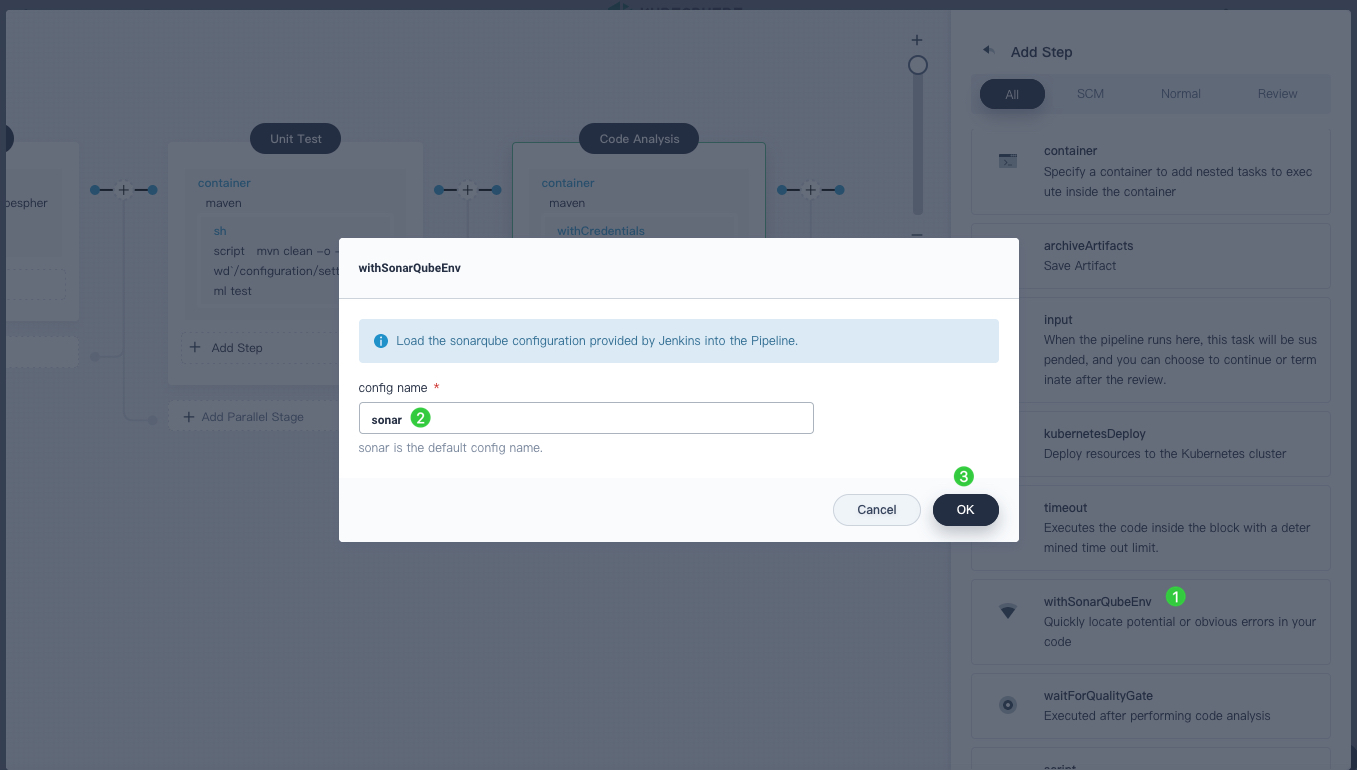
-
Under the withSonarQubeEnv step, click Add Nesting steps to add a nested step for it.
-
Click shell and enter the following command in the command line for the sonarqube branch and authentication. Click OK to finish.
mvn sonar:sonar -o -gs `pwd`/configuration/settings.xml -Dsonar.login=$SONAR_TOKEN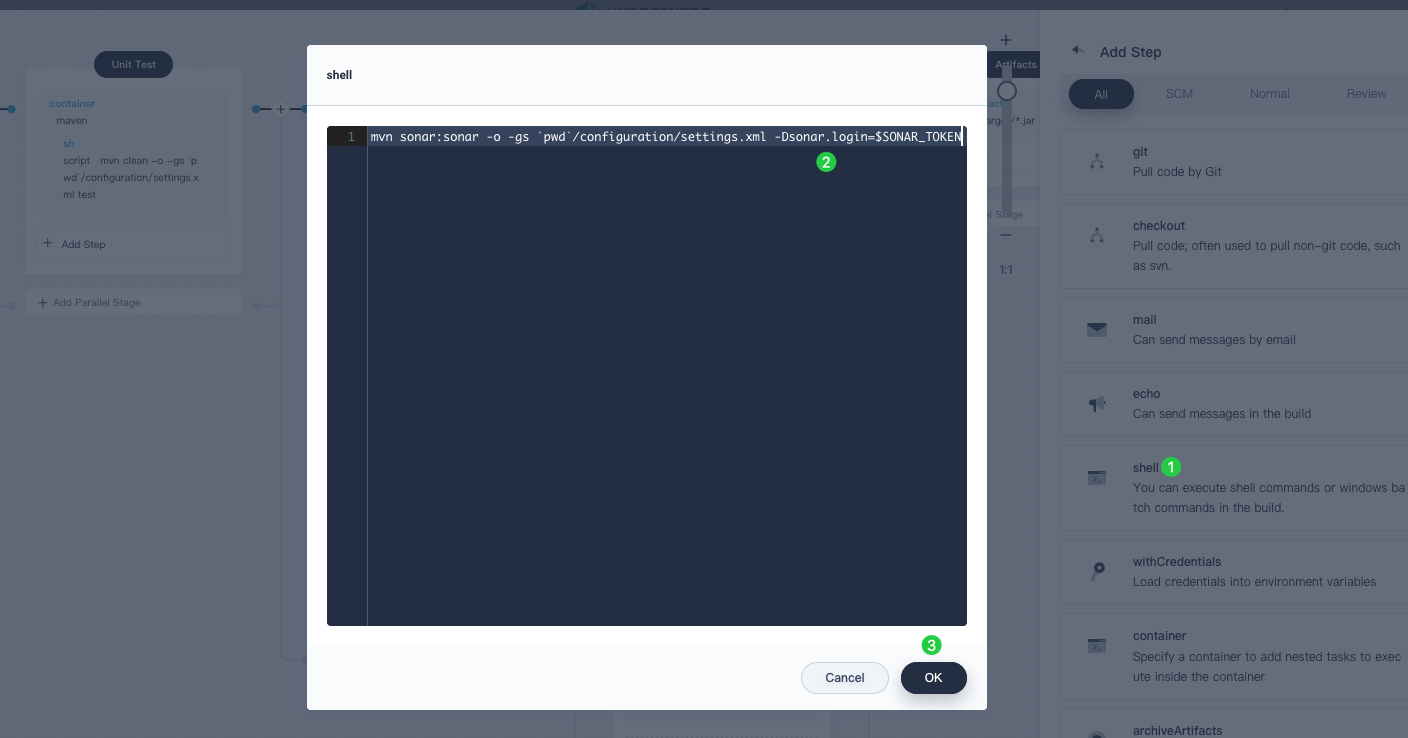
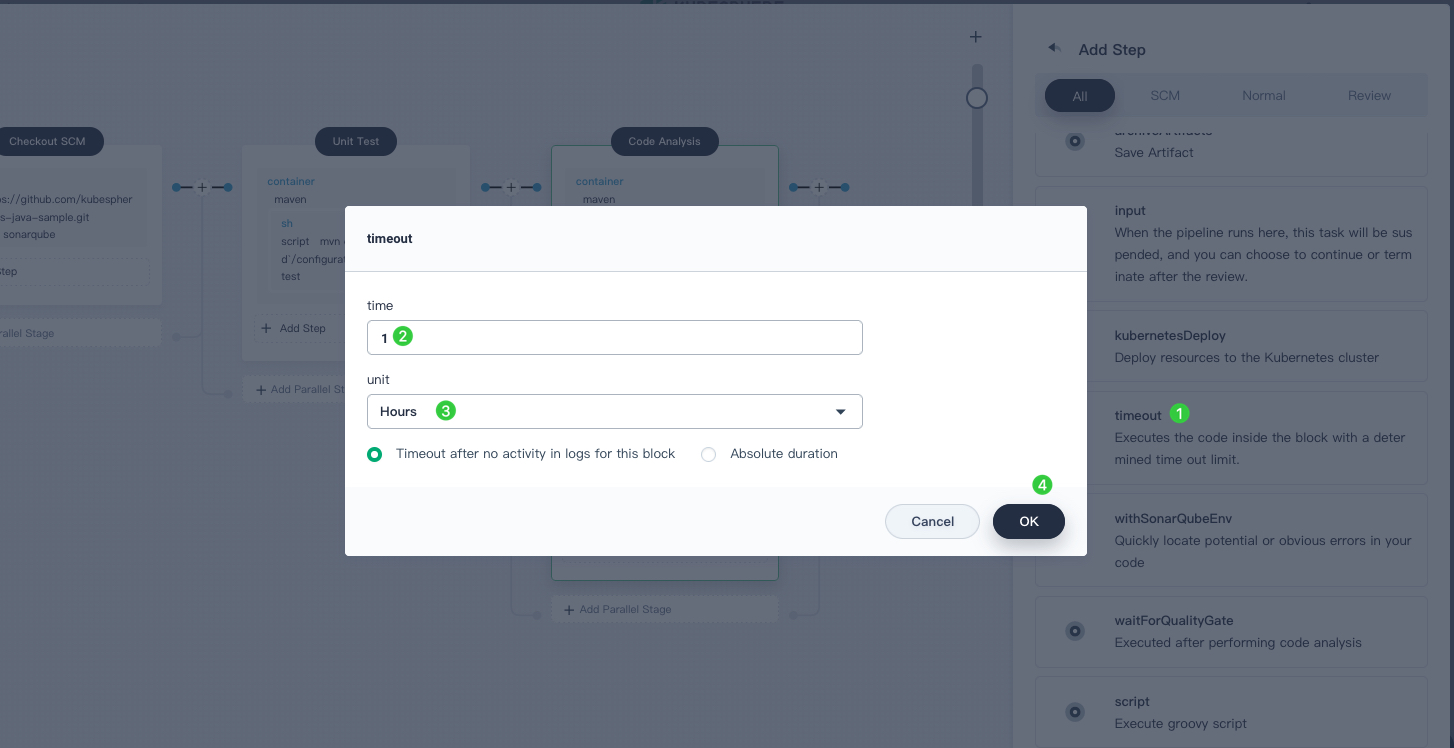
-
Click Add nesting steps (the third one) for the container step directly and select timeout. Input
1for time and select Hours for unit. Click OK to finish.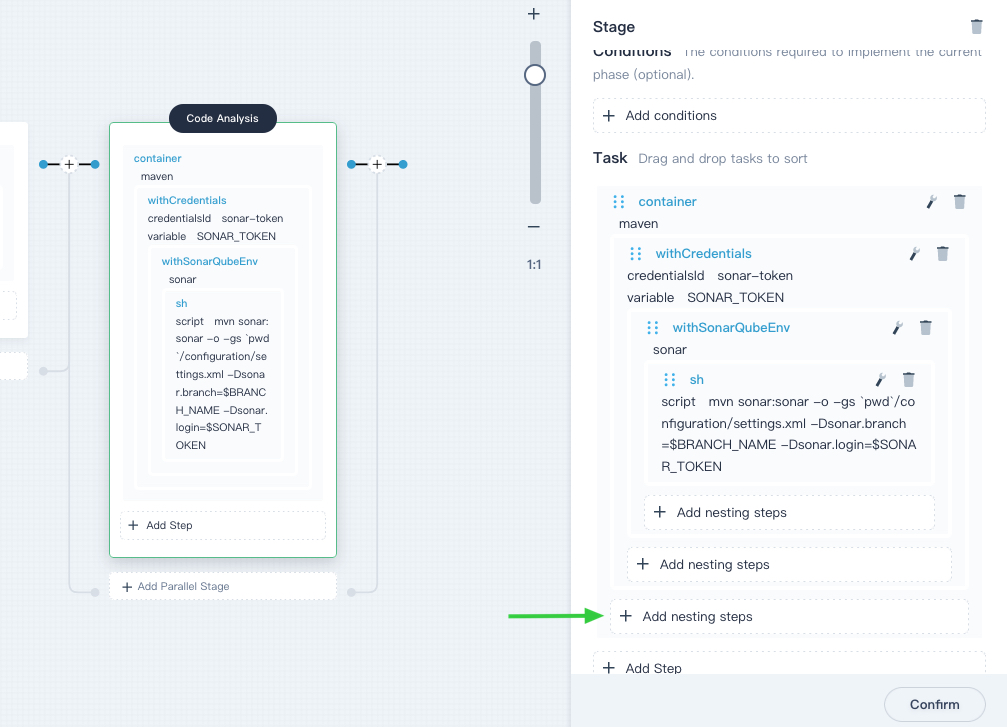
-
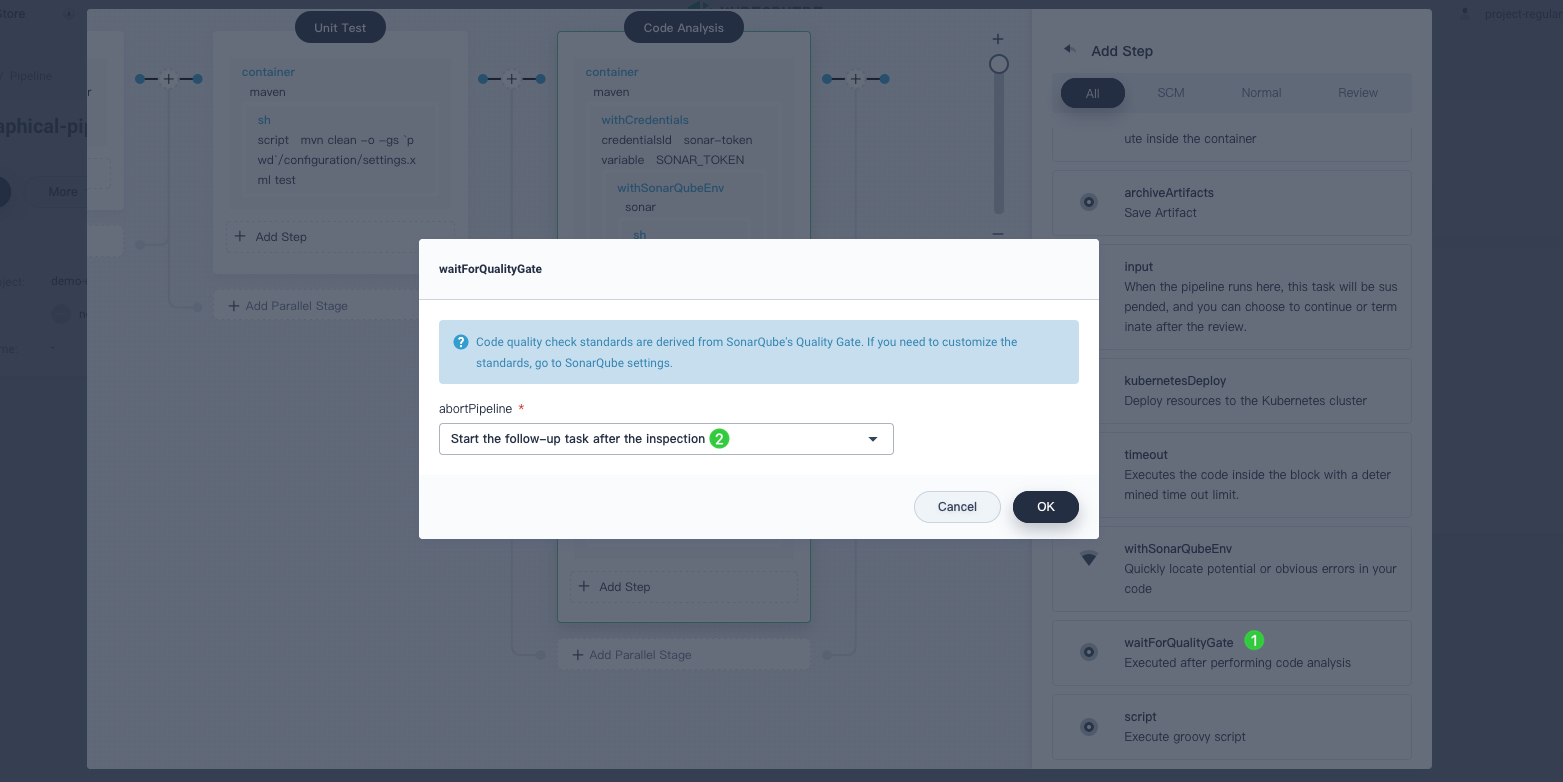
Click Add nesting steps for the timeout step and select waitForQualityGate. Select Start the follow-up task after the inspection in the pop-up dialog. Click OK to save it.

Stage 4: Build and push the image
-
Click the plus icon on the right of the previous stage to add a new stage to build and push images to Docker Hub. Name it
Build and Push.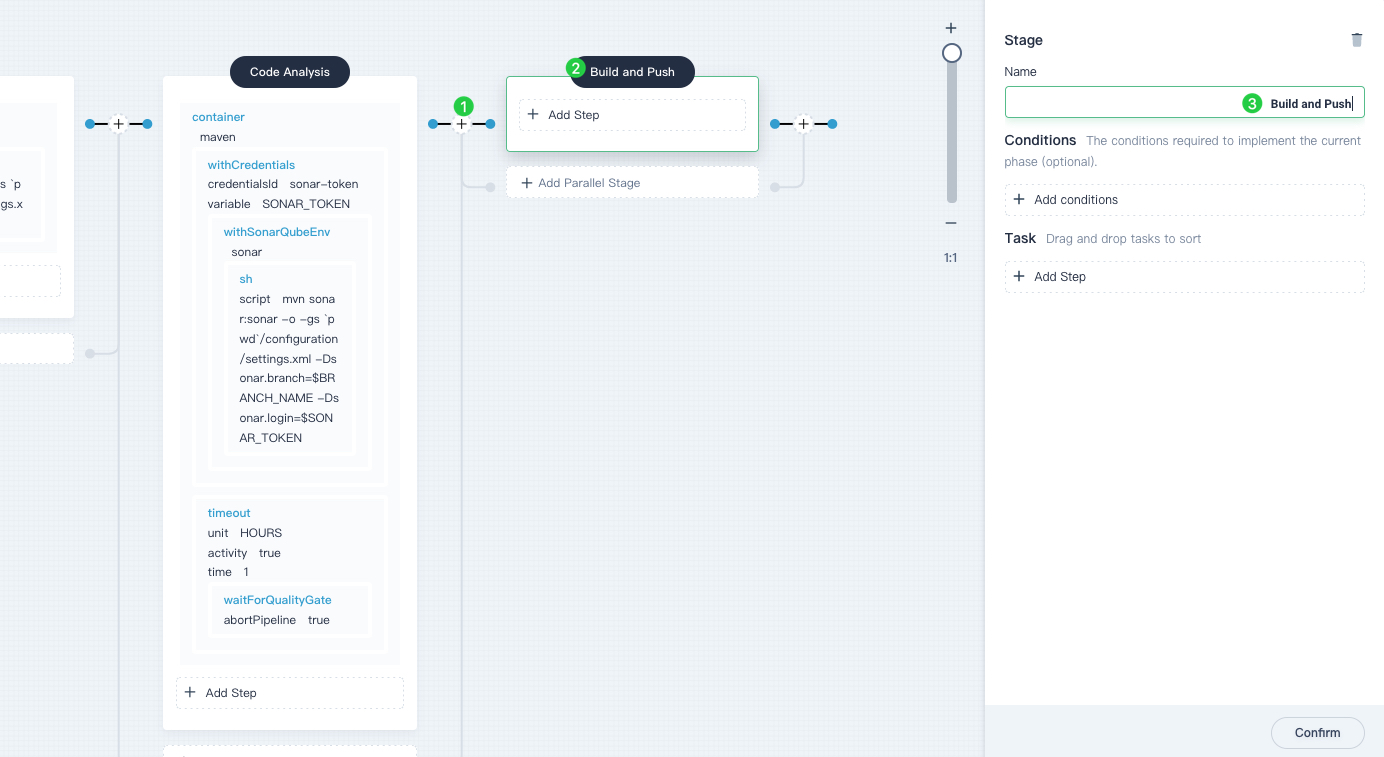
-
Click Add Step under Task and select container. Name it
maven, and then click OK.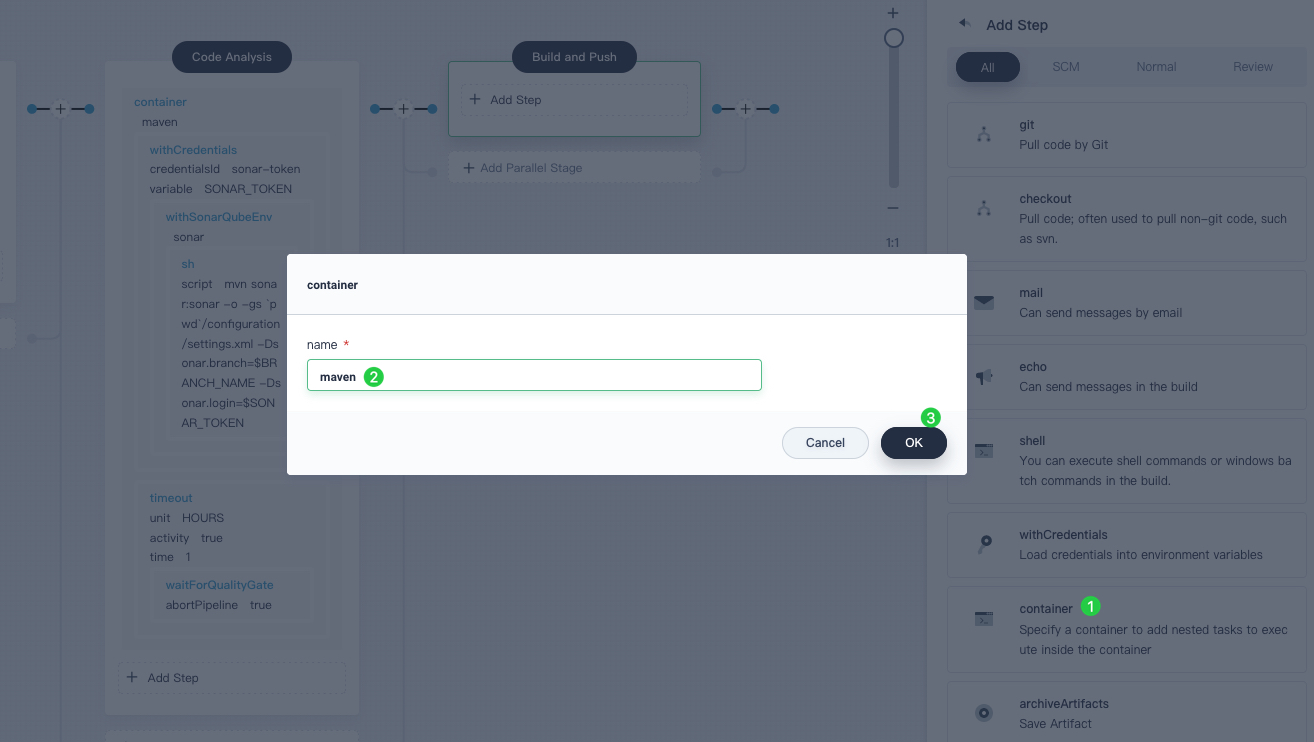
-
Click Add nesting steps under the
mavencontainer to add a nested step. Select shell from the list, and enter the following command in the pop-up window. Click OK to finish.mvn -o -Dmaven.test.skip=true -gs `pwd`/configuration/settings.xml clean package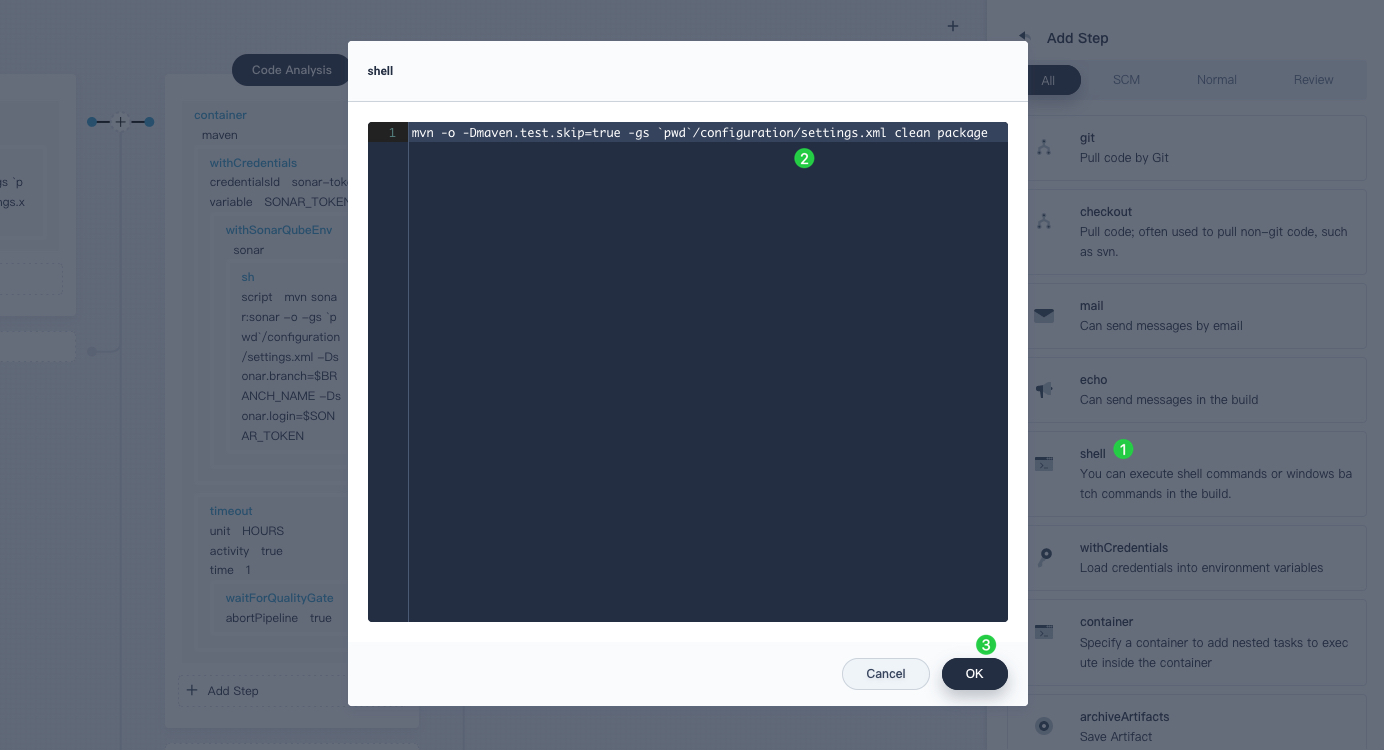
-
Click Add nesting steps again and select shell. Enter the following command in the command line to build a Docker image based on the Dockerfile. Click OK to confirm.
Note
DO NOT omit the dot.at the end of the command.docker build -f Dockerfile-online -t $REGISTRY/$DOCKERHUB_NAMESPACE/$APP_NAME:SNAPSHOT-$BUILD_NUMBER .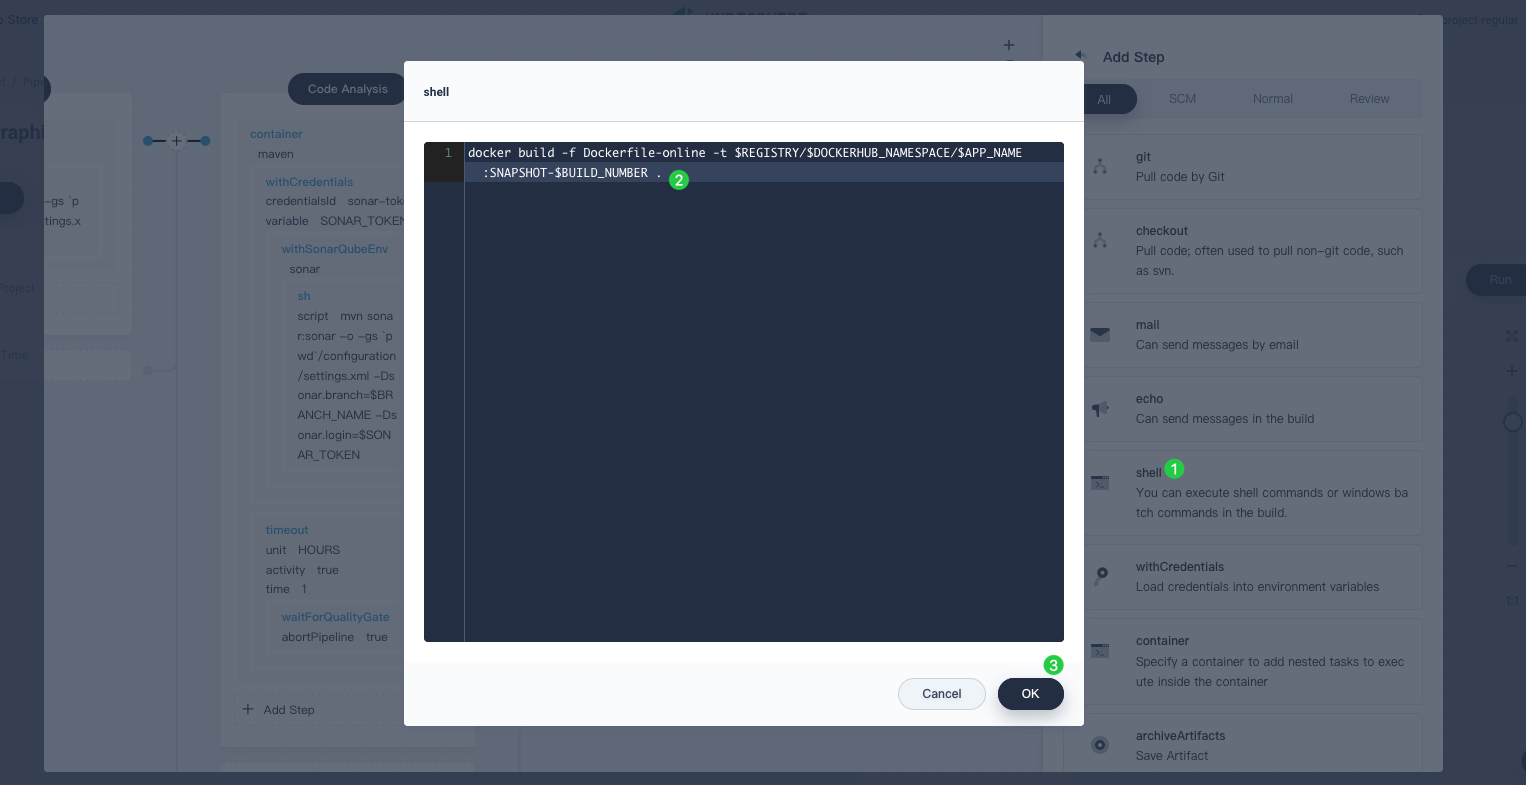
-
Click Add nesting steps again and select withCredentials. Fill in the following fields in the dialog. Click OK to confirm.
- Credential ID: Select the Docker Hub credentials you created, such as
dockerhub-id. - Password Variable: Enter
DOCKER_PASSWORD. - Username Variable: Enter
DOCKER_USERNAME.
Note
For security reasons, the account information displays as variables in the script.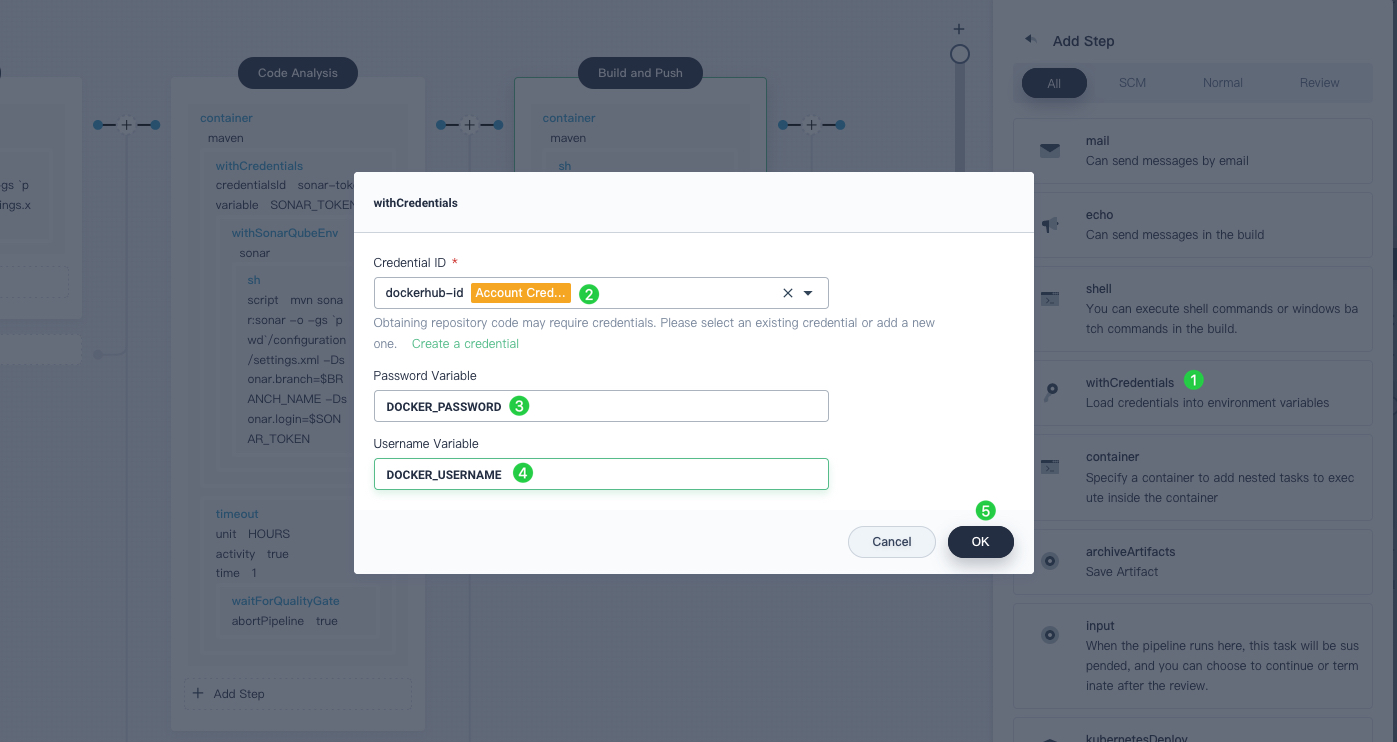
- Credential ID: Select the Docker Hub credentials you created, such as
-
Click Add nesting steps (the first one) in the withCredentials step created above. Select shell and enter the following command in the pop-up window, which is used to log in to Docker Hub. Click OK to confirm.
echo "$DOCKER_PASSWORD" | docker login $REGISTRY -u "$DOCKER_USERNAME" --password-stdin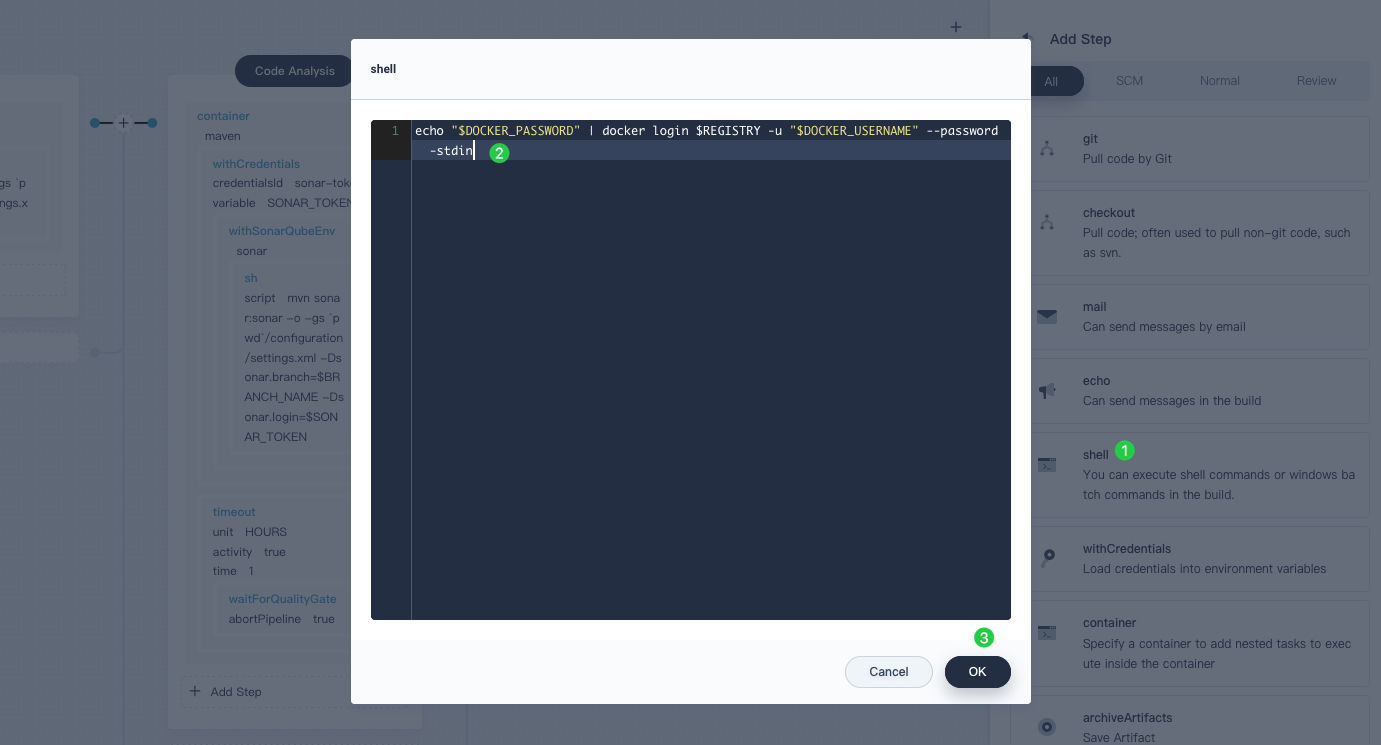
-
Click Add nesting steps in the withCredentials step. Select shell and enter the following command to push the SNAPSHOT image to Docker Hub. Click OK to finish.
docker push $REGISTRY/$DOCKERHUB_NAMESPACE/$APP_NAME:SNAPSHOT-$BUILD_NUMBER
Stage 5: Generate the artifact
-
Click the plus icon on the right of the Build and Push stage to add a new stage to save artifacts and name it
Artifacts. This example uses a jar package.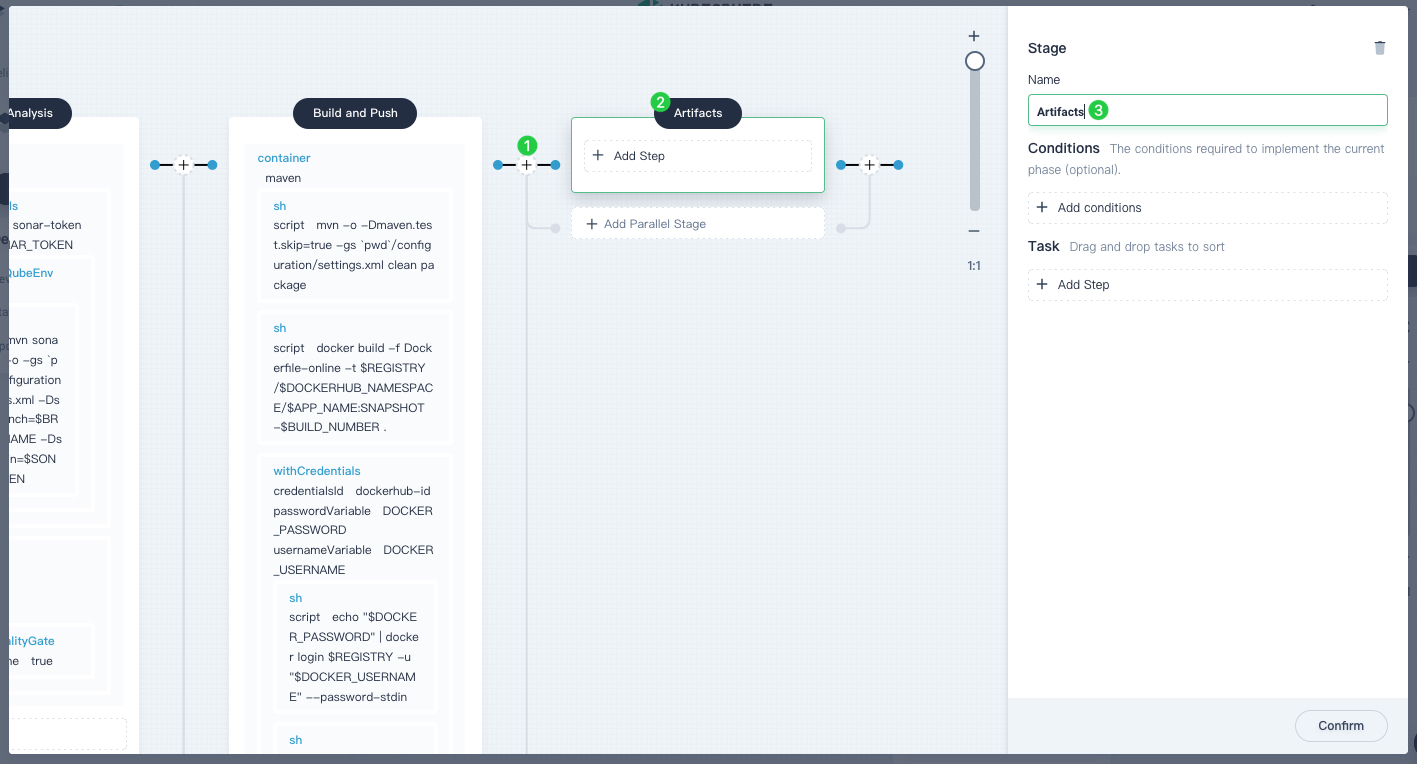
-
With the Artifacts stage selected, click Add Step under Task and select archiveArtifacts. Enter
target/*.jarin the dialog, which is used to set the archive path of artifacts in Jenkins. Click OK to finish.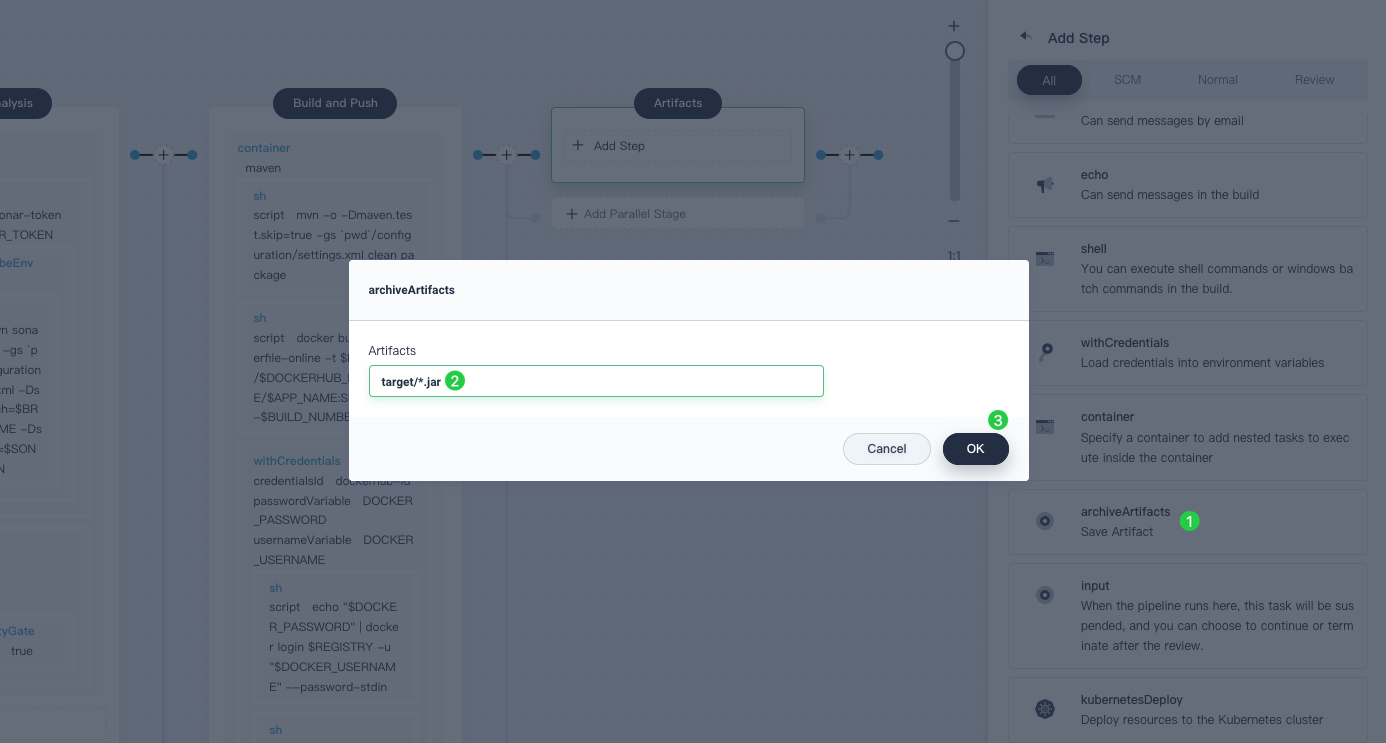
Stage 6: Deploy to development
-
Click the plus icon on the right of the stage Artifacts to add the last stage. Name it
Deploy to Dev. This stage is used to deploy resources to your development environment (namely, the project ofkubesphere-sample-dev).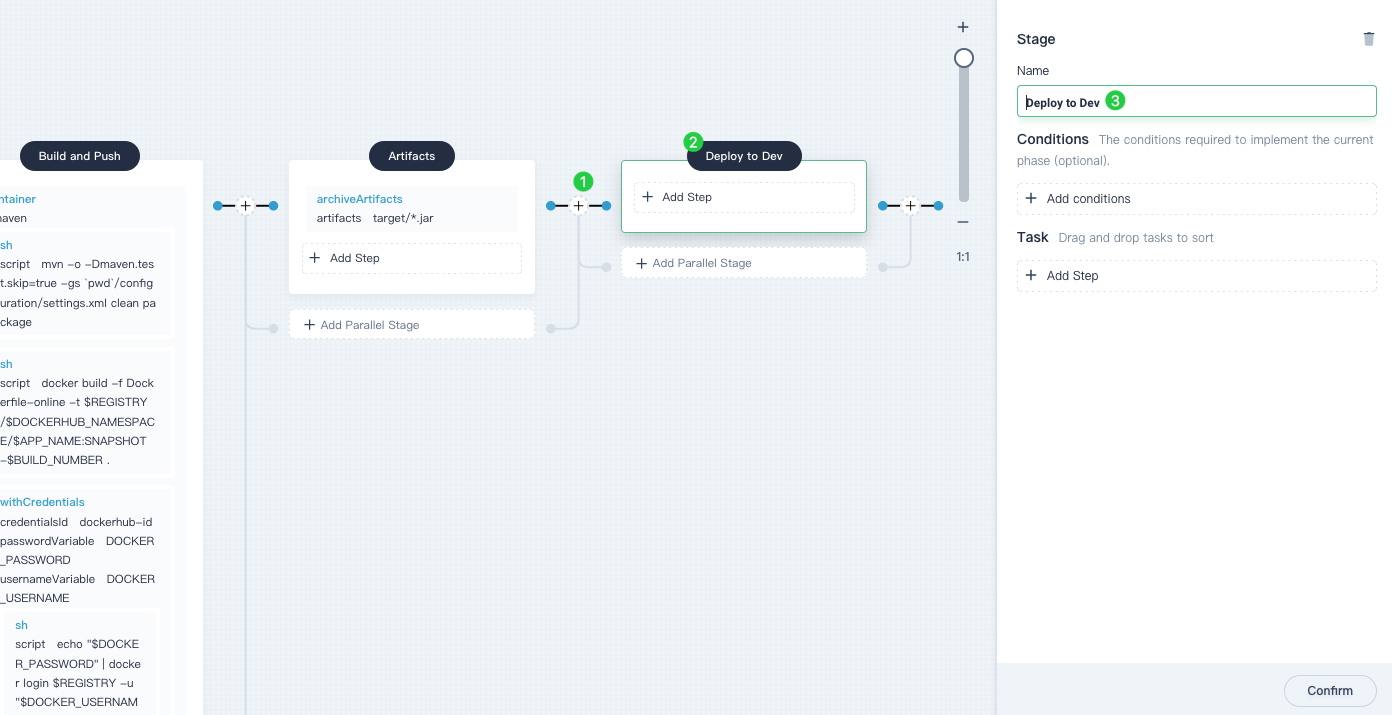
-
Click Add Step under the Deploy to Dev stage. Select input from the list and enter
@project-adminin the Message field, which means the accountproject-adminwill review this pipeline when it runs to this stage. Click OK to save it.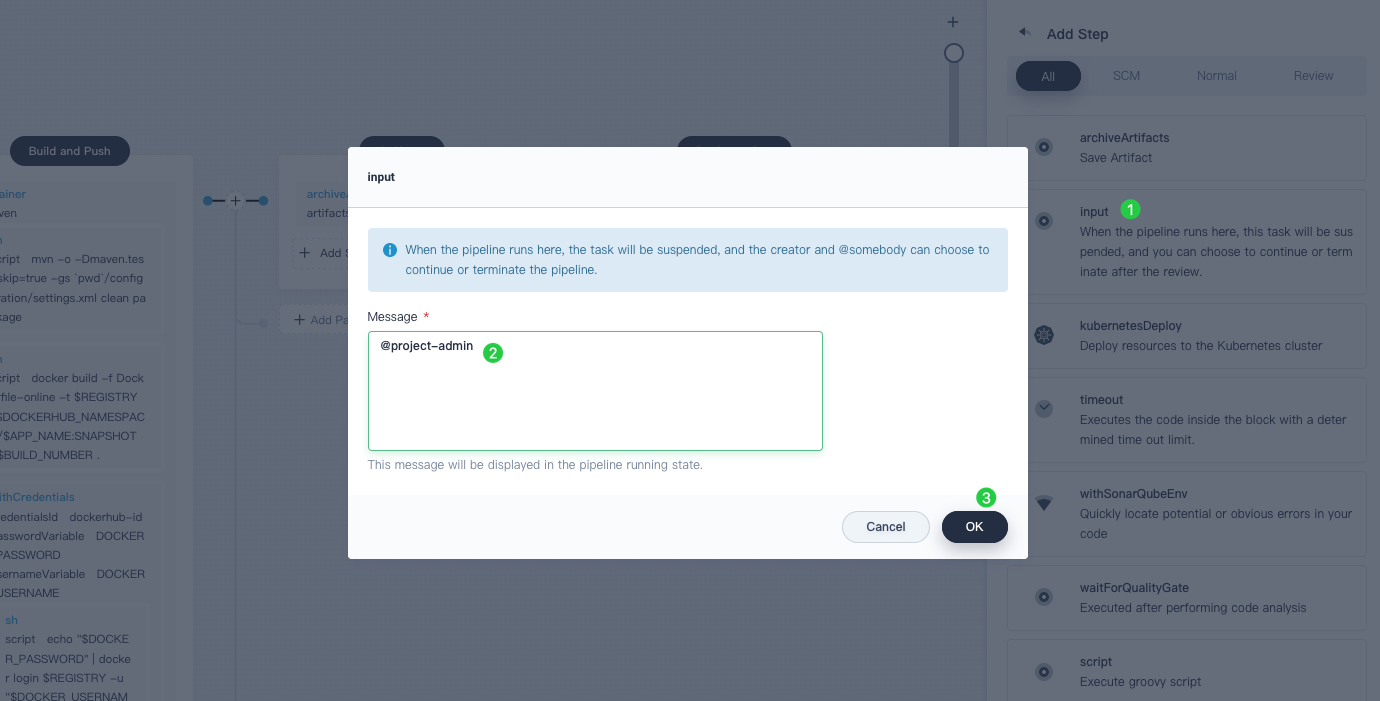
-
Click Add Step under the Deploy to Dev stage again. Select kubernetesDeploy from the list and fill in the following fields in the dialog. Click OK to save it.
- Kubeconfig: Select the Kubeconfig you created, such as
demo-kubeconfig. - Configuration File Path: Enter
deploy/no-branch-dev/**, which is the relative path of the Kubernetes resource YAML file in the code repository.
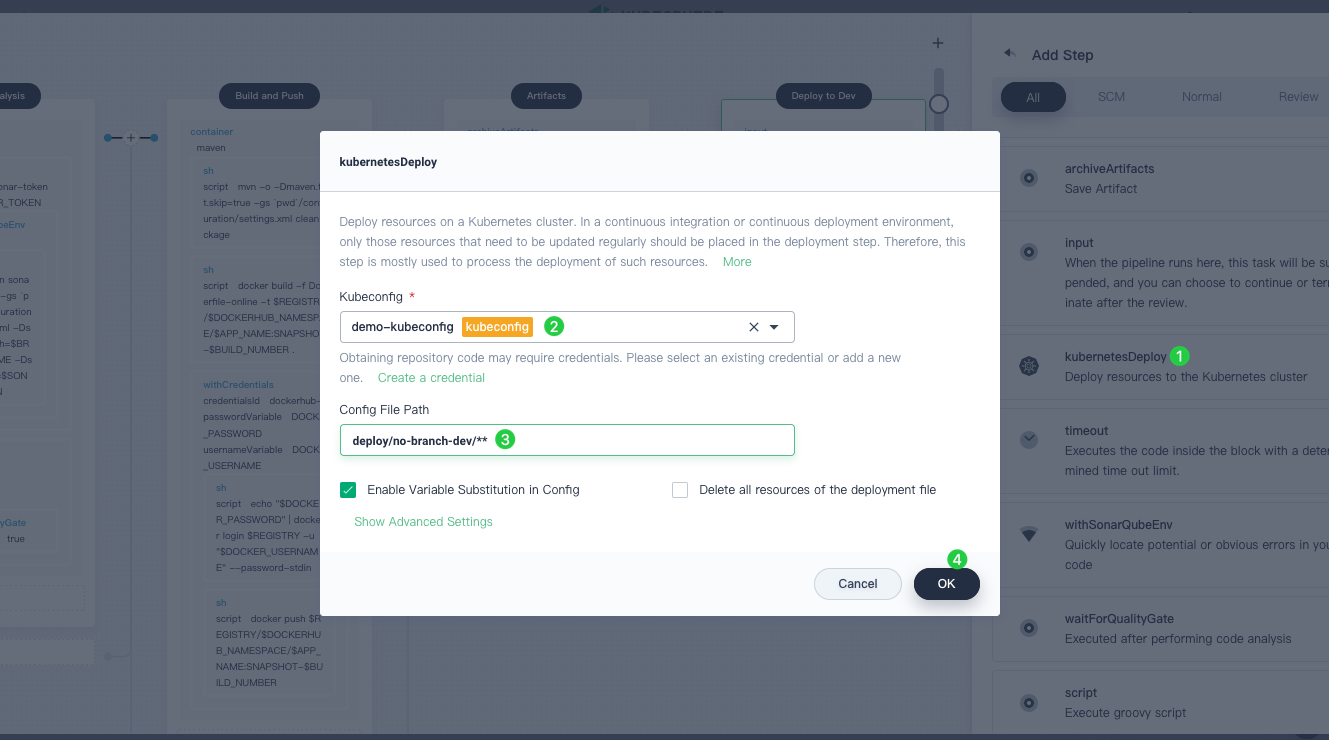
- Kubeconfig: Select the Kubeconfig you created, such as
-
If you want to receive email notifications when the pipeline runs successfully, click Add Step and select mail to add email information. Note that configuring the email server is optional, which means you can still run your pipeline if you skip this step.
Note
For more information on configuring your email server, see Set Email Server for KubeSphere Pipelines. -
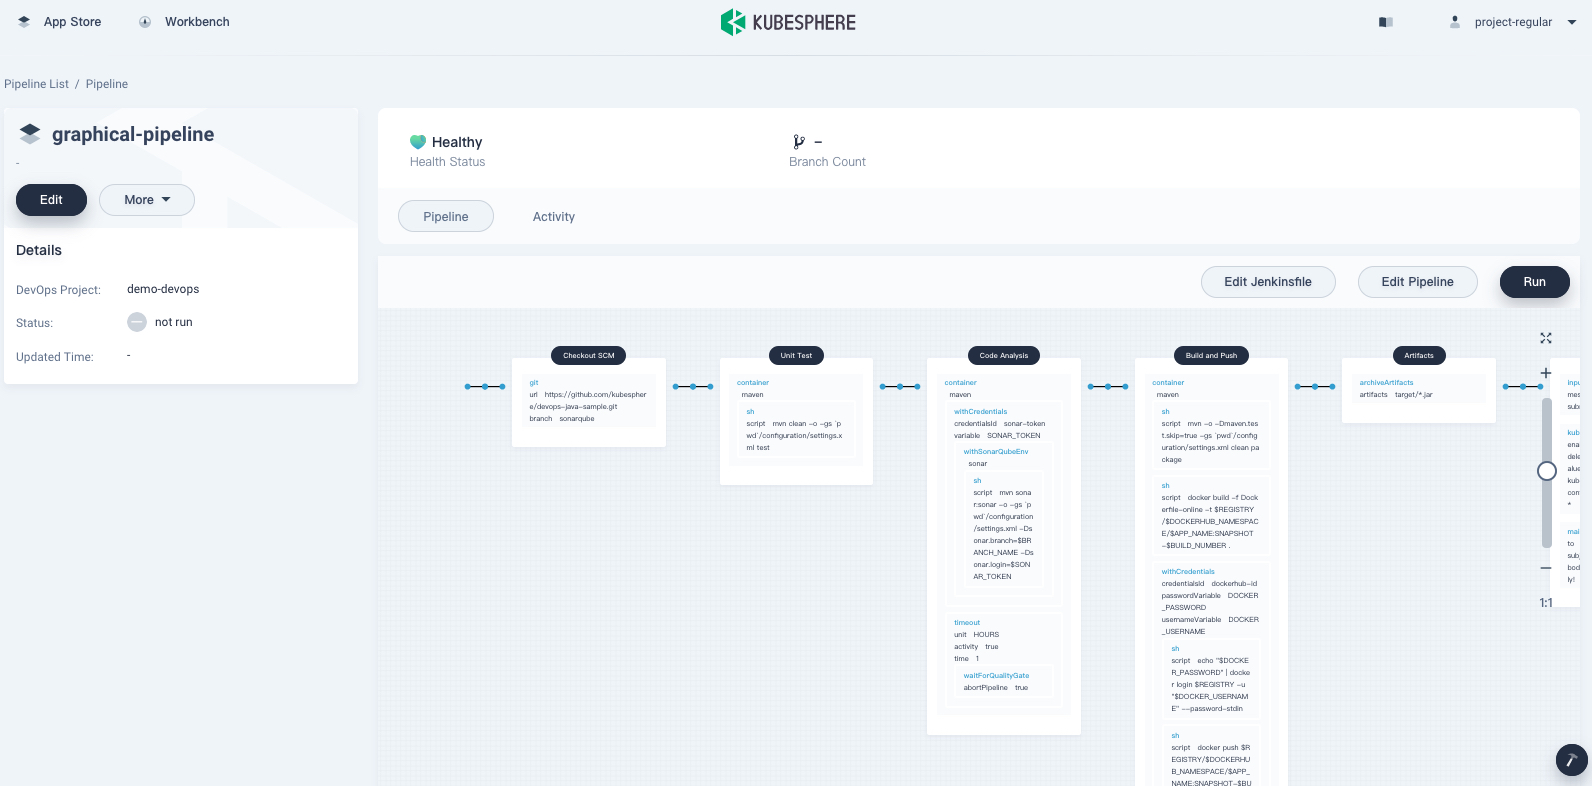
When you finish the steps above, click Confirm and Save in the bottom right corner. You can see the pipeline now has a complete workflow with each stage clearly listed on the pipeline. When you define a pipeline using the graphical editing panel, KubeSphere automatically creates its corresponding Jenkinsfile. Click Edit Jenkinsfile to view the Jenkinsfile.
Step 5: Run a pipeline
-
You need to manually run the pipeline that is created through the graphical editing panel. Click Run, and you can see three string parameters defined in Step 3. Click OK to run the pipeline.

-
To see the status of a pipeline, go to the Activity tab and click the record you want to view.
-
Wait for a while and the pipeline stops at the stage Deploy to Dev if it runs successfully. As the reviewer of the pipeline,
project-adminneeds to approve it before resources are deployed to the development environment.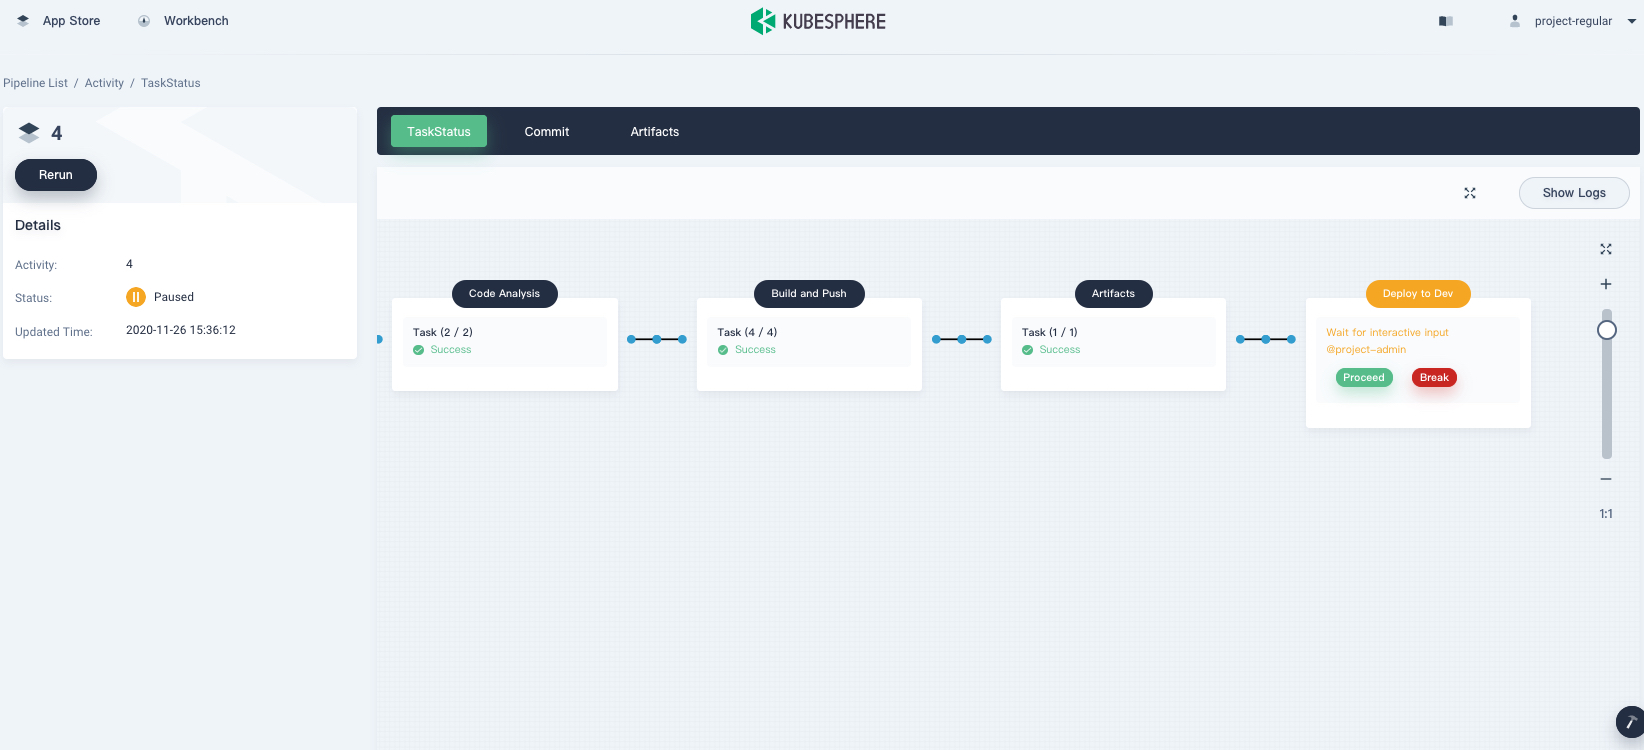
-
Log out of KubeSphere and log back in to the console as
project-admin. Go to your DevOps project and click the pipelinegraphical-pipeline. Under the Activity tab, click the record to be reviewed. To approve the pipeline, click Proceed.
Step 6: View pipeline details
-
Log in to the console as
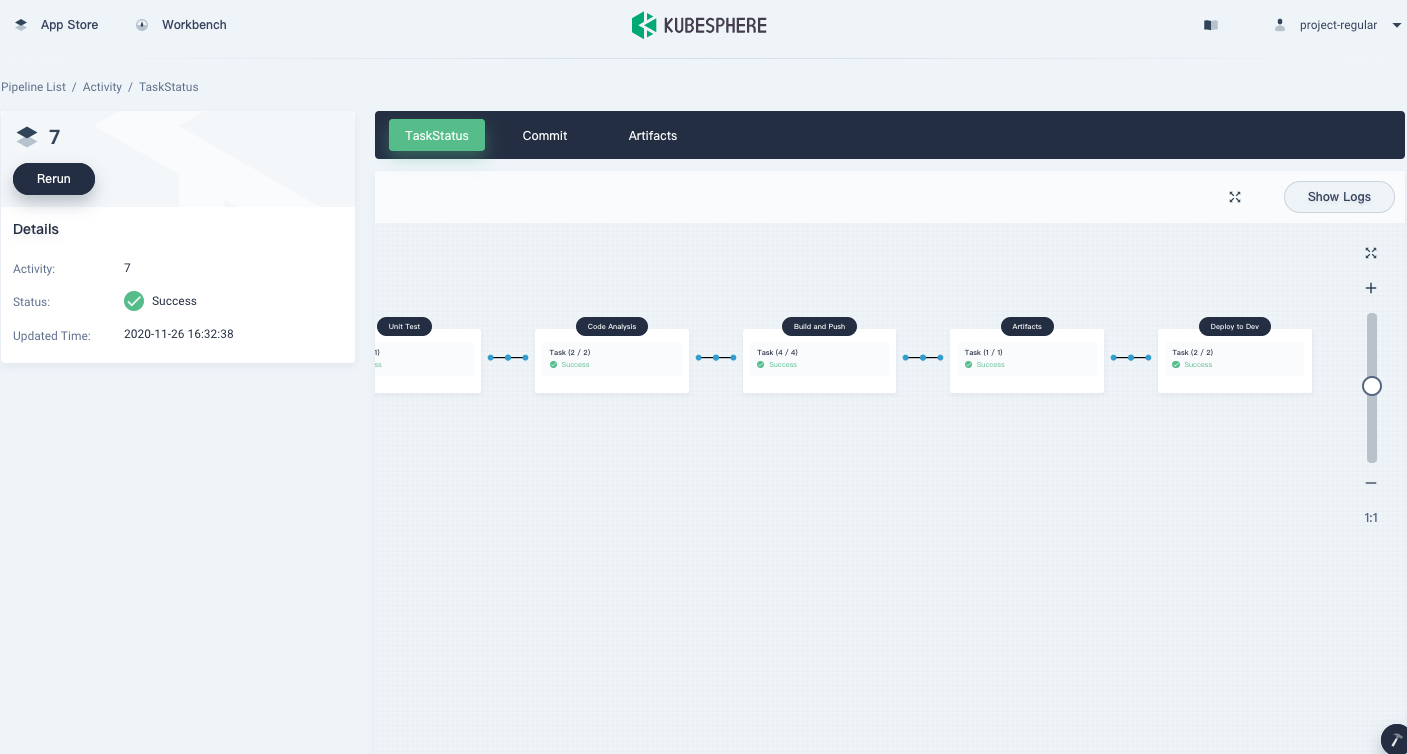
project-regular. Go to your DevOps project and click the pipelinegraphical-pipeline. Under the Activity tab, click the record marked with Success under Status. -
If everything runs successfully, you can see that all stages are completed.
-
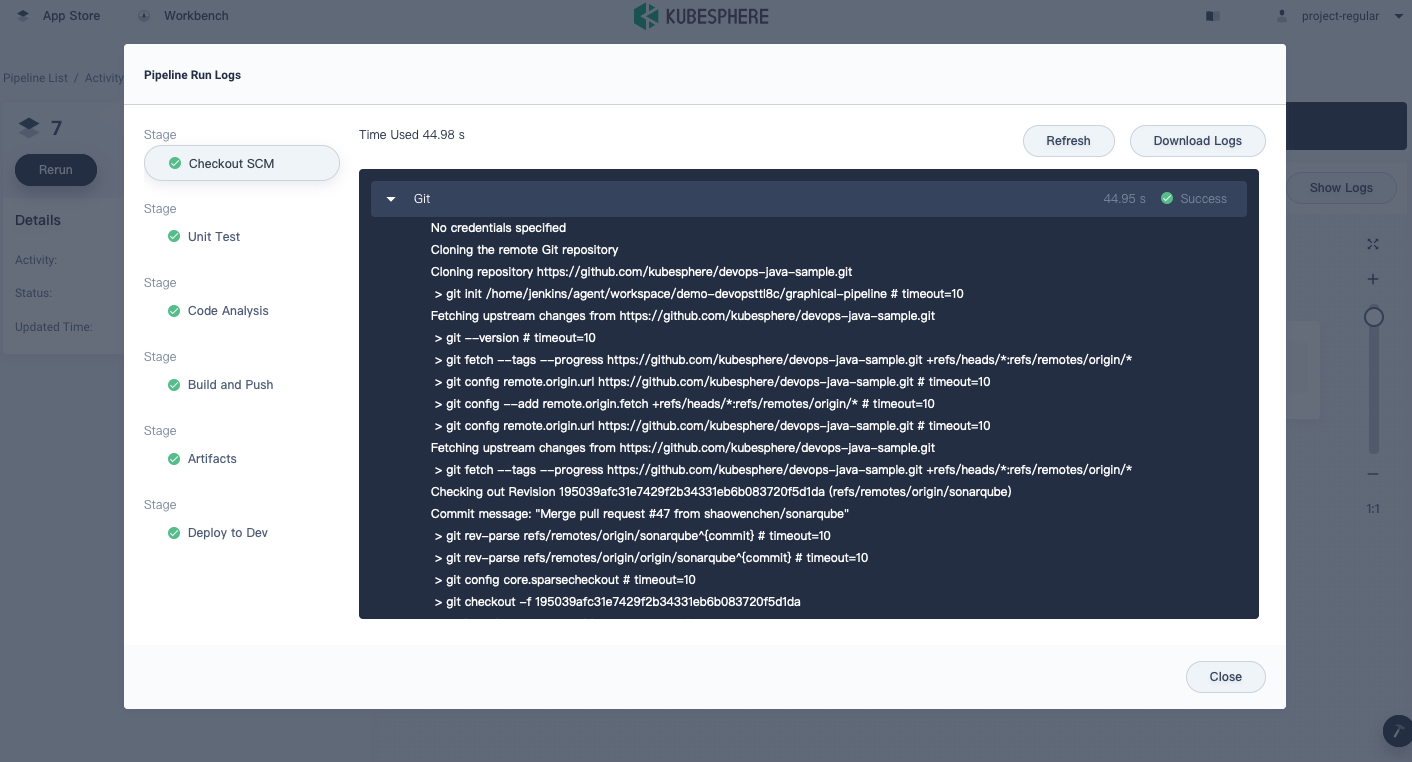
Click Show Logs in the top right corner to inspect all the logs. Click each stage to see detailed logs of it. You can debug any problems based on the logs which also can be downloaded locally for further analysis.
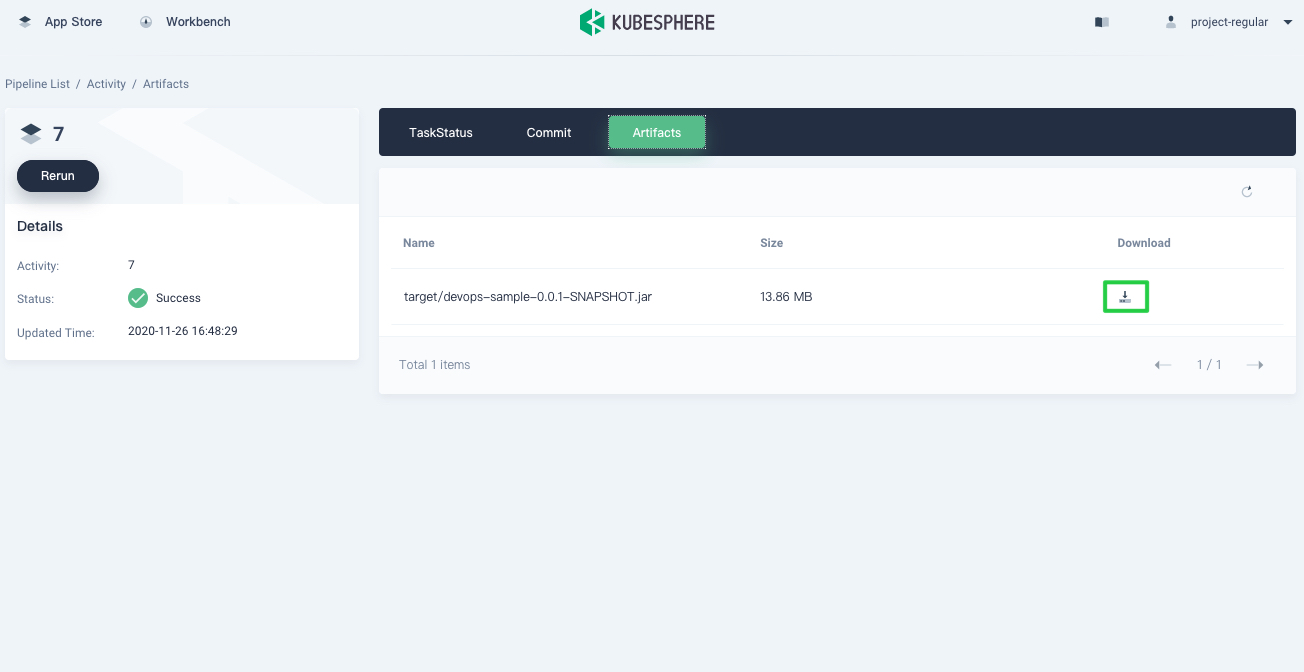
Step 7: Download the artifact
Click the Artifacts tab and then click the icon on the right to download the artifact.
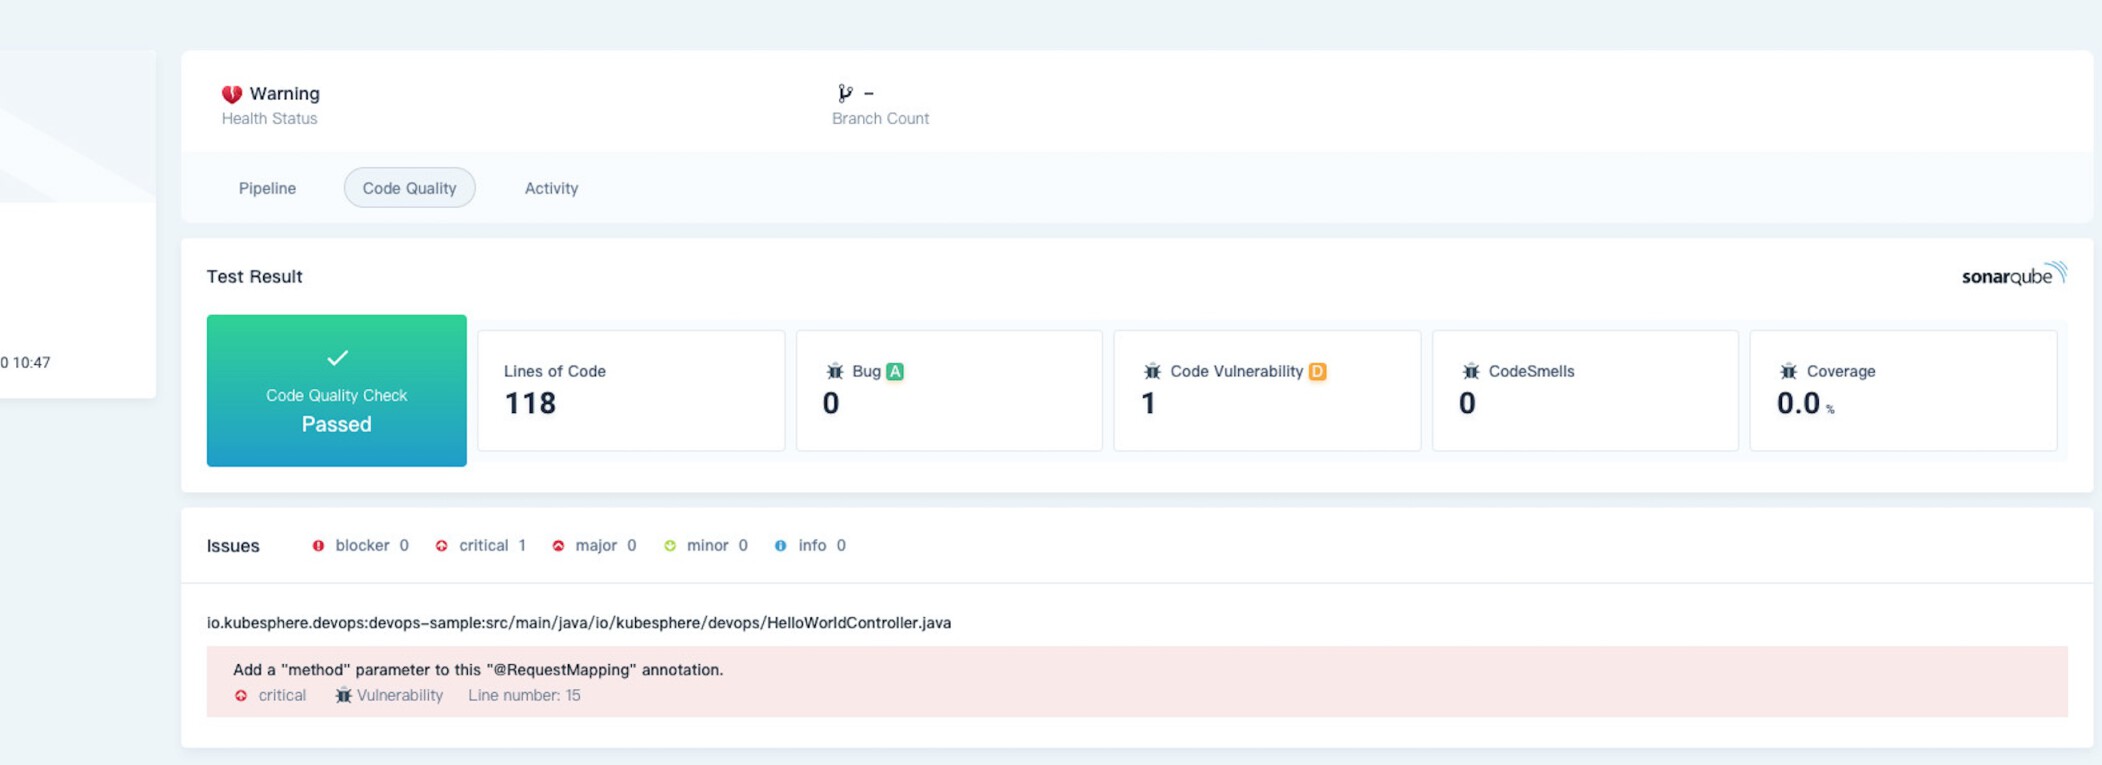
Step 8: View code analysis results
On the Code Quality page, view the code analysis result of this example pipeline, which is provided by SonarQube. If you do not configure SonarQube in advance, this section is not available. For more information, see Integrate SonarQube into Pipelines.
Step 9: Verify Kubernetes resources
-
If every stage of the pipeline runs successfully, a Docker image will be automatically built and pushed to your Docker Hub repository. Ultimately, the pipeline automatically creates a Deployment and a Service in the project you set beforehand.
-
Go to the project (i.e.
kubesphere-sample-devin this tutorial), click Workloads under Application Workloads, and you can see the Deployment displays in the list.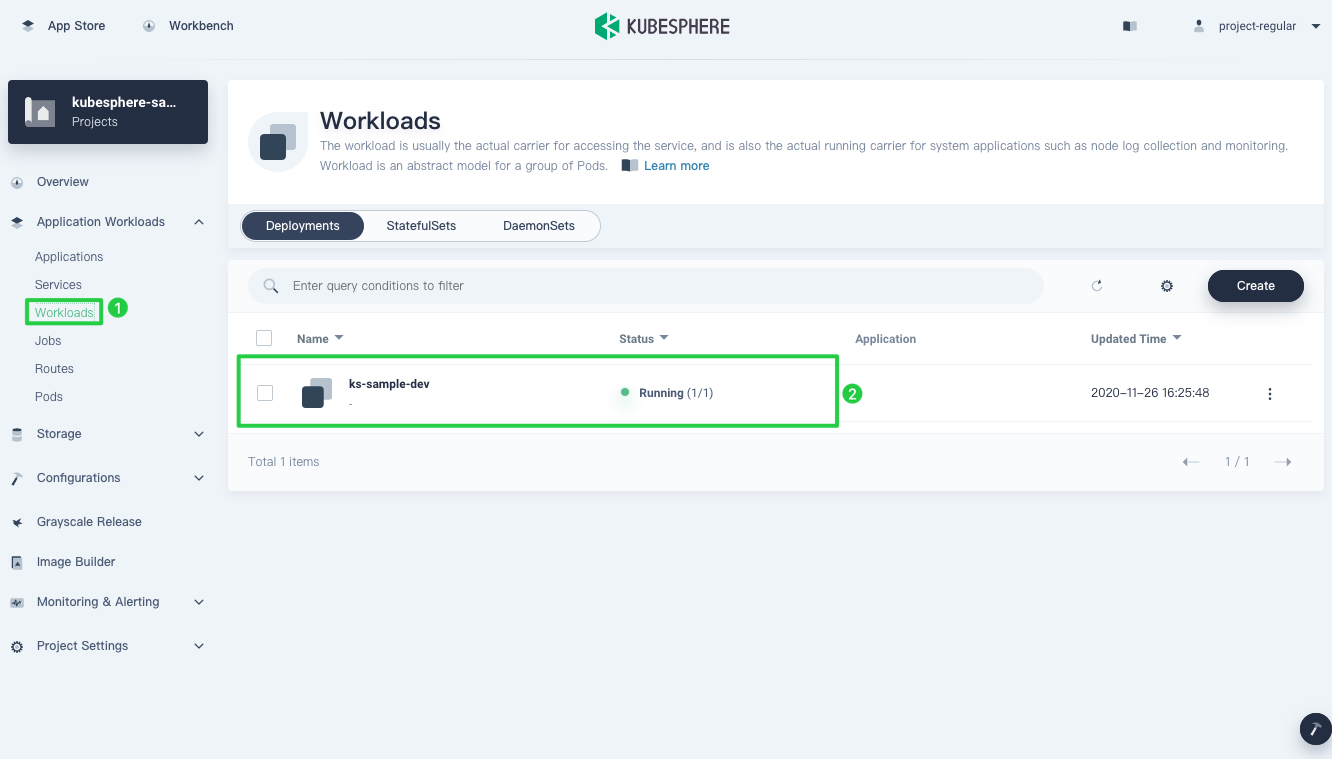
-
In Services, you can find the port number of the example Service is exposed through a NodePort. To access the Service, visit
node IP:port number.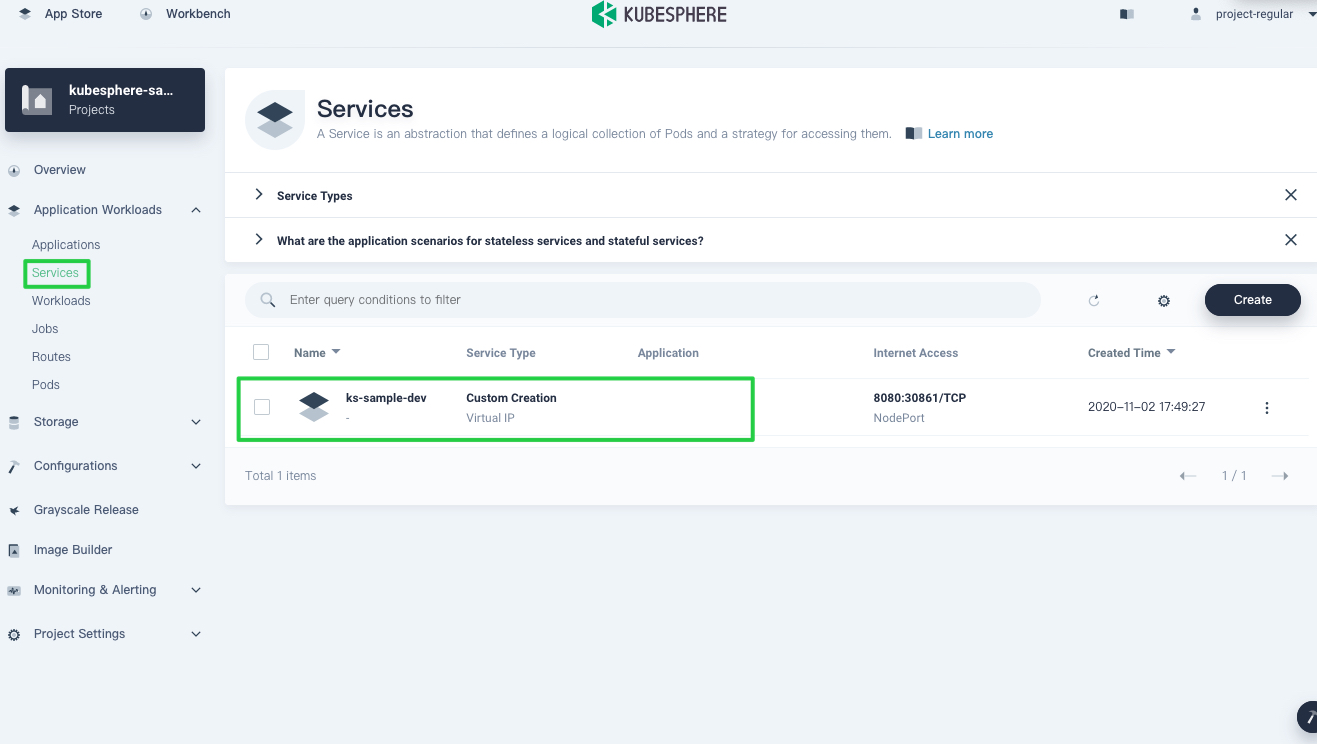
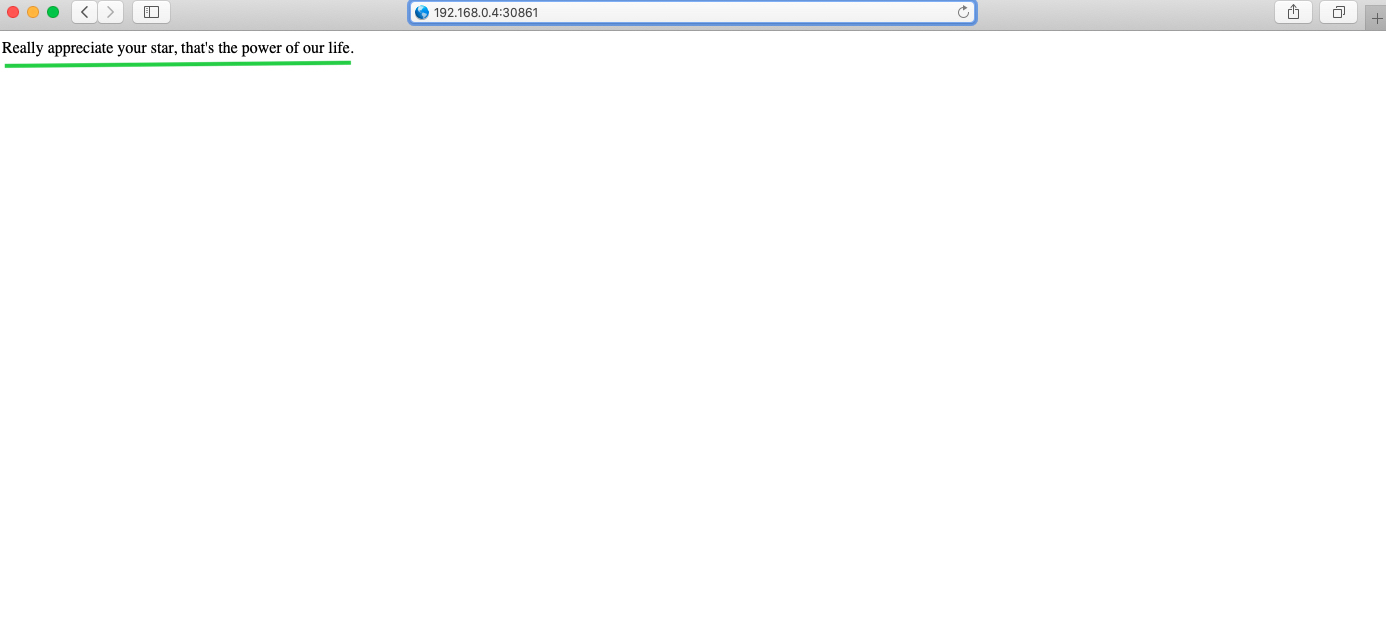
Note
You may need to configure port forwarding rules and open the port in your security group before you access the Service. -
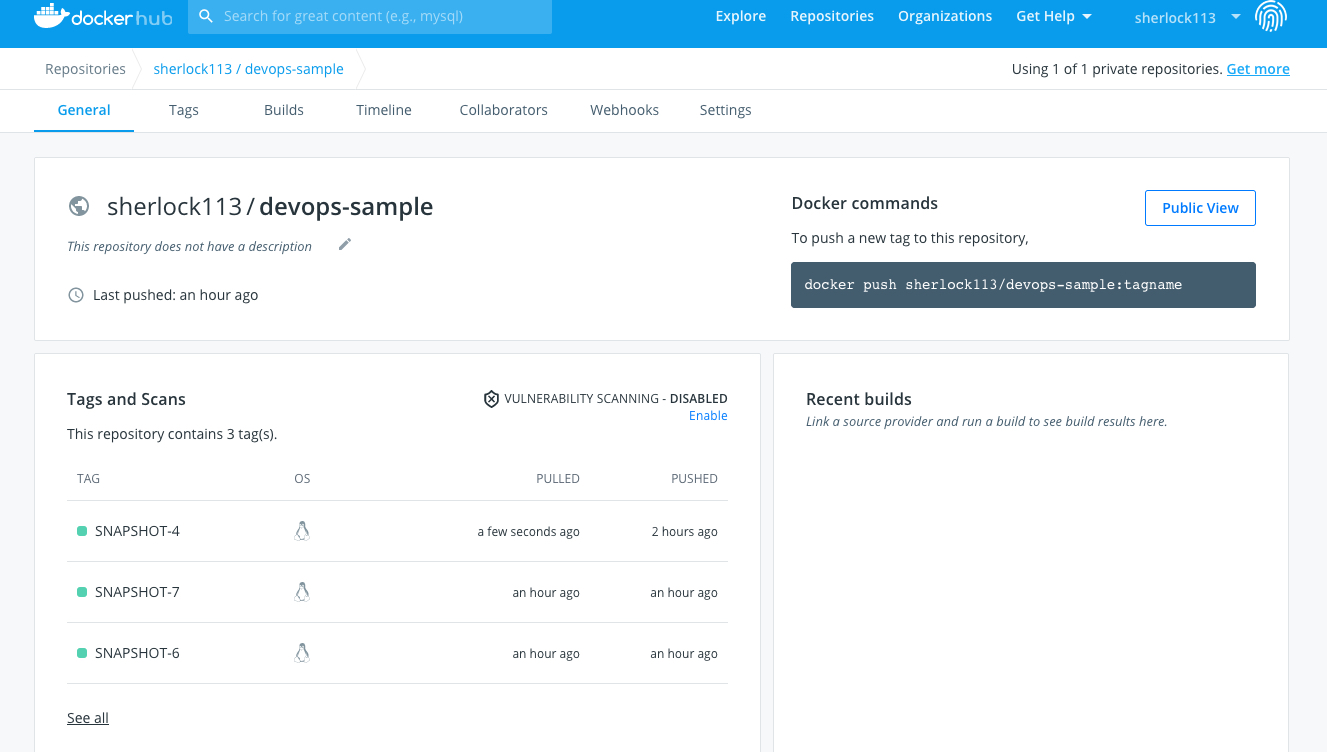
Now that the pipeline has run successfully, an image will be pushed to Docker Hub. Log in to Docker Hub and check the result.
-
The app is named
devops-sampleas it is the value ofAPP_NAMEand the tag is the value ofSNAPSHOT-$BUILD_NUMBER.$BUILD_NUMBERis the serial number of a record under the Activity tab. -
If you set the email server and add the email notification step in the final stage, you can also receive the email message.
See Also
 Previous

What’s on this Page