


You are viewing documentation for KubeSphere version:v3.0.0
KubeSphere v3.0.0 documentation is no longer actively maintained. The version you are currently viewing is a static snapshot. For up-to-date documentation, see the latest version.


Add Kafka as a Receiver (i.e. Collector)
You can use Elasticsearch, Kafka and Fluentd as log receivers in KubeSphere. This tutorial demonstrates:
- Deploy strimzi-kafka-operator and then create a Kafka cluster and a Kafka topic by creating
KafkaandKafkaTopicCRDs. - Add Kafka as a log receiver to receive logs sent from Fluent Bit.
- Verify whether the Kafka cluster is receiving logs using Kafkacat.
Prerequisites
- You need an account granted a role including the authorization of Clusters Management. For example, you can log in to the console as
admindirectly or create a new role with the authorization and assign it to an account. - Before adding a log receiver, you need to enable any of the
logging,eventsorauditingcomponents. For more information, see Enable Pluggable Components.loggingis enabled as an example in this tutorial.
Step 1: Create a Kafka Cluster and a Kafka Topic
You can use strimzi-kafka-operator to create a Kafka cluster and a Kafka topic. If you already have a Kafka cluster, you can start from the next step.
-
Install strimzi-kafka-operator in the
defaultnamespace:helm repo add strimzi https://strimzi.io/charts/helm install --name kafka-operator -n default strimzi/strimzi-kafka-operator -
Create a Kafka cluster and a Kafka topic in the
defaultnamespace by running the following commands. The commands create Kafka and Zookeeper clusters with storage typeephemeralwhich isemptyDirfor demonstration purposes. For other storage types in a production environment, refer to kafka-persistent.cat <<EOF | kubectl apply -f - apiVersion: kafka.strimzi.io/v1beta1 kind: Kafka metadata: name: my-cluster namespace: default spec: kafka: version: 2.5.0 replicas: 3 listeners: plain: {} tls: {} config: offsets.topic.replication.factor: 3 transaction.state.log.replication.factor: 3 transaction.state.log.min.isr: 2 log.message.format.version: '2.5' storage: type: ephemeral zookeeper: replicas: 3 storage: type: ephemeral entityOperator: topicOperator: {} userOperator: {} --- apiVersion: kafka.strimzi.io/v1beta1 kind: KafkaTopic metadata: name: my-topic namespace: default labels: strimzi.io/cluster: my-cluster spec: partitions: 3 replicas: 3 config: retention.ms: 7200000 segment.bytes: 1073741824 EOF -
Run the following command to check Pod status and wait for Kafka and Zookeeper are all up and running.
$ kubectl -n default get pod
NAME                                         READY   STATUS    RESTARTS   AGE
my-cluster-entity-operator-f977bf457-s7ns2   3/3     Running   0          69m
my-cluster-kafka-0                           2/2     Running   0          69m
my-cluster-kafka-1                           2/2     Running   0          69m
my-cluster-kafka-2                           2/2     Running   0          69m
my-cluster-zookeeper-0                       1/1     Running   0          71m
my-cluster-zookeeper-1                       1/1     Running   1          71m
my-cluster-zookeeper-2                       1/1     Running   1          71m
strimzi-cluster-operator-7d6cd6bdf7-9cf6t    1/1     Running   0          104m
Run the following command to check the metadata of the Kafka cluster:
kafkacat -L -b my-cluster-kafka-0.my-cluster-kafka-brokers.default.svc:9092,my-cluster-kafka-1.my-cluster-kafka-brokers.default.svc:9092,my-cluster-kafka-2.my-cluster-kafka-brokers.default.svc:9092
Step 2: Add Kafka as a Log Receiver
-
Log in to KubeSphere as
admin. Click Platform in the top left corner and select Clusters Management. -
If you have enabled the multi-cluster feature, you can select a specific cluster. If you have not enabled the feature, refer to the next step directly.
-
On the Cluster Management page, go to Log Collections in Cluster Settings.
-
Click Add Log Collector and select Kafka. Input the Kafka broker address and port as below, and then click OK to continue.
my-cluster-kafka-0.my-cluster-kafka-brokers.default.svc 9092
my-cluster-kafka-1.my-cluster-kafka-brokers.default.svc 9092
my-cluster-kafka-2.my-cluster-kafka-brokers.default.svc 9092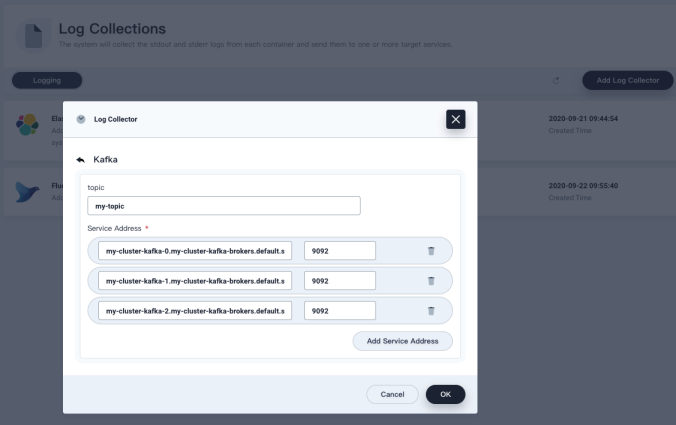
-
Run the following commands to verify whether the Kafka cluster is receiving logs sent from Fluent Bit:
# Start a util container
kubectl run --rm utils -it --generator=run-pod/v1 --image arunvelsriram/utils bash
# Install Kafkacat in the util container
apt-get install kafkacat
# Run the following command to consume log messages from kafka topic: my-topic
kafkacat -C -b my-cluster-kafka-0.my-cluster-kafka-brokers.default.svc:9092,my-cluster-kafka-1.my-cluster-kafka-brokers.default.svc:9092,my-cluster-kafka-2.my-cluster-kafka-brokers.default.svc:9092 -t my-topic
 Previous

What’s on this Page