
You are viewing documentation for KubeSphere version:v3.0.0
KubeSphere v3.0.0 documentation is no longer actively maintained. The version you are currently viewing is a static snapshot. For up-to-date documentation, see the latest version.
Alerting Policies (Node Level)
Objective
KubeSphere provides alerting policies for nodes and workloads. This guide demonstrates how you can create alerting policies for nodes in the cluster and configure mail notifications. See Alerting Policy (Workload Level) to learn how to configure alerting policies for workloads.
Prerequisites
- KubeSphere Alerting and Notification needs to be enabled.
- Mail Server needs to be configured.
Hands-on Lab
Task 1: Create an alerting policy
-
Log in to the console with one account granted the role
platform-admin. -
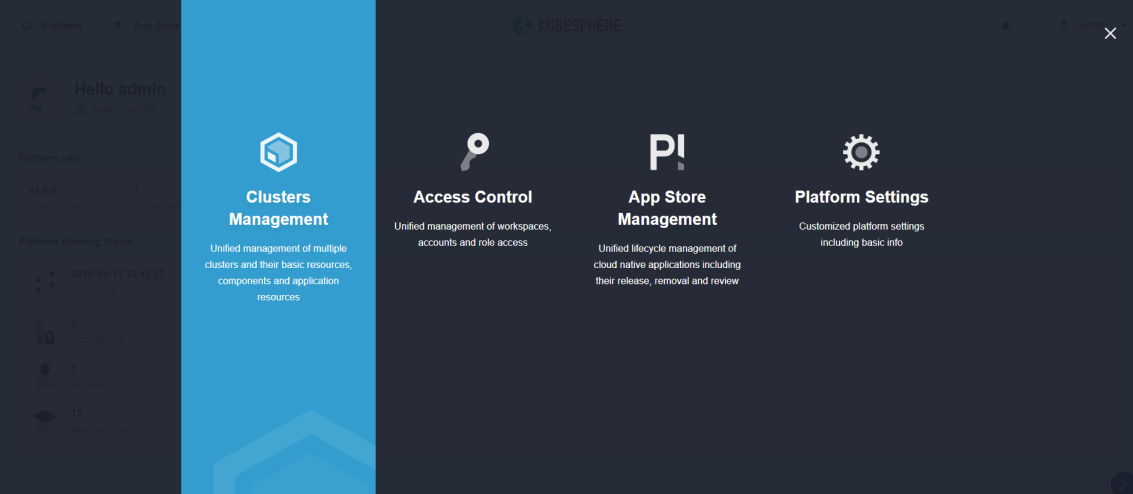
Click Platform in the top left corner and select Clusters Management.
-
Select a cluster from the list and enter it (If you do not enable the multi-cluster feature, you will directly go to the Overview page).
-
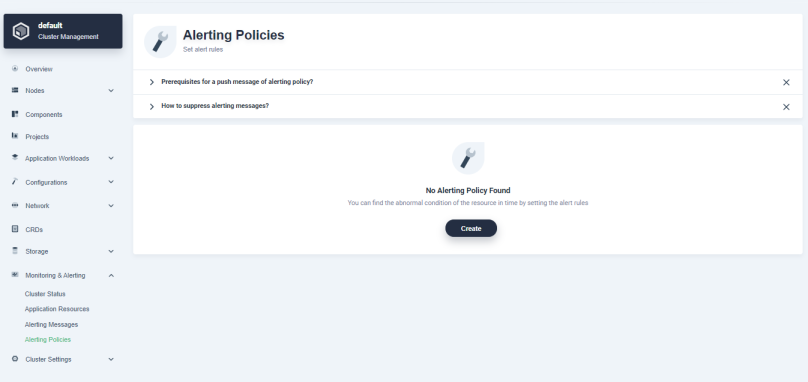
Navigate to Alerting Policies under Monitoring & Alerting, and click Create.
Task 2: Provide basic information
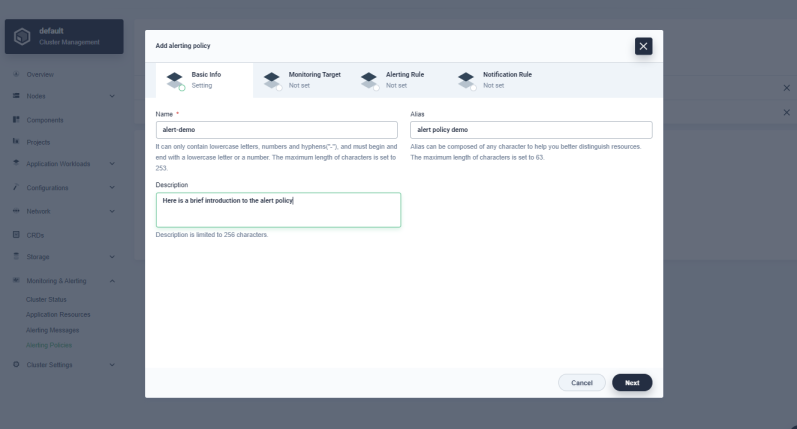
In the dialog that appears, fill in the basic information as follows. Click Next after you finish.
- Name: a concise and clear name as its unique identifier, such as
alert-demo. - Alias: to help you distinguish alerting policies better.
- Description: a brief introduction to the alerting policy.
Task 3: Select monitoring targets
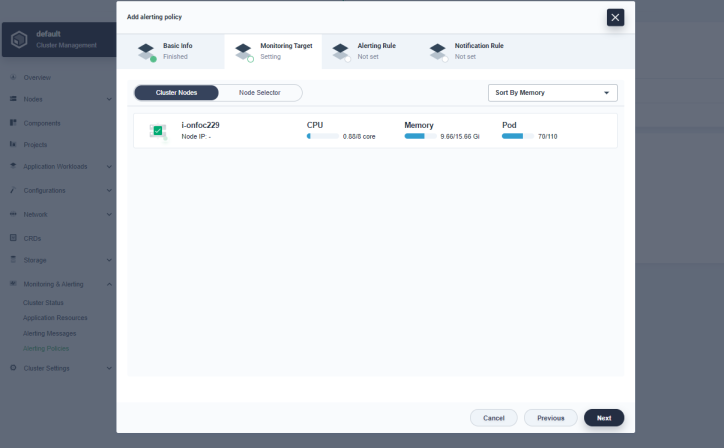
Select several nodes in the node list or use Node Selector to choose a group of nodes as the monitoring targets. Here a node is selected for the convenience of demonstration. Click Next when you finish.
Note
Sort By CPU, Sort By Memory, Sort By Pod Utilization.Task 4: Add alerting rules
-
Click Add Rule to begin to create an alerting rule. The rule defines parameters such as metric type, check period, consecutive times, metric threshold and alert level to provide rich configurations. The check period (the second field under Rule) means the time interval between 2 consecutive checks of the metric. For example,
2 minutes/periodmeans the metric is checked every two minutes. The consecutive times (the third field under Rule) means the number of consecutive times that the metric meets the threshold when checked. An alert is only triggered when the actual time is equal to or is greater than the number of consecutive times set in the alerting policy.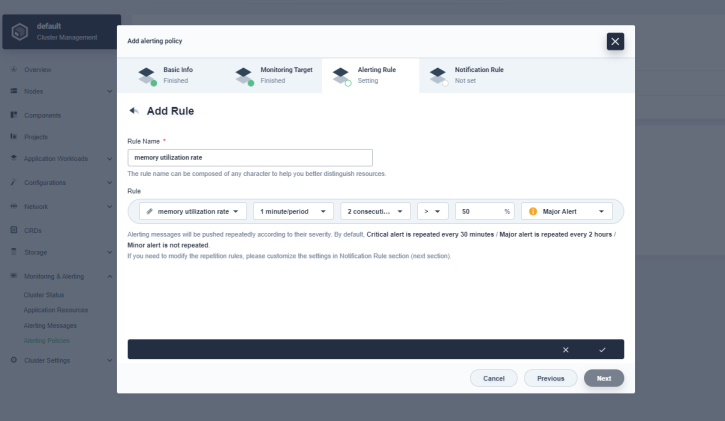
-
In this example, set those parameters to
memory utilization rate,1 minute/period,2 consecutive times,>and50%, andMajor Alertin turn. It means KubeSphere checks the memory utilization rate every minute, and a major alert is triggered if it is larger than 50% for 2 consecutive times. -
Click √ to save the rule when you finish and click Next to continue.
Note
You can create node-level alerting policies for the following metrics:
- CPU:
cpu utilization rate,cpu load average 1 minute,cpu load average 5 minutes,cpu load average 15 minutes - Memory:
memory utilization rate,memory available - Disk:
inode utilization rate,disk space available,local disk space utilization rate,disk write throughput,disk read throughput,disk read iops,disk write iops - Network:
network data transmitting rate,network data receiving rate - Pod:
pod abnormal ratio,pod utilization rate
Task 5: Set notification rules
-
Effective Notification Time Range is used to set sending time of notification emails, such as
09:00 ~ 19:00. Notification Channel currently only supports Email. You can add email addresses of members to be notified to Notification List. -
Customize Repetition Rules defines sending period and retransmission times of notification emails. If alerts have not been resolved, the notification will be sent repeatedly after a certain period of time. Different repetition rules can also be set for different levels of alerts. Since the alert level set in the previous step is
Major Alert, selectAlert once every 5 miniutes(sending period) in the second field for Major Alert andResend up to 3 timesin the third field (retransmission times). Refer to the following image to set notification rules: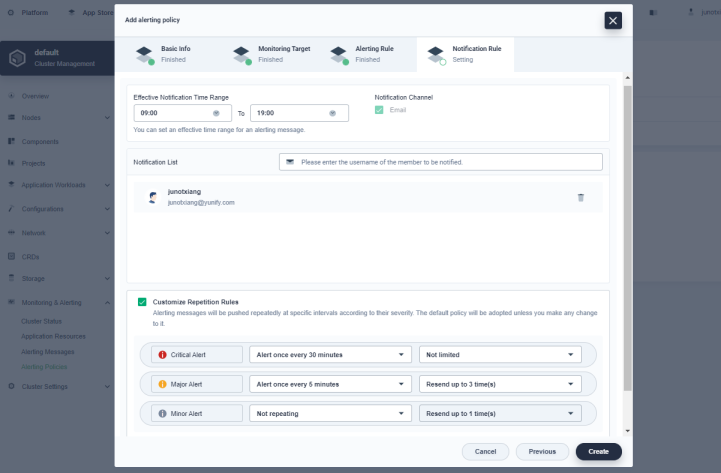
-
Click Create, and you can see that the alerting policy is successfully created.
Note
Task 6: View alerting policies
After an alerting policy is successfully created, you can enter its detail information page to view the status, alert rules, monitoring targets, notification rule, alert history, etc. Click More and select Change Status from the drop-down menu to enable or disable this alerting policy.


 Previous
